Web developers often choose Node.js for writing web backends because of its simple development environment, rich library ecosystem, asynchronous single-threaded nature, and supportive developer community.
We can also use various communication mechanisms to implement our Node.js web backends according to our development requirements. Most development teams choose the HTTP-based RESTful pattern, but some development teams use WebSockets with RESTful endpoints on the same Node.js server to implement real-time, bidirectional communication channels. It helps that popular Node.js web frameworks like Express.js, Fastify, and NestJS offer WebSockets integration via official or third-party plugins.
In this tutorial, I will explain how to enable real-time communication channels in your Fastify-based, RESTful web APIs with the fastify-websocket plugin. We’ll cover:
- Fastify-WebSocket features
- Fastify-WebSocket tutorial: Creating a basic WebSocket endpoint
- Creating a new Fastify project
- Adding WebSocket support to endpoints
- Testing our basic WebSocket endpoint with Postman
- Using WebSocket client event handlers
- Fastify-WebSocket tutorial: Creating multiple WebSocket endpoints using the same server
- Configuring the WebSocket server
- Validating WebSocket connection initializations with Hooks
- Handling HTTP responses and WebSockets in the same route
- Fastify-WebSocket tutorial: Building a simple chat app with fastify-websocket
- Setting up the fastify-static plugin
- Building the chat app frontend
- fastify-websocket vs. ws vs. fastify-ws
- Quick guide to organizing Fastify-WebSocket code
Fastify-WebSocket features
The Fastify-WebSocket plugin lets developers extend Fastify RESTful backends with WebSocket protocol features. This plugin uses the Node.js ws library as the underlying WebSocket server implementation and comes with four excellent features, which I’ll detail below.
Handling WebSocket messages within RESTful handlers
The Fastify-WebSocket plugin doesn’t initiate another HTTP server instance to initiate WebSocket connections. Rather, it uses the same Fastify server instance by default. Therefore, you can handle WebSocket events within any Fastify GET endpoint handler.
Subscribing to WebSocket client event handlers within endpoints
WebSocket client events — like connection initialization, receiving messages, and connection termination — are always helpful in real-time web application development. The Fastify-WebSocket plugin lets developers subscribe to these client events by exposing the underlying Node.js ws library objects.
Controlling WebSocket connections via Hooks
The Fastify Hooks API helps listen to specific events in the Fastify HTTP routing lifecycle. We can use this feature to validate WebSocket connections before the WebSocket handshake occurs.
TypeScript support
The Fastify-WebSocket library comes with an inbuilt TypeScript definitions file, so you don’t need third-party TypeScript definitions for your TypeScript-based Fastify-WebSocket projects.
Fastify-WebSocket tutorial: Creating a basic WebSocket endpoint
We are going to build several example projects with the Fastify-WebSocket plugin. We will explore all features that you need to build real-time, Fastify-based apps in this tutorial.
First, let’s create a new Fastify project to get started.
Creating a new Fastify project
We need to create a new Node.js module for the sample project before installing the Fastify framework. Enter the following commands to create a new Node.js module:
mkdir fastify-ws
cd fastify-ws

npm init -y
# or
yarn init -y
The above command will create a package.json file with some default values for our new project. However, you can also use npm init fastify to scaffold a new project based on a pre-defined template with the create-fastify starter script; we will create a blank project for simplicity.
Next, install the Fastify framework with the following command:
npm install fastify
# or
yarn add fastify
Now, let’s create a GET endpoint with a JSON response. Create a new file named main.js and add the following code:
const fastify = require('fastify')();

fastify.get('/hello', (request, reply) => {
    reply.send({
        message: 'Hello Fastify'
    });
});

fastify.listen({ port: 3000 }, (err, address) => {
    if(err) {
        console.error(err);
        process.exit(1);
    }
    console.log(`Server listening at: ${address}`);
});
Add the following scripts section to the package.json file to define the start script for the Node.js module:
"scripts": {
    "start": "node main.js"
}
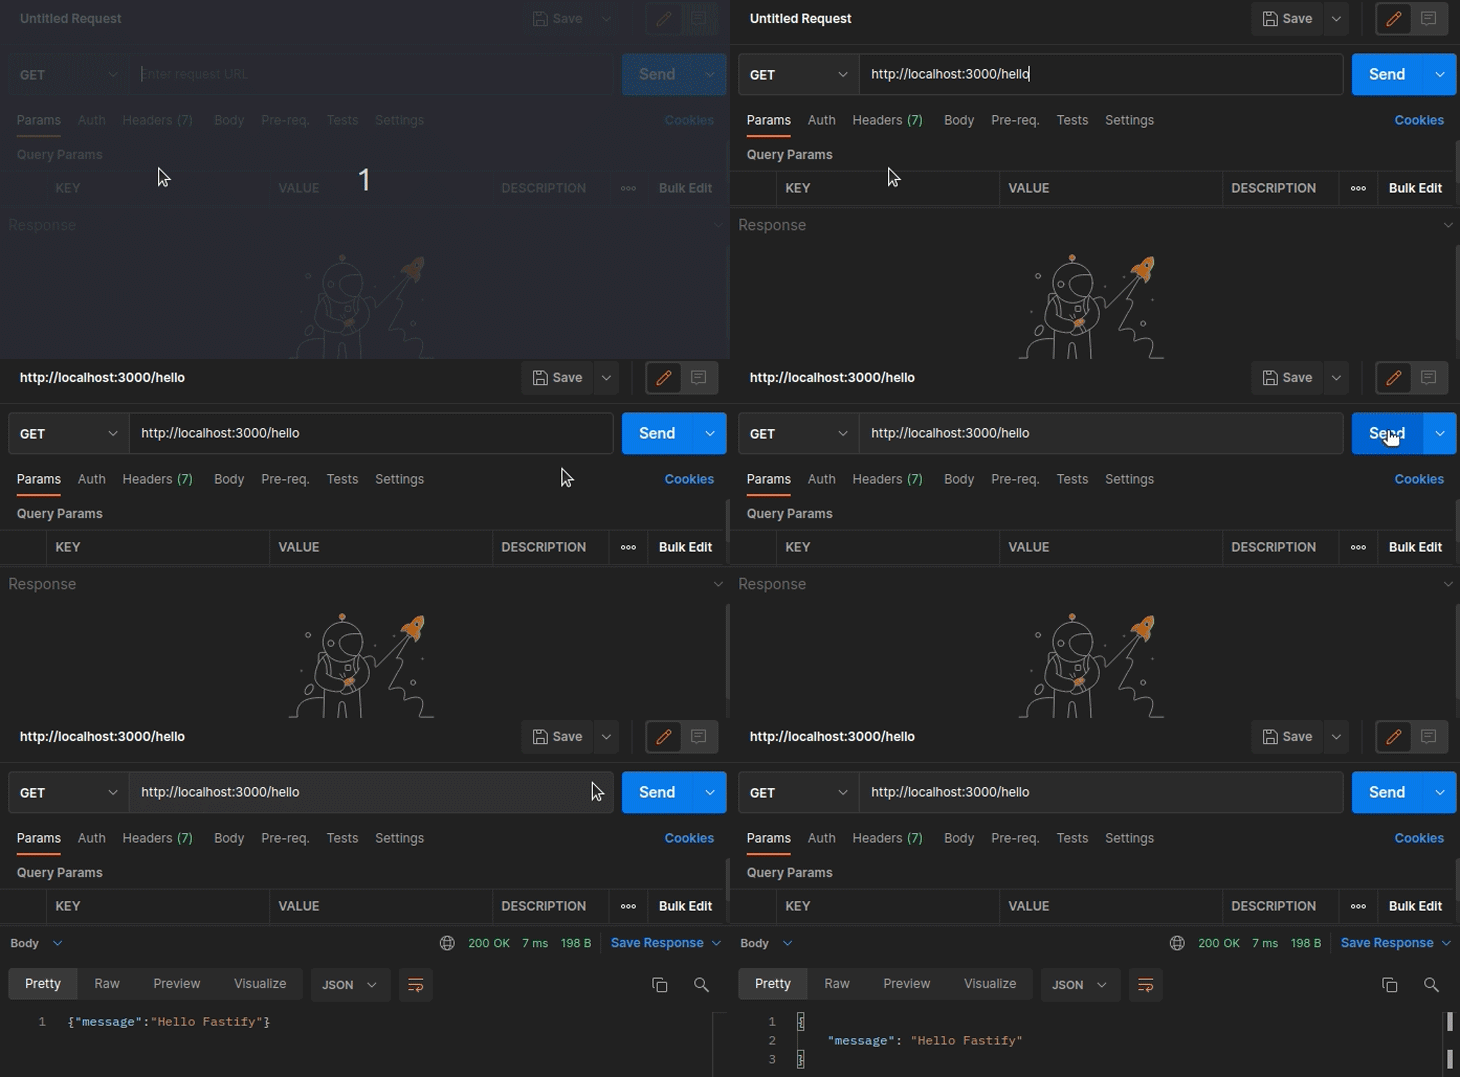
Run the above example code with npm start and invoke the GET /hello endpoint with Postman, as shown below:
Adding WebSocket support to endpoints
Let’s create a WebSocket-enabled endpoint to accept WebSocket client connections. Enter the following command to install the Fastify-WebSocket plugin:
npm install fastify-websocket
# or
yarn add fastify-websocket
Now, we need to activate the plugin before we define the WebSocket-enabled endpoints. Add the following code right after we initialize the fastify constant:
fastify.register(require('fastify-websocket'));
The above code adds WebSocket support for the Fastify RESTful router. Next, create a new GET endpoint named /hello-ws with the WebSocket support, as shown below.
fastify.get('/hello-ws', { websocket: true }, (connection, req) => {
    connection.socket.on('message', message => {
        connection.socket.send('Hello Fastify WebSockets');
    });
});
The above endpoint definition looks like a typical Fastify endpoint, but it uses an additional { websocket: true } configuration object to allow WebSocket handshakes.
Here is the complete source code after adding the WebSocket endpoint:
const fastify = require('fastify')();
fastify.register(require('fastify-websocket'));

fastify.get('/hello', (request, reply) => {
    reply.send({
        message: 'Hello Fastify'
    });
});

fastify.get('/hello-ws', { websocket: true }, (connection, req) => {
    connection.socket.on('message', message => {
        connection.socket.send('Hello Fastify WebSockets');
    });
});

fastify.listen({ port: 3000 }, (err, address) => {
    if(err) {
        console.error(err);
        process.exit(1);
    }
    console.log(`Server listening at: ${address}`);
});
The above code implements two endpoints: the GET /hello to return a JSON payload, and the GET /hello-ws to accept WebSocket handshakes via the HTTP protocol. Also, when the server receives a new WebSocket message, it returns a greeting message to the particular WebSocket client.
Let’s test the above WebSocket endpoint.
Testing our basic WebSocket endpoint with Postman
Typically, developers write client applications to test their WebSocket server implementations, but Postman lets you check any WebSocket connection without writing code.
Open a new WebSocket testing tab in Postman by selecting the WebSocket Request menu item from the New main menu. Connect to the WebSocket endpoint and send a message, as shown below.
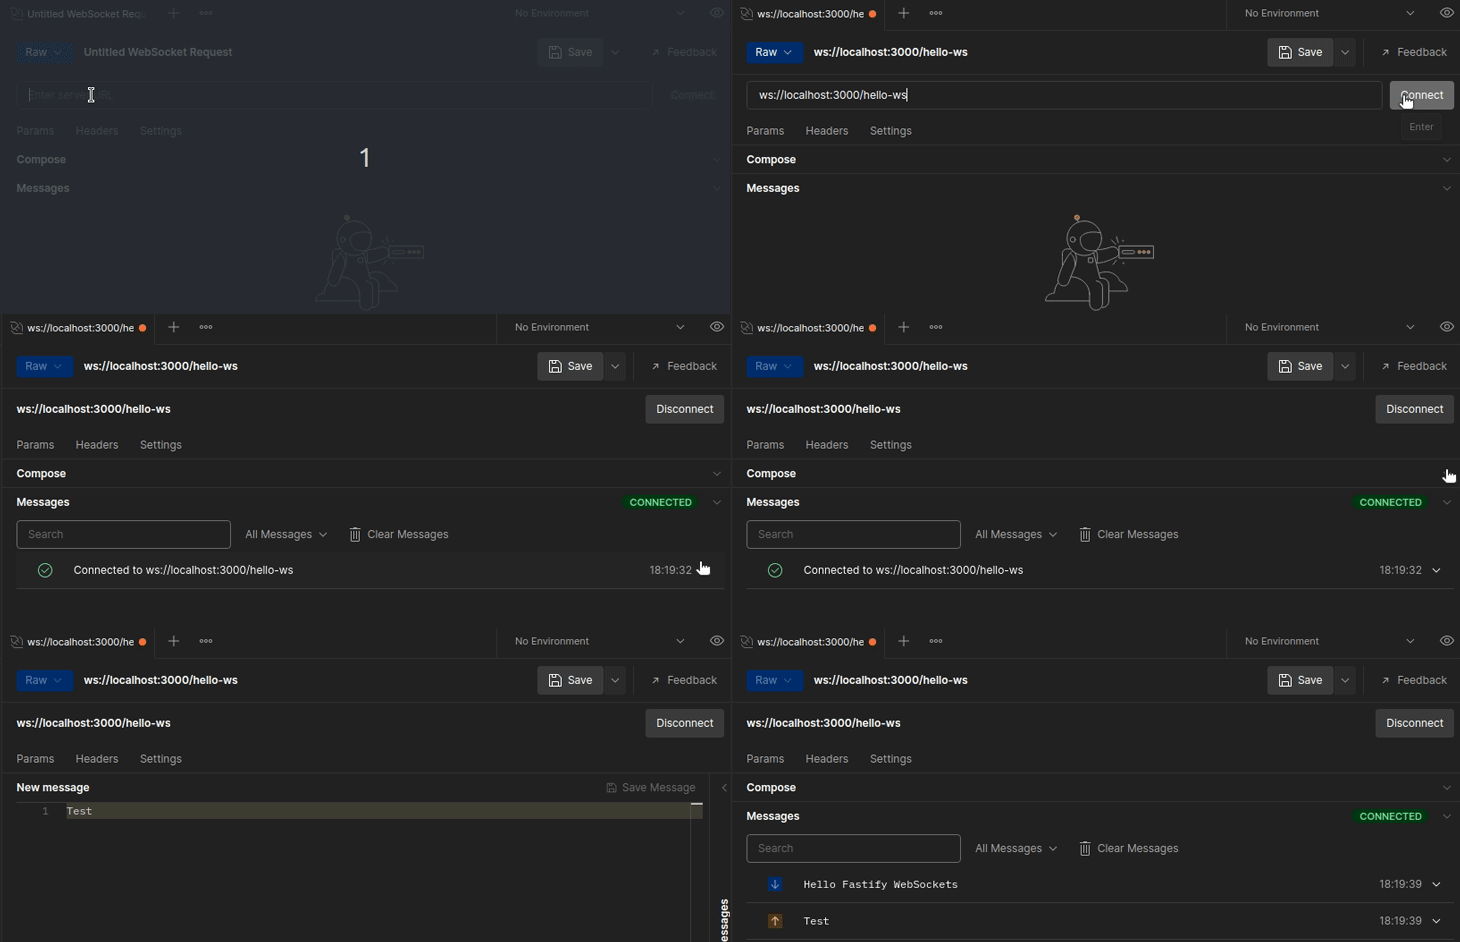
As shown, you will get a greeting message from the WebSocket server for each message you send. Here, we need to connect to the server using the WebSocket protocol URL; i.e., we could use the following URL format to establish a WebSocket connection via the GET /hello-ws endpoint:
ws://localhost:3000/hello-ws
If you are connecting to your production server via a TLS connection, you need to use wss instead of ws, as we’ll use https instead of http.
Using WebSocket client event handlers
The WebSocket concept is a solution for managing a real-time, bidirectional connection between a web server and clients. If you use WebSockets to build a group chat application, you typically need to know when a new client connects and disconnects. The Fastify-WebSocket library lets you subscribe to these events via the underlying ws library implementation.
Update the current GET /hello-ws endpoint implementation with the following code snippet to experiment with client event handlers:
fastify.get('/hello-ws', { websocket: true }, (connection, req) => {
    // Client connect
    console.log('Client connected');
    // Client message
    connection.socket.on('message', message => {
        console.log(`Client message: ${message}`);
    });
    // Client disconnect
    connection.socket.on('close', () => {
        console.log('Client disconnected');
    });
});
When the WebSocket handshake is successful, the plugin invokes the WebSocket endpoint handler , which we can use to detect the client connection event.
As shown above, we can use the close event handler to identify WebSocket client disconnections. The message event handler gets invoked for each incoming client message.
Try to open several Postman WebSocket testing tabs and send some messages — you will see client events on the terminal, as shown below.
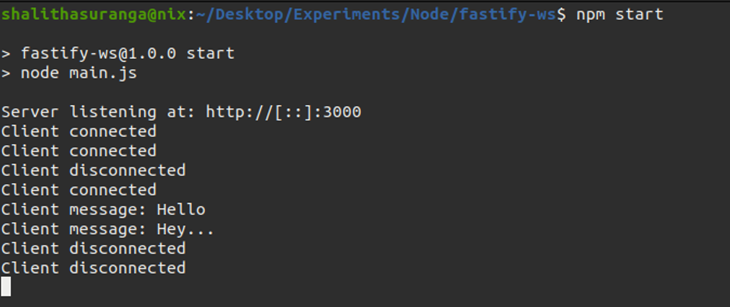
We haven’t yet written any code yet to store client connection details, but we will discuss it later in this tutorial when we build a real-time chat application example.
Fastify-WebSocket tutorial: Creating multiple WebSocket endpoints using the same server
The Fastify-WebSocket plugin is very flexible. It lets you make more than one WebSocket endpoint via route definitions.
You can create any number of WebSocket-enabled RESTful endpoints by adding the { websocket: true } configuration object to the route definition. Look at the following example:
const fastify = require('fastify')();
fastify.register(require('fastify-websocket'));

fastify.get('/digits', { websocket: true }, (connection, req) => {
    let timer = setInterval(() => {
        connection.socket.send(randomDigit(1, 10).toString());
    }, 1000);
    connection.socket.on('close', () => {
        clearInterval(timer);
    });
});

fastify.get('/letters', { websocket: true }, (connection, req) => {
    let timer = setInterval(() => {
        connection.socket.send(randomLetter());
    }, 1000);
    connection.socket.on('close', () => {
        clearInterval(timer);
    });
});

fastify.listen({ port: 3000 }, (err, address) => {
    if(err) {
        console.error(err);
        process.exit(1);
    }
    console.log(`Server listening at: ${address}`);
});

function randomDigit(min, max) {
    return Math.floor(Math.random() * (max - min) + min);
}

function randomLetter() {
    return 'abcdefghijklmnopqrstuvwxyz'[randomDigit(1, 26)];
}
The above code snippet implements two WebSocket endpoints:
GET /digits: This WebSocket endpoint sends random digits once connectedGET /letters: This WebSocket endpoint sends random English letters once connected
You can test the above WebSocket endpoints simultaneously with Postman by connecting to both, as shown below.
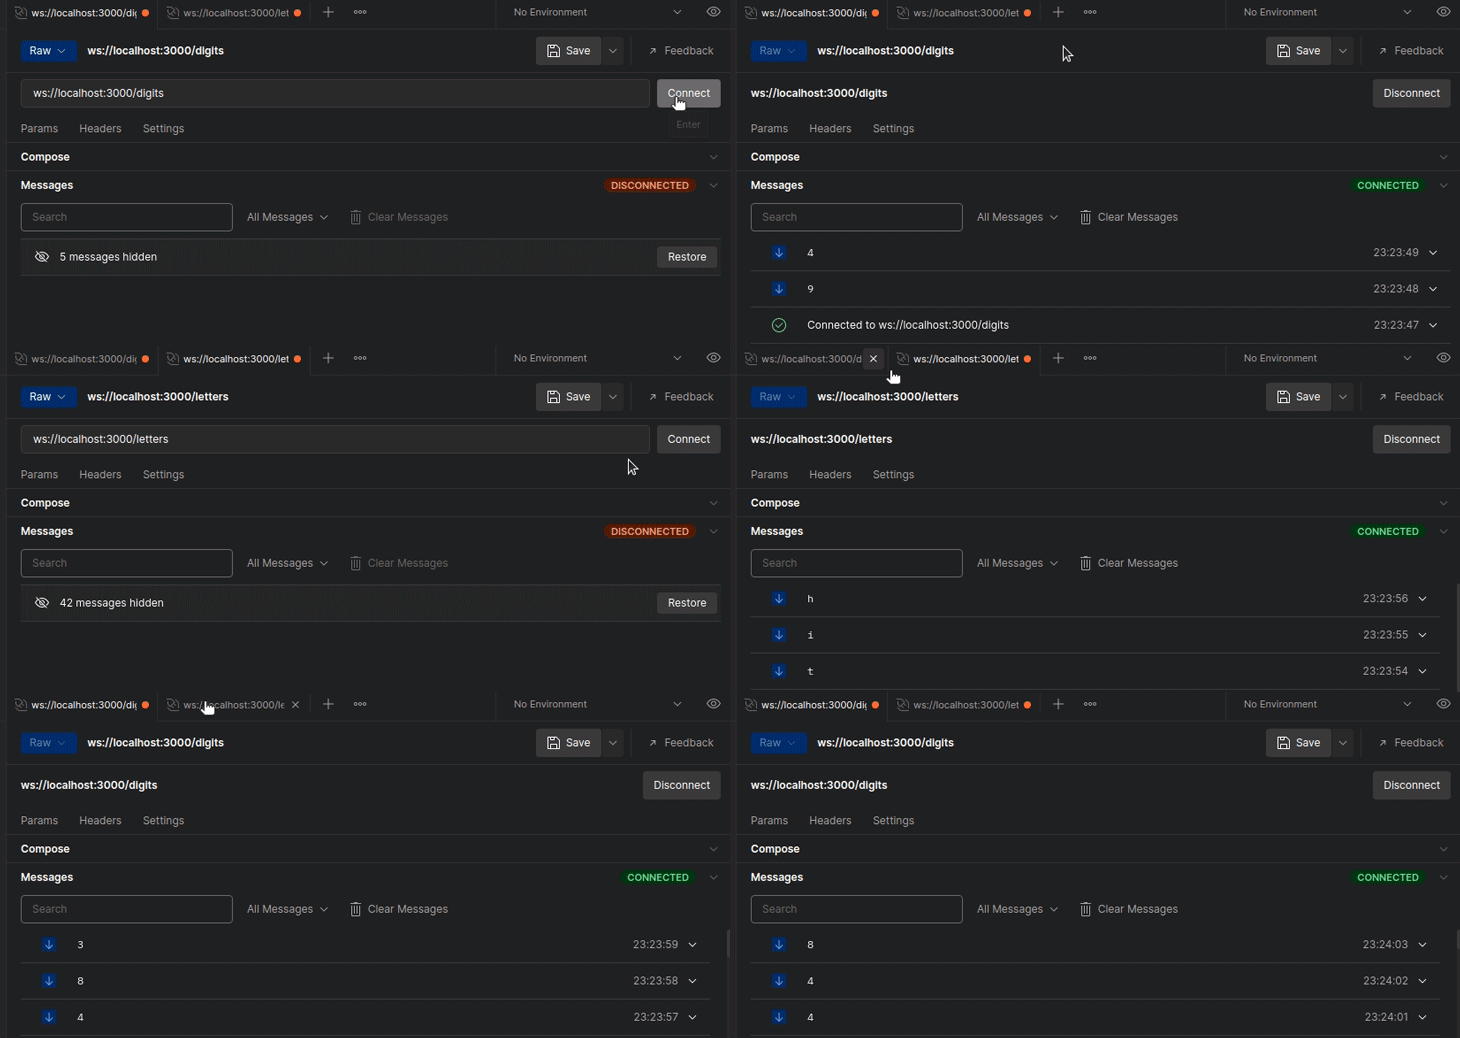
Similarly, you can implement more WebSocket endpoints on the same Fastify server, and you can accept WebSocket connections via any GET endpoint by registering a WebSocket-enabled GET endpoint to the /* route.
Configuring the WebSocket server
The ws Node.js library comes into play here again to handle WebSocket data transmissions. Its WebSocket implementation accepts a configuration object with several properties, so the fastify-websocket plugin also accepts those configuration properties.
For example, we can change the maximum allowed message size via the maxPayload property, as shown below.
fastify.register(require('fastify-websocket'), {
    options: {
        maxPayload: 10 // in bytes
    }
});
You can browse all supported data transmission configuration options from the ws module documentation.
Validating WebSocket connection initializations with Hooks
In some scenarios, we may need to accept only specific WebSocket connection requests according to a set of validation rules. For example, we can allow WebSocket connections by checking the URL query parameters or HTTP headers.
We can conditionally accept or reject incoming WebSocket connections with the prevValidation Hook. The following server-side code allows WebSocket clients that connect to the server with the username query parameter in the URL:
const fastify = require('fastify')();
fastify.register(require('fastify-websocket'));

fastify.addHook('preValidation', async (request, reply) => {
    if(!request.query.username) {
        reply.code(403).send('Connection rejected');
    }
});

fastify.get('/*', { websocket: true }, (connection, req) => {
    connection.socket.send(`Hello ${req.query.username}!`);
});

fastify.listen({ port: 3000 }, (err, address) => {
    if(err) {
        console.error(err);
        process.exit(1);
    }
    console.log(`Server listening at: ${address}`);
});
The above code snippet seeks WebSocket connections from any GET endpoint with the wildcard routing syntax (/*), but it conditionally accepts connections if the username query parameter is present. For example, you can’t establish a WebSocket connection with the following URLs:
ws://localhost:3000
ws://localhost:3000/ws
ws://localhost:3000/hello-ws
But you can establish a WebSocket connection and receive a greeting message with the following URLs:
ws://localhost:3000?username=Fastify
ws://localhost:3000/ws?username=Developer
ws://localhost:3000/hello-ws?username=Nodejs
ws://localhost:3000/hello-ws?username=Nodejs&anotherparam=10
Besides, you can validate WebSocket connection initializations by checking WebSocket handshake headers, too, via the request.headers property.
Handling HTTP responses and WebSockets in the same route
Assume that if someone visits a WebSocket endpoint from the web browser, you need to reply with an HTTP response. Then, we need to return that particular HTTP response if the endpoint receives a normal HTTP request, but we still need to perform WebSocket handshakes to accept incoming WebSocket connections.
We can handle both protocols in the same endpoint by using Fastify’s full declaration syntax, as shown below.
fastify.route({
    method: 'GET',
    url: '/hello',
    handler: (req, reply) => {
        // HTTP response
        reply.send({ message: 'Hello Fastify' });
    },
    wsHandler: (conn, req) => {
        // WebSocket message
        conn.socket.send('Hello Fastify WebSockets');
    }
});
Here, we make HTTP responses via the handler callback and communicate with WebSocket clients via the wsHandler callback. Both operations happen within the GET /hello endpoint.
Fastify-WebSocket tutorial: Building a simple chat app with fastify-websocket
We’ve discussed almost all of the features the fastify-websocket plugin provides, so it’s time to build a simple group chat application by using those features.
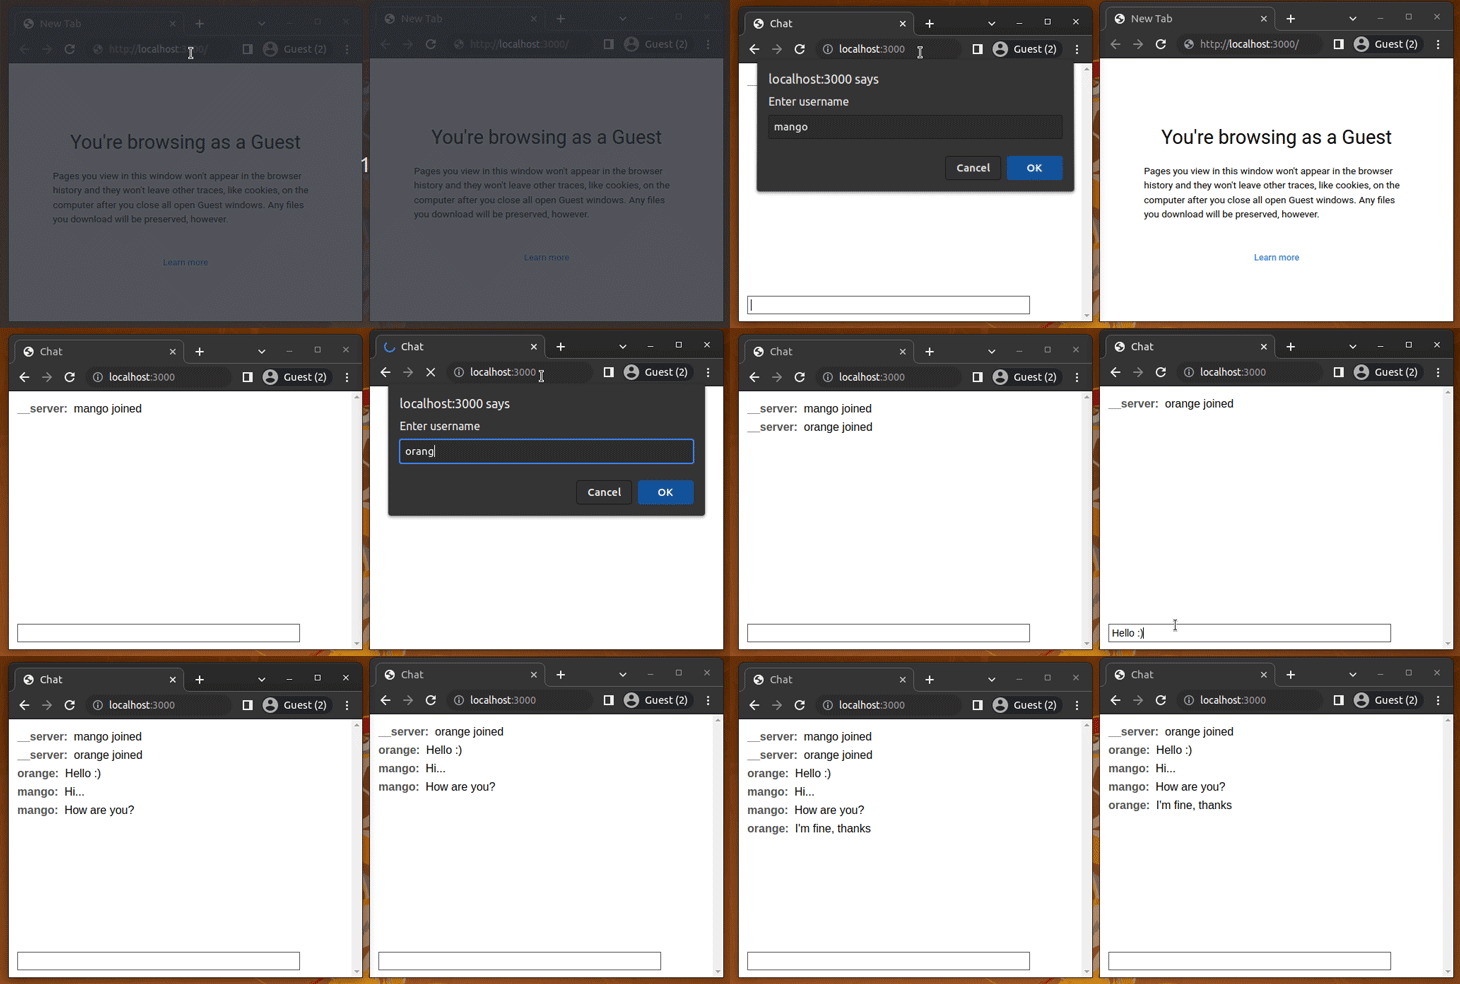
This chat app will let anyone enter a group conversation by entering a username. Once a user enters the username, the chat app lets the particular user post a message for all users.
Let’s keep it simple and build this application with vanilla JavaScript and plain HTML.
Setting up the fastify-static plugin
First, we need to install the fastify-static plugin to enable the static file serving feature to serve the chat application frontend. Install the plugin with the following command:
npm install fastify-static
# or
yarn add fastify-static
Next, add the following code to your main.js file:
const fastify = require('fastify')();
const path = require('path');

fastify.register(require('fastify-websocket'));
fastify.register(require('fastify-static'), {
    root: path.join(__dirname, 'www')
});

fastify.addHook('preValidation', async (request, reply) => {
    if(request.routerPath == '/chat' && !request.query.username) {
        reply.code(403).send('Connection rejected');
    }
});

fastify.get('/chat', { websocket: true }, (connection, req) => {
    // New user
    broadcast({
        sender: '__server',
        message: `${req.query.username} joined`
    });
    // Leaving user
    connection.socket.on('close', () => {
        broadcast({
            sender: '__server',
            message: `${req.query.username} left`
        });
    });
   // Broadcast incoming message
    connection.socket.on('message', (message) => {
        message = JSON.parse(message.toString());
        broadcast({
            sender: req.query.username,
            ...message
        });
    });
});

fastify.listen({ port: 3000 }, (err, address) => {
    if(err) {
        console.error(err);
        process.exit(1);
    }
    console.log(`Server listening at: ${address}`);
});

function broadcast(message) {
    for(let client of fastify.websocketServer.clients) {
        client.send(JSON.stringify(message));
    }
}
The above server-side implementation contains a static file server to serve the frontend application resources. It also handles the WebSocket server-side events of the chat application, i.e., when a new chat client tries to establish a connection, it conditionally accepts the connection by checking the existence of the username query parameter. Moreover, it also notifies all chat clients when:
- A new user joins the conversation
- A user sends a message from the application frontend
- An existing user leaves the conversation
All unique WebSocket client connection references are stored in the fastify.websocketServer.clients Set_, so we can loop through it and send a message to all connected chat users. This action is known as broadcasting in WebSocket-based applications; we’ve implemented it inside the broadcast function.
Before developing the frontend, you also can test the WebSocket endpoint with Postman. Try to open several WebSocket testing tabs and connect with the WebSocket endpoint by providing different usernames.
Building the chat app frontend
Let’s build the chat application frontend. Create a directory named www, and inside the project directory create index.html, where you’ll add the following code:
<!DOCTYPE html>
<html lang="en">
<head>
<title>Chat</title>
<meta charset="UTF-8" />
<meta name="viewport" content="width=device-width,initial-scale=1" />
<meta name="description" content="" />
<style>
html, body {
margin: 0;
padding: 0;
}
* {
box-sizing: border-box;
font-family: Arial;
}
#chat {
width: 100vw;
height: 100vh;
padding: 12px;
}
#chat div {
padding: 4px 0px;
}
#chat div b {
color: #555;
}
input[type=text] {
position: fixed;
bottom: 10px;
left: 12px;
outline: none;
width: 400px;
border: #555 solid 1px;
font-size: 14px;
padding: 4px;
}
</style>
</head>
<body>
<div id="chat"></div>
<input id="message" type="text" autofocus/>
<script>
let _ws = null;
init();
function init() {
let username = getUsername();
if(!username) {
sessionStorage.setItem('username', prompt('Enter username'))
username = getUsername();
}
if(!username) {
init();
}
_ws = new WebSocket(`ws://${window.location.host}/chat?username=${username}`);
_ws.onmessage = (message) => {
message = JSON.parse(message.data);
appendMessage(message);
};
document.getElementById('message')
.onkeypress = (evt) => {
if(evt.key == 'Enter') {
_ws.send(JSON.stringify({
message: evt.target.value
}));
evt.target.value = '';
}
};
}
function getUsername() {
return sessionStorage.username;
}
function appendMessage(message) {
document.getElementById('chat').innerHTML +=
`
<div>
<b>${message.sender}: </b>
${message.message}
</div>
`
}
</script>
</body>
</html>
The above code implements a minimal frontend for the chat application backend that we just built with the Fastify-WebSocket plugin. Start the Fastify server with the npm start (or yarn start) command and go to the following URL to access the chat application:
http://localhost:3000
Try to open multiple browser windows and test the application, as shown below.
You can download the full source code from my GitHub repository.
Fastify-WebSocket vs. ws vs. Fastify-ws
The Fastify-WebSocket plugin is a great solution to add WebSocket endpoints to an existing Fastify-based RESTful web service. And, if you’re planning to build a real-time web application like our demo chat app, using fastify, fastify-websocket, and fastify-static Node.js modules gives your project an instant kickstart.
However, if you need more control over your WebSocket server lifecycle, events, and configuration, using the ws library directly is a good idea. The Fastify-WebSocket plugin wraps the ws library’s functionality to offer you an abstract Fastify plugin. However, the plugin is flexible enough for any general purpose, real-time application because it offers a direct way to subscribe to every necessary WebSocket client event.
There is also the fastify-ws third-party plugin for adding WebSocket plugin for Fastify-based web services, but, unfortunately, it’s not actively developed and doesn’t support the features that the fastify-websocket plugin offers (especially adding WebSocket support to a specific route).
Quick guide to organizing Fastify-WebSocket code
We’ve worked with two different protocols in this post: RESTful HTTP and WebSockets. The RESTful pattern follows a stateless, uni-directional, and request-response-based communication strategy, while the WebSocket concept is asynchronous and a typically stateful communication mechanism. As a result, we need to carefully organize the code to reduce its complexity and achieve better maintainability factors.
Consider using the following pointers for organizing your Fastify-WebSocket-based codebases:
- Use an MVC-like project structure to enhance the maintainability factors by separating routes, handlers, controllers, and helper modules
- If your WebSocket event handling logic grows, write separate message handler functions instead of anonymous functions (and move them to separate modules if needed)
- Try not to mix typical RESTful endpoints with WebSocket-enabled endpoints — isolate WebSocket endpoints into a module if possible
- For example, you can create a file named
chat.jsand place the WebSocket endpoint and event handlers of a real-time chat module
- For example, you can create a file named
- Try to apply the DRY programming principle and create shared functions for repetitive code in event handlers
- For example, consider the
broadcastfunction in the chat app we built together!
- For example, consider the
Conclusion
In this tutorial, we learned how to use the Fastify-WebSocket plugin with several practical examples.
The Fastify development team developed this plugin as a wrapper for the ws library, but it’s most useful because it lets us make customizations that we often need. This plugin’s goal is to support Fastify developers in adding WebSocket-enabled endpoints into RESTful web services with the same Fastify routing syntax.
Therefore, developers can easily extend their RESTful app backends with real-time web app modules, such as inbuilt chat systems, monitoring dashboards, and more. Its best advantage is that you can use only one network port for all WebSocket and HTTP connections — making your authentication strategy simple.
The Fastify-WebSocket plugin project is actively developed, provides good developer support, and offers inbuilt TypeScript support — so we can use it in our Fastify projects without a doubt.
The post Using WebSockets with Fastify appeared first on LogRocket Blog.
from LogRocket Blog https://ift.tt/7FWlgUY
via Read more


