


There are several reasons why a smart contract might be migrated to another blockchain. Some obvious reasons are lower gas fees or faster transaction time. There are also instances where it makes sense to shift a contract to a different chain in order to debug a contract, to provide additional security, or even to provide access to the contract if it has become inaccessible due to theft or a technical issue.
This smart contract migration guide demonstrates how to migrate a smart contract from a local development chain to individual blockchains, and how to migrate smart contracts between different chains. This article also provides an overview of several blockchains and how they vary with regard to smart contract migration.
Jump ahead:
- Prerequisites
- Considerations for migrating between chains
- Demo: Smart contract migration from a local development chain
- Smart contract migration between chains
Prerequisites
To follow along with the tutorial portion of this article, ensure that you have the following:
- Ganache installed
- Truffle framework installed
- Node installed
- npm installed
- Git installed
- GitHub account
- VS Code, or the code editor of your choosing
- MetaMask account
Considerations for migrating between blockchains
Several factors could influence a decision to migrate a smart contract from one blockchain to another. Let’s take a look at a few examples.
Ethereum vs. Binance Smart Chain
The Ethereum blockchain is a decentralized, transparent, and secure public blockchain. At the time of this writing, Ethereum uses a Proof of Work consensus algorithm. Smart contracts may be created on the Ethereum network.
Every operation made on the Ethereum blockchain, whether successful or not, must be paid for with a gas fee. An operation could be sending an amount of ether (Ethereum’s cryptocurrency) from one account to another or deploying a contract.
The gas fee must be paid before miners add the transaction to a block. Ethereum enforces a maximum amount of gas per block, referred to as the block gas limit.
The Binance Smart Chain (BSC) uses a Proof of Stake consensus algorithm. Like Ethereum, it supports the creation of smart contracts.
Some incentives for migrating from Ethereum to BSC are Binance’s lower gas fees and faster transaction times. These benefits make BSC more scalable than Ethereum. Ethereum Smart contracts can easily be migrated to the BSC platform with minimal or no changes to the code.
However, BSC does have some drawbacks, including less decentralization. This is due to having several centralized entities, such as the 21,000 node validators which are either directly or indirectly owned by Binance and responsible for the network’s lower gas fees.
Polygon vs. Ethereum
Similar to BSC, the Polygon blockchain uses a Proof of Stake consensus algorithm. Polygon supports the creation of smart contracts and enables interoperability by allowing for the cross-communication of smart contracts launched on its blockchain. The network’s token, MATIC, offers several functionalities such as paying gas fees, staking, and voting.
Some incentives for migrating from Ethereum to Polygon are Polygon’s faster transaction times and lower transaction fees. Polygon’s structure also makes it more scalable than Ethereum. As the number of nodes on the Polygon network increases, the ecosystem expands to adequately contain the nodes and process their transactions.
Now, let’s take a look at how to migrate smart contracts between different chains.
Demo: Smart contract migration from a local development chain
For this tutorial, we’ll be using a smart contract written in Solidity and deployed on the Tuffle Suite framework. Truffle Suite integrates with other Ethereum Virtual Machine blockchains and has inbuilt features for creating, testing, compiling, and deploying smart contracts.
After deploying the smart contract to a local development chain, we’ll demonstrate how to deploy it to individual blockchains. We’ll use MetaMask for the deployment in order to easily see our account balance and transaction history.
Deploying the smart contract to Ganache
We’ll start by deploying the smart contract to Ganache, a blockchain simulation tool built in the Truffle environment. This will allow us to ensure the code compiles correctly and that there are no issues with deployment.
To begin, clone the smart contract code from this GitHub repo in your terminal. Then, in the project’s directory, run the following command to install the dependencies:
npm install
Before proceeding further, ensure that you have Ganache installed as this is the development blockchain you‘ll use.
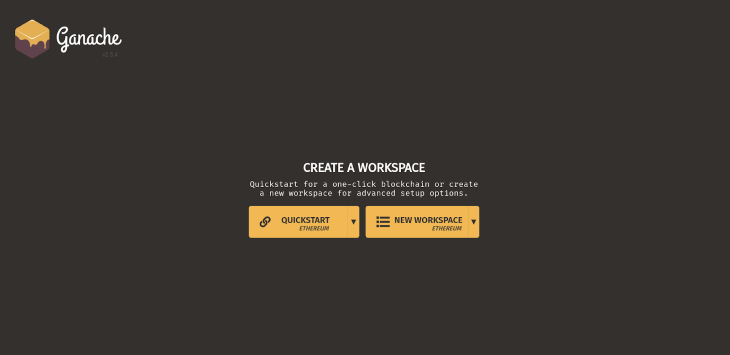
Now, run Ganache on your system and click QUICKSTART, as shown below:
Next, we’ll deploy the smart contract using the migrations defined in the 2_deploy_migration.js file.
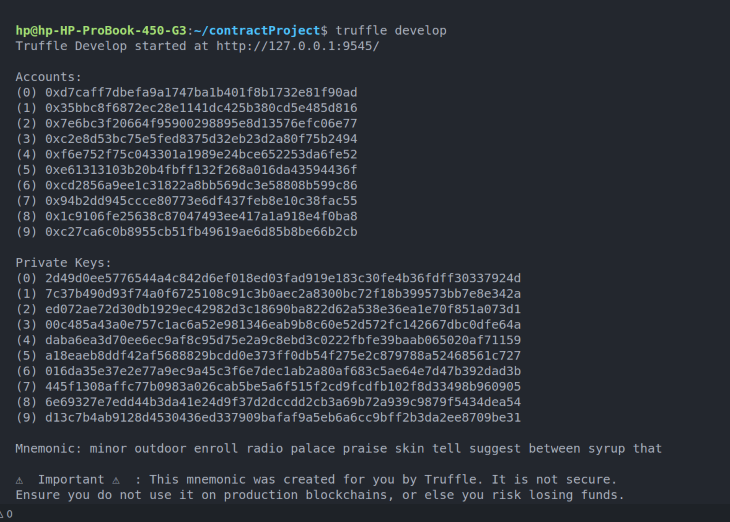
First, in your terminal and project’s directory, run the following command to start the development blockchain:
truffle develop
This will start your development blockchain with ten addresses, each containing 100ETH and private keys:
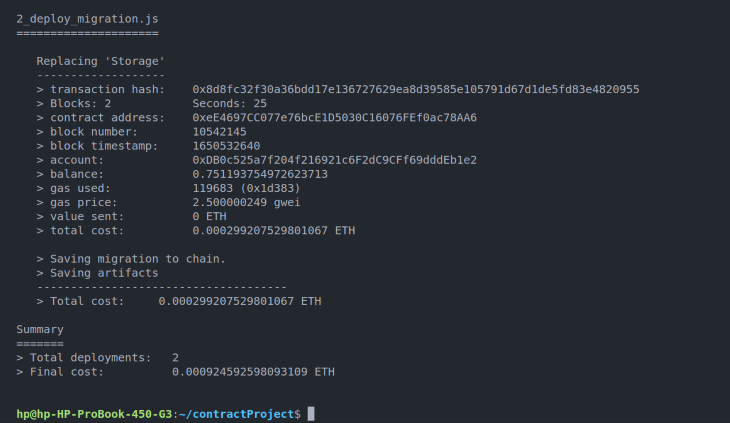
Next, deploy the smart contract by running the following command to execute all code in the migration folder:
migrate -reset
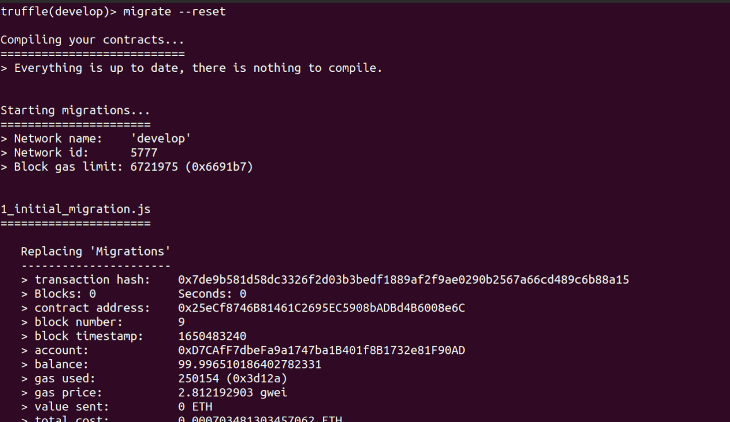
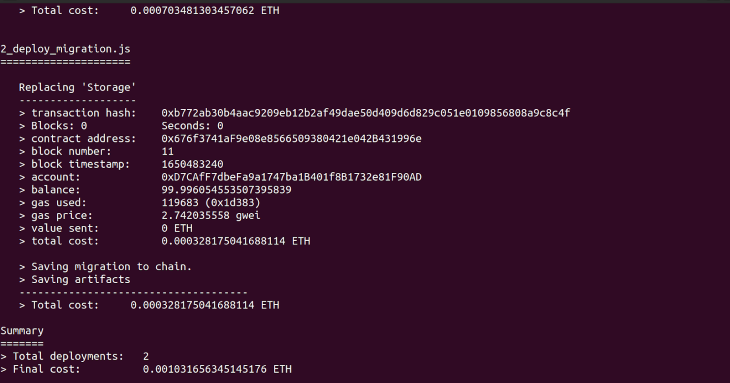
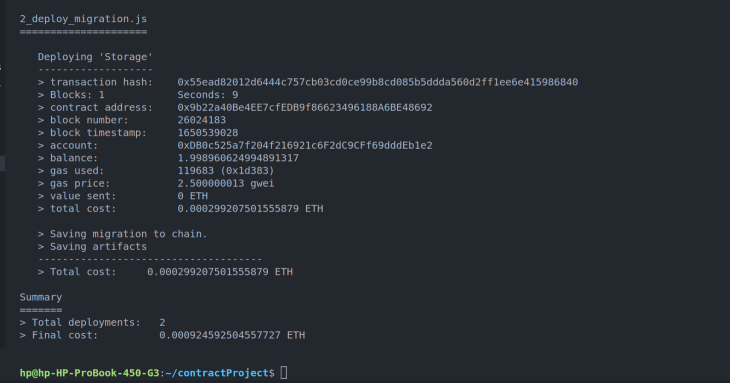
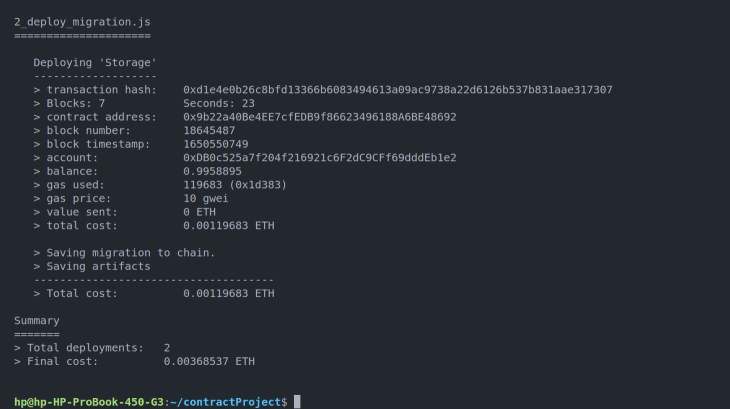
The terminal’s output shows that the 2_deploy_migration.js file is deployed. The output also shows contract information, including the transaction hash, block number, and contract address.
Notice that some of the smart contract information, such as value sent and total cost, is provided in ETH (Ethereum’s currency). When migrating the smart contract, you’ll have to first update any of the information that is in ETH to the native currency of the blockchain you’re migrating the contract to.
To exit the environment, type CTRL + C twice in your terminal.
Now, let’s see how to migrate the smart contract to the Ethereum blockchain.
Deploying a smart contract to Ethereum’s testnet (Rinkeby)
To deploy the smart contract from the local blockchain to Ethereum’s Rinkeby network, you must first have an address.
To generate the address, open your MetaMask wallet and connect to the Rinkeby test network.
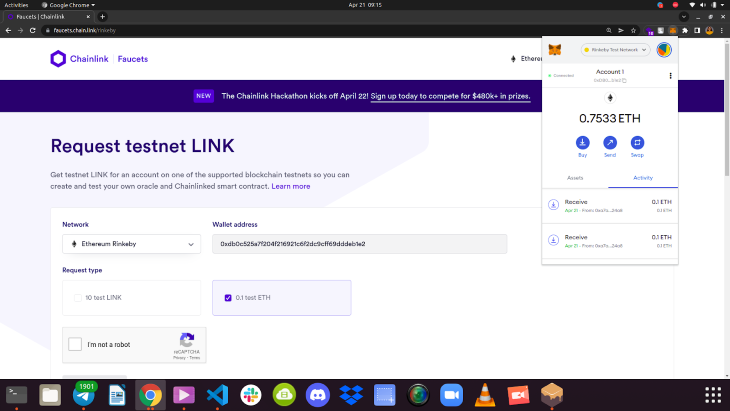
To get free ether use the Faucets Chainlink, connect to Rinkeby, and paste the wallet address into the field.
Then, click Send request.
As shown below, this should send 0.1ETH to your wallet.
Next, it’s time to configure Truffle. In your code editor, open the truffle-config.js file to define your network configurations.
Check the truffle-config.js file’s documentation where it defines the following:
/**
* Use this file to configure your truffle project. It's seeded with some
* common settings for different networks and features like migrations,
* compilation and testing. Uncomment the ones you need or modify
* them to suit your project as necessary.
*
* More information about configuration can be found at:
*
* https://trufflesuite.com/docs/truffle/reference/configuration
*
* To deploy via Infura you'll need a wallet provider (like @truffle/hdwallet-provider)
* to sign your transactions before they're sent to a remote public node. Infura accounts
* are available for free at: infura.io/register.
*
* You'll also need a mnemonic - the twelve-word phrase the wallet uses to generate
* public/private key pairs. If you're publishing your code to GitHub make sure you load this
* phrase from a file you've .gitignored so it doesn't accidentally become public.
*
*/
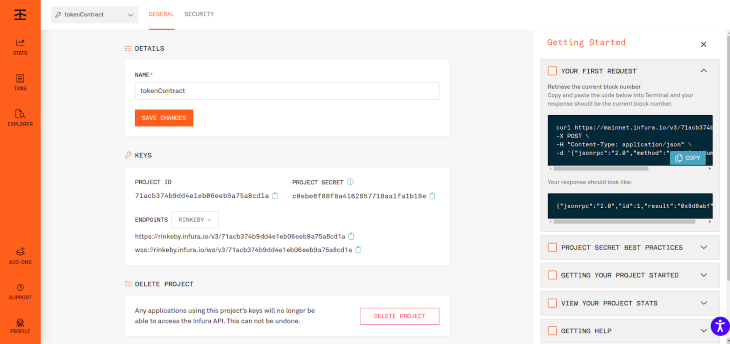
Next, create an account on Infura: infura.io/register, then create a new project and click on PROJECT SETTINGS in the top right.
On the General tab, under Keys, select RINKEBY from the Endpoints dropdown. You should see your project ID displayed as well as the URL for your node on Infura.
N.B., you’ll be using the @truffle/hdwallet-provider dependency installed in your package.json file to set your provider to your private key on MetaMask
In your truffle-config.js file, require the @truffle/hdwallet-provider dependency and create an array that will store your private keys:
const HDWalletProvider = require('@truffle/hdwallet-provider');
const privateKeys = ['<app your private key>'];
Now, scroll down to the networks section and add a development script to set the provider to your private key on MetaMask and your URL for your node on Infura:
development: {
     provider: () => new
HDWalletProvider("<Your private key on metamask", `https://rinkeby.infura.io/v3/71acb374b9dd4e1eb06eeb9a75a8cd1a`),
     network_id: 4,       // Any network (default: none)
},
You’ll notice in the above code that the network_id is set to 4; this is the network ID for Rinkeby. Other Ethereum networks have different IDs.
Next, execute the migration and your configuration by running the following command:
truffle migrate -network development --reset
Now, copy the transaction hash. Navigate to MetaMask and click View Account on Etherscan. In the list of transactions, you’ll see the transaction hash that just deployed:
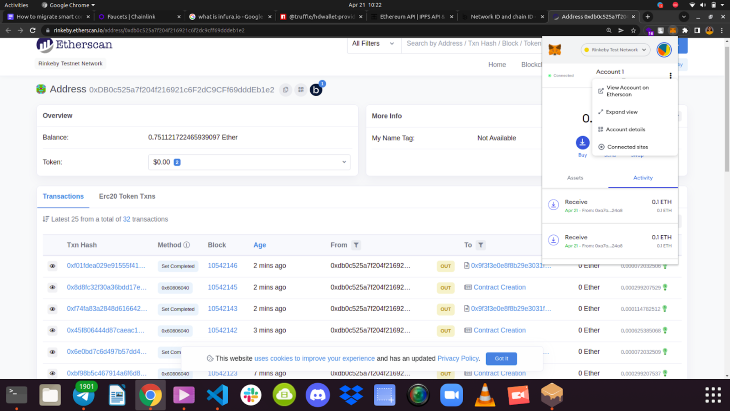
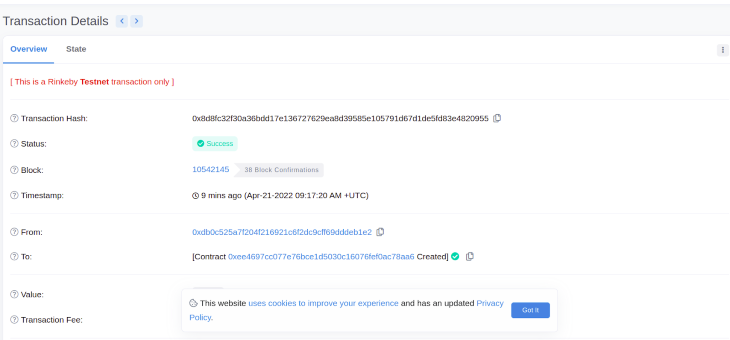
Click on an individual transaction to see more details:
Deploying the smart contract to Polygon’s testnet (Mumbai)
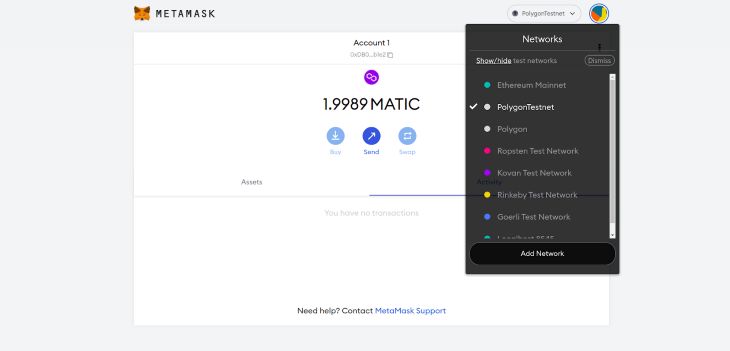
To deploy the smart contract to the Polygon’s Mumbai network, you’ll start by connecting your MetaMask wallet to Polygon. Open MetaMask and click Add Network, then add the following to the appropriate fields:
- Network name: PolygonTestnet.
- RPC URL: https://rpc-mumbai.matic.today
- Chain ID: 80001
- Currency symbol: MATIC
- Block Explorer URL: https://mumbai.polygonscan.com/
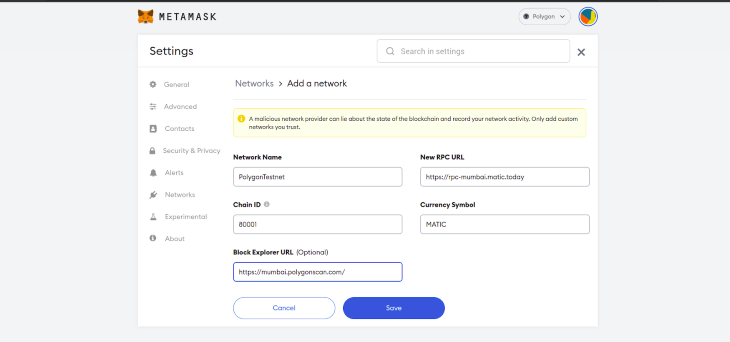
Then, click Save, and MetaMask will connect to Polygon.
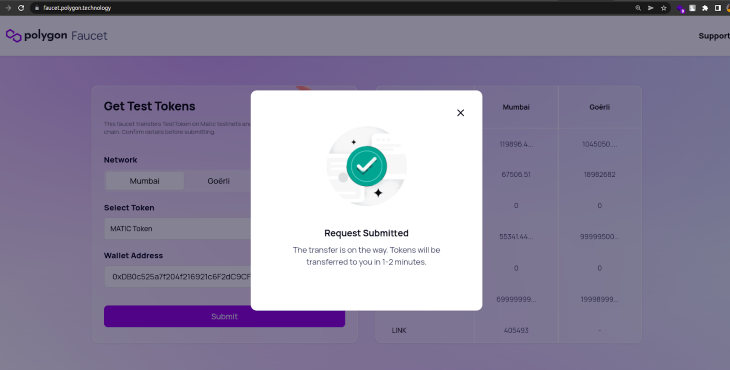
Since you are migrating the contract to Polygon’s testnet, you’ll need MATIC tokens to pay for your transaction. To get MATIC tokens, open your MetaMask wallet and copy your wallet address. Then, navigate to the Polygon faucet and paste the address into the wallet address field. Click Submit, then click Confirm.
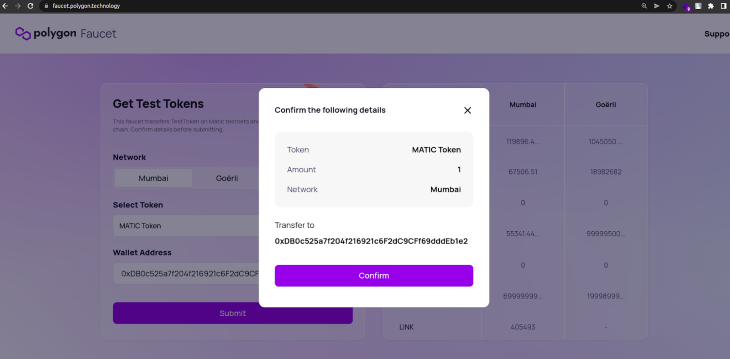
As shown below, you should see confirmation that the request was submitted.
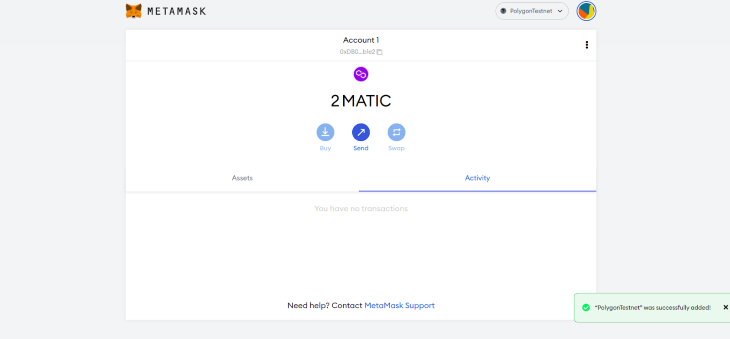
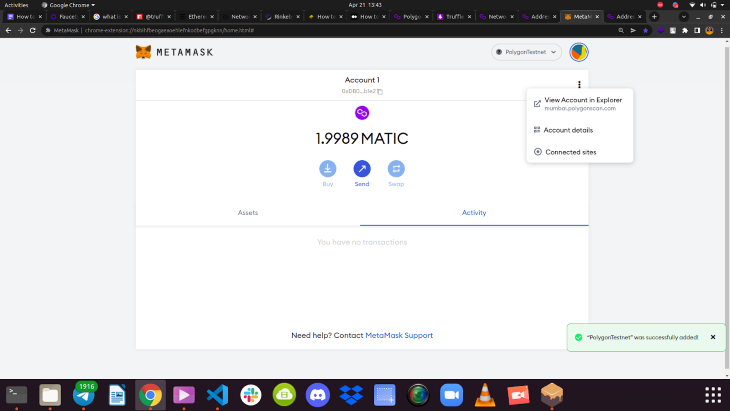
In a few minutes, you should see the tokens in your MetaMask wallet. Once the MATIC tokens are successfully transferred, they will appear in your wallet balance.
Next, in your code editor, open the truffle-config.js file. In the network script, add a network provider for Polygon below the network provider for Ethereum. You’ll be using the RPC URL for the Mumbai testnet as defined in the Polygon documentation.
Copy the RPC link shown below, https://rpc-mumbai.matic.today:
Then, paste the RPC link into the code as the provider URL. Also paste the chainid (above) into the code as the network_id:
polygonTestnet: {
     provider: () => new HDWalletProvider(privateKeys, `https://rpc-mumbai.matic.today`),
     network_id: 80001,       // Any network (default: none)
   },
Now, open your terminal, and run the migration and configuration to the Polygon testnet with this command:
truffle migrate --network polygonTestnet --reset
You can see below that your contract has been successfully migrated:
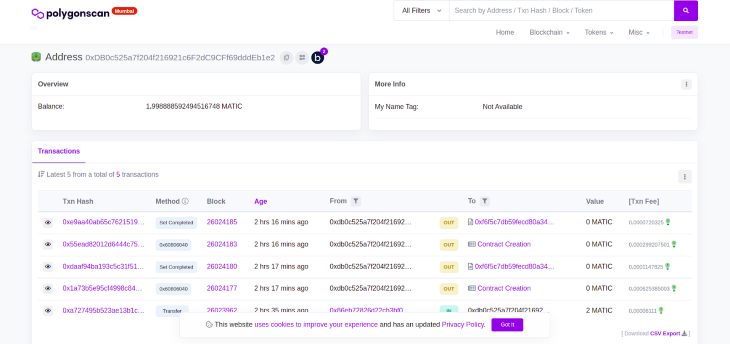
Now, copy the transaction hash. Open your MetaMask account and click View Account in Explorer:
You should see the deployed contract with the transaction has in the Polygonscan blockchain explorer:
Deploying the smart contract to Binance Smart Chain
To deploy your smart contract to the Binance Smart Chain’s testnet. you’ll need to get BNB tokens (which is the native currency of the Binance Smart chain).
You’ll start by connecting your MetaMask wallet to BSC. Open MetaMask and click Add Network:
Next, add the following to the appropriate fields:
- Network name: BSCTestnet
- RPC URL: https://rpc-mumbai.matic.today
- Chain ID: 97
- Currency symbol: BNB
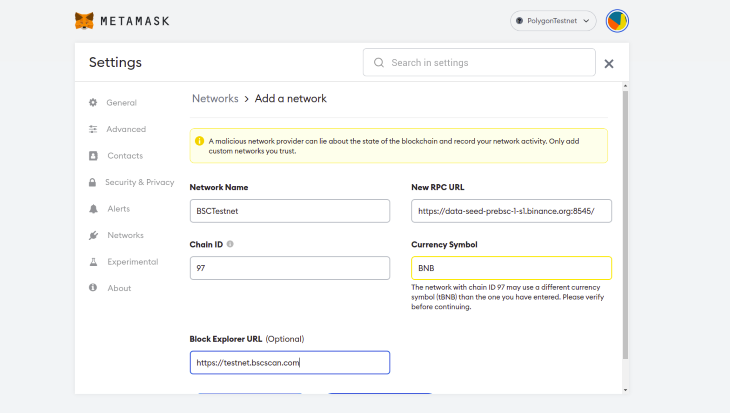
Then, click Save, and MetaMask will connect to BSC and will set the BNB token to zero:

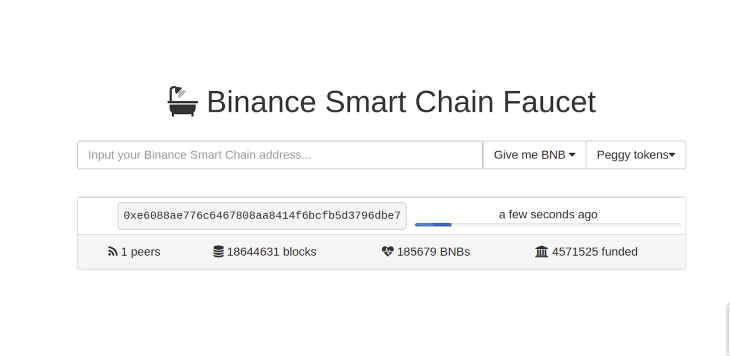
To get free BNB tokens, open your MetaMask wallet and copy your wallet address. Then, navigate to the Binance Smart Chain Faucet. In the address input, paste your MetaMask wallet address.
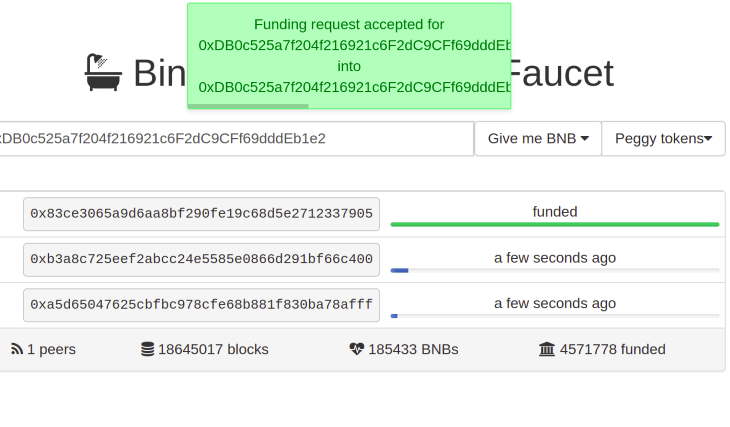
Now, click on Give me BNB, and 1 BNB will be transferred to your MetaMask wallet.
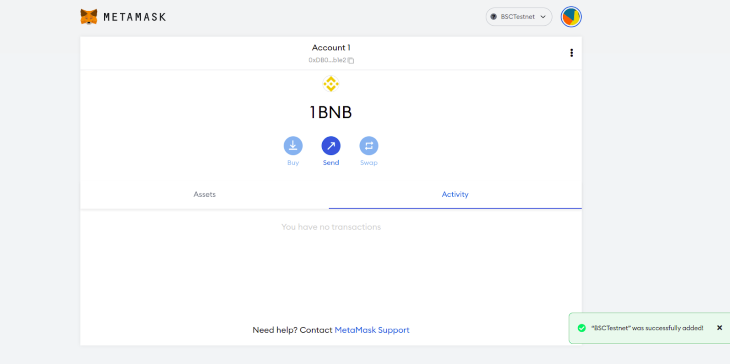
You can confirm that the token was sent by checking your MetaMask account balance:
Now, edit the truffle-config.js file in your code editor and add the following configuration for the Binance Smart Chain network:
 bscTestnet: {
     provider: () => new HDWalletProvider(privateKeys, `https://data-seed-prebsc-1-s1.binance.org:8545/`),
     network_id: 97,       // Any network (default: none)
   },
To deploy your contract to the Binance Smart Chain testnet, open your terminal and run this command:
truffle migrate --network bscTestnet --reset
Smart contract migration between chains
We discussed some factors that could influence the decision to migrate a smart contract from one blockchain to another. Now, let’s look at a couple of smart contract migration techniques.
Migration via parachains
The Polkadot network provides a familiar and secure environment for blockchains to easily interact with each other.
Parachains are layer-1 blockchains that interact in the Polkadot ecosystem. Parachains are independent of each other but run in parallel. They are connected by the network’s Relay Chain. This connection allows for cross-chain interoperability, or the ability to communicate and share data.
The Polkadot network leverages a Proof of Stake consensus mechanism through the use of validators and nominators. The collators (shown in the below illustration), retain information on the network’s transactions.
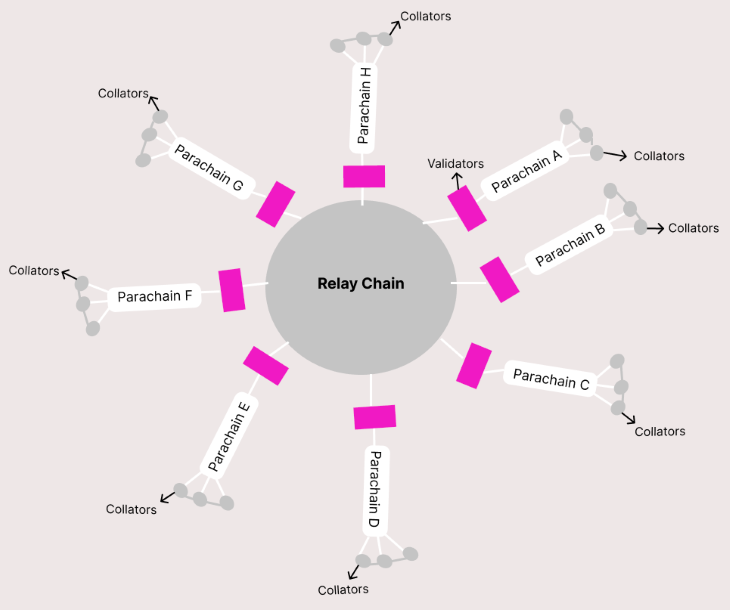
Parachains enable developers to migrate contracts within the Polkadot ecosystem using Polkadot’s Cross-Consensus Messaging format (XCM) instead of wrapping and unwrapping tokens (which we’ll discuss in the next section).
XCM is used to format messages sent between chains, smart contracts, or bridges. XCM enables a defined format for sending transactions from one wallet to another for an extended period.
XCM has protocols that act on messages with distinct functions: Vertical Message Passing (VMP) and Cross-Chain Message Passing (XCMP).
Additionally, XCM uses a Cross-Consensus Virtual Machine (XCVM), which contains several instructions running as a program and the message(s) to be transferred. The instructions in the XCVM consist of the message that is transferred and its destination.
In addition, bridges exist between Polkadot and other layer-1 blockchains, such as Ethereum and Binance Smart Chain, enabling interoperability.
Migration by wrapping and unwrapping tokens
Each blockchain has tradable tokens designed according to its native digital currencies. When smart contracts are migrated between different chains, there needs to be a way for the tokens designed for one blockchain to work on another.
This is sort of like traveling to a country that uses a different currency. However, instead of exchanging one type of token for another, blockchains typically utilize the concept of wrapping and unwrapping.
Wrapping entails pegging the value of a token to its original cryptocurrency. The wrapped token is basically a tradeable token that may be used on other blockchains. As an example, let’s say some Ethereum’s ERC-20 are wrapped. Their value will be pegged at their current value, but they are now considered wrapped Ether (WETH). WETH tokens may be used in MetaMask wallets, and others, to interact on various blockchains (BSC, IOTA, etc.)
One of the most significant benefits of wrapping a token is that the original asset is preserved but the wrapped token inherits the functionalities of the new blockchain. Some of these functionalities could include minimized transaction time and low gas fees.
Unwrapping tokens refers to the process of reversing the token to the original cryptocurrency. For example, WETH can be unwrapped to its original cryptocurrency of ETH.
Here’s a demo showing the wrapping and unwrapping of an Ethereum token using the OpenZeppelin ERC-20 standard:
// SPDX-License-Identifier: GPL-3.0
pragma solidity >=0.7.0 <0.9.0;
import https://github.com/OpenZeppelin/openzeppelin-contracts/blob/master/contracts/token/ERC20/ERC20.sol;
contract WETH is ERC20 {
    constuctor() ERC20("Wrapped Ether", "WETH") public {};

    // define a mint function to create new wrapped ether token
    function mint() external payable {
        _mint(msg.sender, msg.value);
    }
    // define a burn function to create an unwrapped token
    function burn(uint amount) external { //specify the amount that you want back
        payable(msg.sender).transfer(amount); // transfers
        _burn(msg.sender, amount); //sending back the ether to the user
    }
}
Let’s take a closer look at the individual lines of code in the above code block:
- Line 1: specifies the license used for the Solidity compiler
- Line 2: specifies the Solidity version
- Line 3: imports the ERC-20 token standard, as defined in OpenZeppelin
- Line 4: defines the contract to create the wrapped and unwrapped tokens
- Line 5: defines a
constructor``()function that sets the name of the Ether to “Wrapped Ether” and its symbol to “WETH” as soon as the contract is executed - Line 7: defines a
mint()function that accepts a value of Ether and creates a new wrapped Ether token; the external qualifier means that the function can be called from other contracts; the payable qualifier denotes that the function can accept and send Ether - Line 9: uses the
_mintfunction that is defined in the OpenZeppelin code; it accepts the address of the transaction’s caller asmsg.senderand the value of the sent Ether asmsg.value - Line 12: defines a
burn()function that accepts the amount of token a user wants and sends back an unwrapped token - Line 13: specifies the amount to be transferred by wrapping the address of the transaction’s caller,
msg.sender, with the payable qualifier to enable it to transfer Ether; uses thetransferfunction defined in OpenZeppelin to accept the amount to be transferred - Line 14: uses the
_burn()function defined in OpenZeppelin to send the caller of the transaction an unwrapped token (the original Ether)
Conclusion
In this article, we demonstrated how to set up a smart contract in Ganache and then migrate it to Ethereum’s Rinkeby testnet, Polygon’s Mumbai testnet, the Binance Smart Chain, and Polygon using MetaMask. We also discussed different strategies for migrating smart contracts between different chains: wrapping and unwrapping tokens, as well as parachains.
The post How to migrate smart contracts between different chains appeared first on LogRocket Blog.
from LogRocket Blog https://ift.tt/0MkqzbR
via Read more


