When it comes to sharing documents, there’s no better way than using a PDF. Originally developed as a way for documents to look the same no matter where they were opened, PDFs are used by pretty much every business in the world today.
Using PDFs to transmit user-readable data is a good choice for many reasons. For example, the document will appear the same regardless of what device opens the PDF. In addition, in terms of file size, PDFs are relatively small.
Another useful feature of PDFs is that everyone will always be able to open this file type. Any major OS, like Android or iOS, will provide this functionality out of the box.
In this tutorial, we will review:
- Setting up a Flutter app that produces PDFs
- Adding elements to your PDF in Flutter
- Creating the PDF preview page in Flutter
- How your finished product should look
Setting up a Flutter app that produces PDFs
Producing PDFs from our Flutter application is actually quite an enjoyable experience for three reasons.
First, there’s a mature and well-tested library available on pub.dev, suitably called pdf.
Second, the Flutter PDF library lays out PDF elements much like how Flutter lays out widgets within the UI. If you already know how rows and columns work, you can reuse this knowledge to create and edit your PDF in Flutter.
Third, a companion package called printing makes it easy to preview, share, and print PDFs from within your app.
As an example of how we can create PDFs within Flutter, we will walk through creating an app that lets us produce invoices for customers. This example app will also let us specify new line items and calculate the total amount of money that’s due.
Once we have our invoice created, we’ll be able to convert it to a PDF to send to our customer. Let’s see how we can make this happen from within our Flutter app!
Configuring our pubspec.yaml
First, we need to add two appropriate packages to our pubspec file:
- The
pdfpackage for PDF production - The
printingpackage to preview the PDFs that we produce
We’ll use these two packages to produce and then share the PDFs that we create.
Add pdf and printing to your pubspec.yaml, like so:
dependencies:
  flutter:
    sdk: flutter


  # The following adds the Cupertino Icons font to your application.
  # Use with the CupertinoIcons class for iOS style icons.
  cupertino_icons: ^1.0.2
  pdf: ## add this
  printing: ## also add this
Setting up our model for the invoices
Now, we need to create a data model that will allow us to create and store these invoices. An invoice should contain relevant customer information, display a list of line items being invoiced, and sum up the cost of these items.
To achieve these elements, let’s create our data model, like so:
class Invoice {
  final String customer;
  final String address;
  final List<LineItem> items;
  Invoice(this.customer, this.address, this.items);
  double totalCost() {
    return items.fold(0, (previousValue, element) => previousValue + element.cost);
  }
}

class LineItem {
  final String description;
  final double cost;

  LineItem(this.description, this.cost);
}
This is a pretty simple data class that holds the data for our invoice.
You may have noticed we also declared a totalCost function, which uses the .fold operator to work out the total cost of all the line items associated with this invoice. This convenience function will handle this calculation for us so we don’t have to manually add each value.
Working on our UI: The invoice list page
When our app starts up, it should show our list of invoices. We’ll sample some test data so our list displays some items when we first open it up.
To start, let’s go ahead and create a new folder called pages. Within that folder, create a Dart file called invoices.dart. We’ll also create a StatelessWidget, which will take care of showing this list of invoices initially.
Within this class, we’ll also declare some sample data for our invoices themselves. In reality, you’d likely query this data from an API or equivalent, but in our case, sample data is enough to show how to generate PDFs in a Flutter app.
For each invoice, our sample data should include:
- The customer’s name and address
- The name of the invoice
- An itemized list of services provided to the customer with their respective names and costs
final invoices = [
  Invoice(
      customer: 'David Thomas',
      address: '123 Fake St\r\nBermuda Triangle',
      items: [
        LineItem(
          'Technical Engagement',
          120,
        ),
        LineItem('Deployment Assistance', 200),
        LineItem('Develop Software Solution', 3020.45),
        LineItem('Produce Documentation', 840.50),
      ],
      name: 'Create and deploy software package'),
  Invoice(
    customer: 'Michael Ambiguous',
    address: '82 Unsure St\r\nBaggle Palace',
    items: [
      LineItem('Professional Advice', 100),
      LineItem('Lunch Bill', 43.55),
      LineItem('Remote Assistance', 50),
    ],
    name: 'Provide remote support after lunch',
  ),
  Invoice(
    customer: 'Marty McDanceFace',
    address: '55 Dancing Parade\r\nDance Place',
    items: [
      LineItem('Program the robots', 400.50),
      LineItem('Find tasteful dance moves for the robots', 80.55),
      LineItem('General quality assurance', 80),
    ],
    name: 'Create software to teach robots how to dance',
  )
];
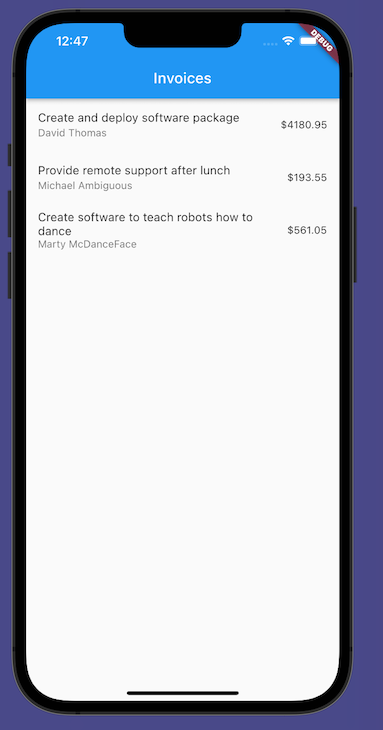
Within our InvoicePage class, we’ll also design a fairly simple UI to display all existing invoices in the list. Each item on this list should display a preview of the invoice’s details, including the invoice name, the customer’s name, and the total cost.
This is done by combining a ListView widget with any ListTile items, like so:
@override
Widget build(BuildContext context) {
  return Scaffold(
    appBar: AppBar(
      title: Text('Invoices'),
    ),
    body: ListView(
      children: [
        ...invoices.map(
          (e) => ListTile(
            title: Text(e.name),
            subtitle: Text(e.customer),
            trailing: Text('\$${e.totalCost().toStringAsFixed(2)}'),
            onTap: () {
              Navigator.of(context).push(
                MaterialPageRoute(
                  builder: (builder) => DetailPage(invoice: e),
                ),
              );
            },
          ),
        )
      ],
    ),
  );
}
By using the map operator on the invoices list, we convert the list into ListTile items, which can be displayed in our ListView. We also set the total cost of the invoice to be displayed using the trailing method:
trailing: Text('\$${e.totalCost().toStringAsFixed(2)}'),
This string interpolation method can be slightly confusing. Let’s break it down to understand it better.
\$ renders as a dollar sign within our string. We have to prefix it with a \ because $ is normally used to indicate a string interpolation. In this case, we’d like to actually use the raw dollar sign symbol itself, so we have to escape its normal usage by using a \.
The unprefixed usage of $ begins our string interpolation for our totalCost function for the invoice. Finally, we truncate to two decimal places when we convert the number to a string.
The widget produces a list of all invoices, like so:
When we click on each invoice, our app navigates to a DetailPage. Let’s see how we can create a sample detail page now.
Working on our UI: The invoice detail page
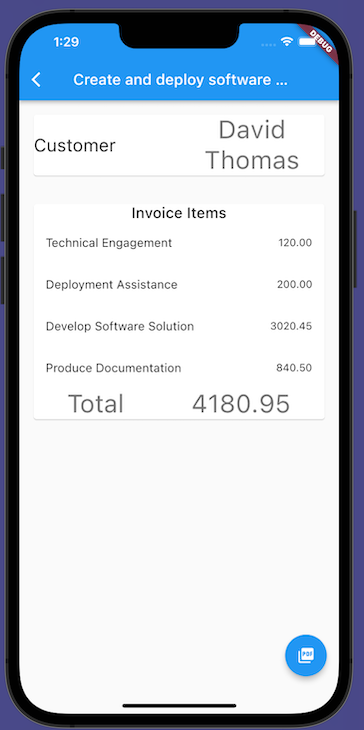
The DetailPage accepts an invoice as a parameter and transforms the invoice object into something that can be checked by the user in your Flutter app before producing a PDF.
Again, we use a Scaffold with a ListView to show details about the invoice. We also use a FloatingActionButton, which is a unique widget in Flutter, to let the user produce and share a PDF containing the invoice information.
These are great UI elements to know in Flutter, but let’s stay focused on the code we will use to produce this DetailPage, which should look like this:
class DetailPage extends StatelessWidget {
  final Invoice invoice;
  const DetailPage({
    Key? key,
    required this.invoice,
  }) : super(key: key);

  @override
  Widget build(BuildContext context) {
    return Scaffold(
      floatingActionButton: FloatingActionButton(
        onPressed: () {
          Navigator.of(context).push(
            MaterialPageRoute(
              builder: (context) => PdfPreviewPage(invoice: invoice),
            ),
          );
          // rootBundle.
        },
        child: Icon(Icons.picture_as_pdf),
      ),
      appBar: AppBar(
        title: Text(invoice.name),
      ),
      body: ListView(
        children: [
          Padding(
            padding: const EdgeInsets.all(15.0),
            child: Card(
              child: Row(
                mainAxisAlignment: MainAxisAlignment.spaceBetween,
                children: [
                  Expanded(
                    child: Text(
                      'Customer',
                      style: Theme.of(context).textTheme.headline5,
                    ),
                  ),
                  Expanded(
                    child: Text(
                      invoice.customer,
                      style: Theme.of(context).textTheme.headline4,
                      textAlign: TextAlign.center,
                    ),
                  ),
                ],
              ),
            ),
          ),
          Padding(
            padding: const EdgeInsets.all(15.0),
            child: Card(
              child: Column(
                children: [
                  Text(
                    'Invoice Items',
                    style: Theme.of(context).textTheme.headline6,
                  ),
                  ...invoice.items.map(
                    (e) => ListTile(
                      title: Text(e.description),
                      trailing: Text(
                        e.cost.toStringAsFixed(2),
                      ),
                    ),
                  ),
                  DefaultTextStyle.merge(
                    style: Theme.of(context).textTheme.headline4,
                    child: Row(
                      mainAxisAlignment: MainAxisAlignment.spaceAround,
                      children: [
                        Text("Total"),
                        Text(
                          invoice.totalCost().toStringAsFixed(2),
                        ),
                      ],
                    ),
                  )
                ],
              ),
            ),
          ),
        ],
      ),
    );
  }
}
This code should result in an invoice preview page that looks like this:
Adding elements to your PDF in Flutter
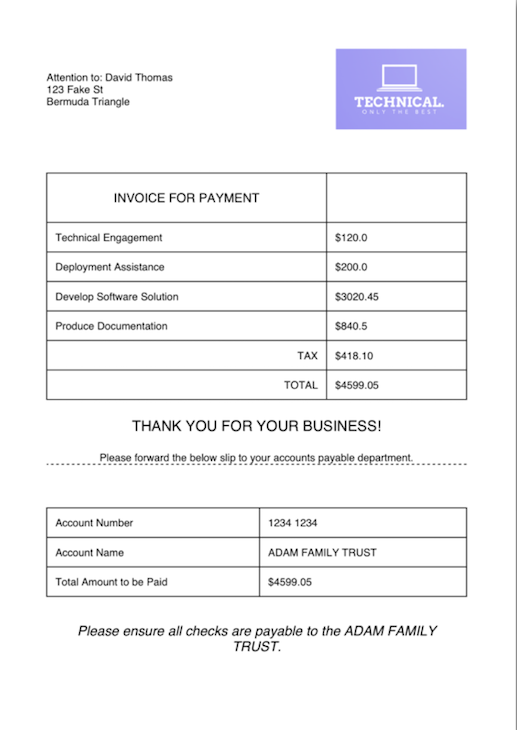
To create a PDF for our invoice app, we first need some idea of what the finished product should look like. Most invoices contain:
- Information about the customer
- The company logo
- A list of services that were provided
- A final price (including GST)
- Payment details, or what information the company needs to process the invoice
To produce this, our PDF requires quite a complicated visual layout. We need our PDF invoice to have pictures, text, tables, and a dotted line to indicate that everything below that line is for the accounts payable department.
Normally, we’d have to use offsets and really try to articulate in pixels exactly where we would like everything. However, one of the main advantages of the pdf package is that it uses the same layout rules as Flutter to help you construct your PDFs.
If you already know how to create Columns and Rows, load pictures, and set paddings, you should also already know how to lay out your PDF. This immediately lowers the barriers to creating and producing your own PDFs from within Flutter applications.
To create our PDF, we’ll create a new Dart file called pdfexport. Our class will expose a single function that returns the binary data for the PDF we are creating.
Let’s declare the makePdf function in our Dart file and make it accept a parameter of type Invoice. Next, we’ll construct the shell of our PDF document by declaring our Document object, adding a page, and adding a Column to the page.
Future<Uint8List> makePdf(Invoice invoice) async {
  final pdf = Document();
  pdf.addPage(
    Page(
    build: (context) {
      return Column(
        children: []
      }
    );
}
We’ll add individual pieces of information to this page as we need to. The PDF will need three main areas: the customer details, the breakdown of the costs, and the slip to be given to accounts payable.
When we’re finished, our PDF will look like this:
Creating the address and logo row
Our first row within the invoice is our customer information and logo row. Because it includes the logo of our company, we’ll add a reference to our pubspec.yaml for our company logo. In my case, I’ve just generated a simple logo, but you can use any PNG image that you would like.
assets:
   - assets/technical_logo.png
Back within our makePdf function, we now need to load this PNG from the assets to be displayed in our PDF. Fortunately, that’s as simple as telling Flutter that we’d like to load this particular image and store it in memory.
final imageLogo = MemoryImage((await rootBundle.load('assets/technical_logo.png')).buffer.asUint8List());
With this, we can now create our first row containing our customer details and the company logo.
Row(
  mainAxisAlignment: MainAxisAlignment.spaceBetween,
  children: [
    Column(
      children: [
        Text("Attention to: ${invoice.customer}"),
        Text(invoice.address),
      ],
      crossAxisAlignment: CrossAxisAlignment.start,
    ),
    SizedBox(
      height: 150,
      width: 150,
      child: Image(imageLogo),
    )
  ],
),
We align both children of this row to be as far away from each other as the available space allows by using MainAxisAlignment.spaceBetween. Then, we specify the customer details within our first Column and align the children of this Column to the left.
Next, we load our Image within a SizedBox, constraining the size and height to 150 so the company logo doesn’t take up too much room. The result of this row looks like this:

Hopefully, we can begin to see how using commonly available constructs like Row and Column makes it very easy for us to lay out a PDF in a way that we like.
Next, let’s create a table to encompass the invoice details.
Creating the invoice table
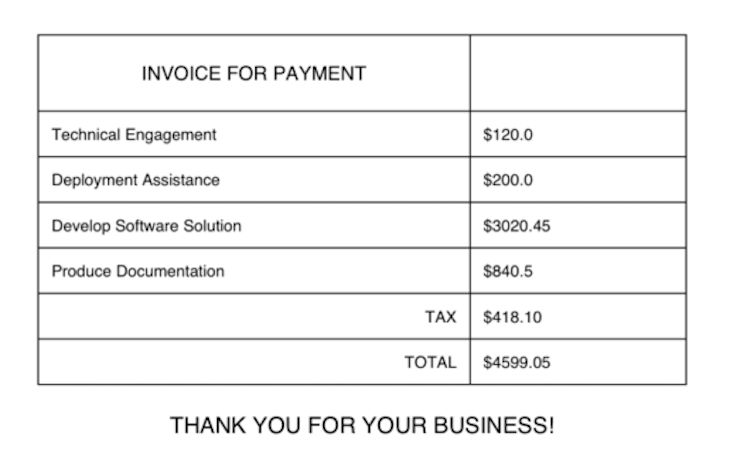
Our invoice table should present an itemized list of the goods or services being invoiced. It should also show the individual cost for each item.
Displaying items in a table with appropriate spacing makes it easy to see what cost is associated with a particular line item on an invoice. To help with this, let’s add a simple helper class called PaddedText to specify what kind of padding we would like around our Text object.
Widget PaddedText(
  final String text, {
  final TextAlign align = TextAlign.left,
}) =>
    Padding(
      padding: EdgeInsets.all(10),
      child: Text(
        text,
        textAlign: align,
      ),
    );
We can use a Table within the pdf package to achieve this functionality. This will let us set up a table with the appropriate black borders for display within our PDF.
Because this particular row’s layout is a little more involved, you can refer to the inline comments below to understand how this is achieved.
Table(
  border: TableBorder.all(color: PdfColors.black),
  children: [
   // The first row just contains a phrase 'INVOICE FOR PAYMENT'
    TableRow(
      children: [
        Padding(
          child: Text(
            'INVOICE FOR PAYMENT',
            style: Theme.of(context).header4,
            textAlign: TextAlign.center,
          ),
          padding: EdgeInsets.all(20),
        ),
      ],
    ),
    // The remaining rows contain each item from the invoice, and uses the
    // map operator (the ...) to include these items in the list
    ...invoice.items.map(
    // Each new line item for the invoice should be rendered on a new TableRow
      (e) => TableRow(
        children: [
          // We can use an Expanded widget, and use the flex parameter to specify
          // how wide this particular widget should be. With a flex parameter of
          // 2, the description widget will be 66% of the available width.
          Expanded(
            child: PaddedText(e.description),
            flex: 2,
          ),
          // Again, with a flex parameter of 1, the cost widget will be 33% of the
          // available width.
          Expanded(
            child: PaddedText("\$${e.cost}"),
            flex: 1,
          )
        ],
      ),
    ),
    // After the itemized breakdown of costs, show the tax amount for this invoice
    // In this case, it's just 10% of the invoice amount
    TableRow(
      children: [
        PaddedText('TAX', align: TextAlign.right),
        PaddedText('\$${(invoice.totalCost() * 0.1).toStringAsFixed(2)}'),
      ],
    ),
    // Show the total
    TableRow(
      children: [
        PaddedText('TOTAL', align: TextAlign.right),
        PaddedText("\$${invoice.totalCost()}"),
      ],
    )
  ],
),
Padding(
  child: Text(
    "THANK YOU FOR YOUR CUSTOM!",
    style: Theme.of(context).header2,
  ),
  padding: EdgeInsets.all(20),
),
The result of this code shows an itemized list of the goods or services associated with the invoice and their respective costs, like so:
Creating the payment slip
Finally, we need to include a dotted line to indicate that the second part of the invoice can be forwarded to the accounts payable department. This PDF element should also display payment details so the customer can pay the invoice correctly.
The code below demonstrates how to specify a dotted line in our PDF and use another table to show account information. It ends with instructions on what information to include on the check when paying this invoice.
Again, as this is a longer piece of code, refer to the inline comments to understand what is happening.
Text("Please forward the below slip to your accounts payable department."),
// Create a divider that is 1 unit high and make the appearance of
// the line dashed
Divider(
  height: 1,
  borderStyle: BorderStyle.dashed,
),
// Space out the invoice appropriately
Container(height: 50),
// Create another table with the payment details
Table(
  border: TableBorder.all(color: PdfColors.black),
  children: [
    TableRow(
      children: [
        PaddedText('Account Number'),
        PaddedText(
          '1234 1234',
        )
      ],
    ),
    TableRow(
      children: [
        PaddedText(
          'Account Name',
        ),
        PaddedText(
          'ADAM FAMILY TRUST',
        )
      ],
    ),
    TableRow(
      children: [
        PaddedText(
          'Total Amount to be Paid',
        ),
        PaddedText('\$${(invoice.totalCost() * 1.1).toStringAsFixed(2)}')
      ],
    )
  ],
),
// Add a final instruction about how cheques should be created
// Centre align and italicise this text to draw the reader's attention
// to it.
Padding(
  padding: EdgeInsets.all(30),
  child: Text(
    'Please ensure all cheques are payable to the ADAM FAMILY TRUST.',
    style: Theme.of(context).header3.copyWith(
          fontStyle: FontStyle.italic,
        ),
    textAlign: TextAlign.center,
  ),
)
Finally, at the end of our makePdf function, we should also return the generated PDF to the caller.
return pdf.save();
The last thing we need to do is create a basic page to display the PdfPreview widget. Let’s do that now.
Creating the PDF preview page in Flutter
Creating a PDF previewer is simple when using the printing package. We just need to include a Scaffold (so the user can still navigate within our app) and then specify the body of the Scaffold as PdfPreview.
Within the build function of our PdfPreview, we call the function that creates our PDF. This build function will accept a byte array of the PDF, but it will also accept a Future that yields a byte array for the PDF.
These options make it easy to call the function that creates our PDF, even if the code that produces the PDF is asynchronous.
class PdfPreviewPage extends StatelessWidget {
  final Invoice invoice;
  const PdfPreviewPage({Key? key, required this.invoice}) : super(key: key);

  @override
  Widget build(BuildContext context) {
    return Scaffold(
      appBar: AppBar(
        title: Text('PDF Preview'),
      ),
      body: PdfPreview(
        build: (context) => makePdf(invoice),
      ),
    );
  }
}
How your finished product should look
The result of the above is an app that produces PDFs based on the data we have specified. We can also see that in our PdfPreviewPage, the PdfPreview widget includes options to let us download and share our PDF by emailing or printing it.
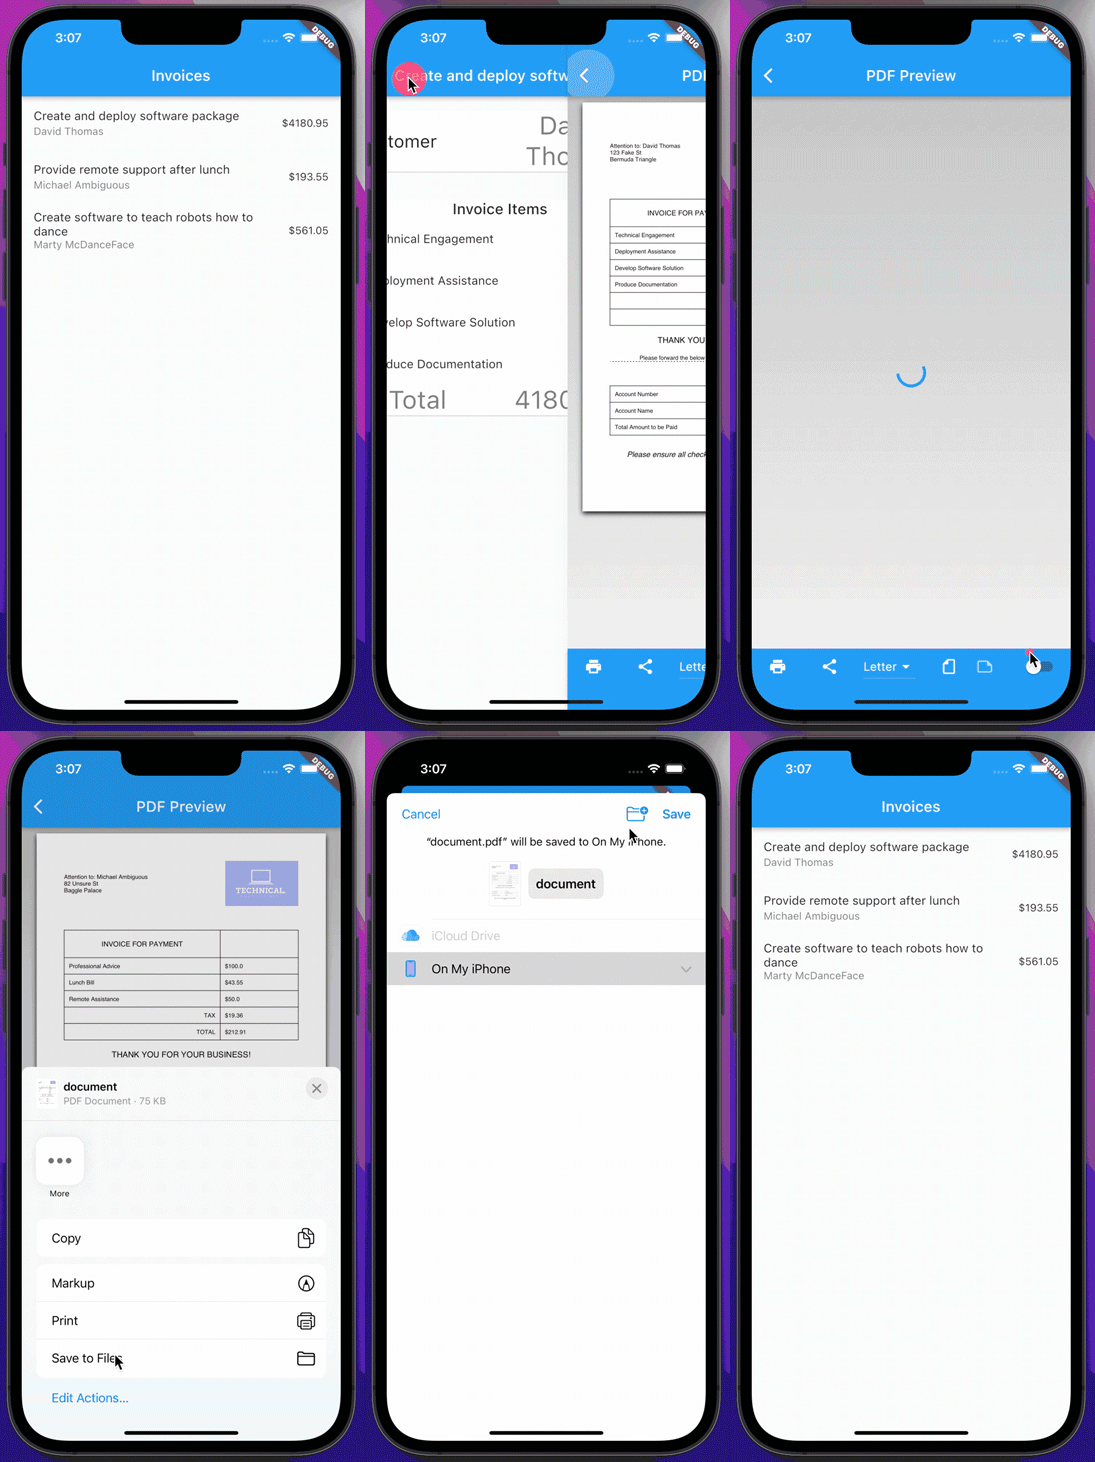
The example in this article uses static data, but it would be fairly straightforward to load this data from an API and then display it in a PDF. As always, you can grab a copy of the code from GitHub.
Hopefully, this article has shown you how you can create and share PDFs from within Flutter. If you already have an understanding of the Flutter layout system, you can reuse this knowledge to create beautiful and informative PDFs within your app.
The post How to create PDFs in Flutter appeared first on LogRocket Blog.
from LogRocket Blog https://ift.tt/g6rEZWs
via Read more


