In this tutorial, you’ll learn about how to build an augmented reality app in Flutter with a plugin that supports both Android and iOS devices.
An AR app adds data or visuals to your experience on your camera. Popular examples include Instagram filters, Snapchat filters, various map apps, and more.
AR allows users to place virtual objects in the real world and then interact with them. AR apps will be (I think already are) especially popular in gaming — AR headset devices like Microsoft Hololens and Google Glass providing real gaming experiences — shopping, and industrial sectors.
Maybe one of us can build an app with which I can easily check the type of hat or cap that suits me? I honestly need it before buying and returning something unsatisfied. See, AR can help us here by providing the ease to try things out in our homes.
In this tutorial, you’ll learn the following:
N.B., this tutorial assumes you have some prior knowledge of Flutter. If you are new to Flutter, please go through the official documentation to learn about it.
What is ARCore?
ARCore is Google’s platform that enables your phone to sense its environment, understand the world, and interact with information. Some of the provided APIs are accessible across Android and iOS devices, enabling a shared AR experience.
Here are the ARCore supported devices. The gist is that most iPhones running iOS 11.0 or later and most Android phones running Android 7.0 or newer support ARCore.
Google’s ARCore documentation puts it this way: “Fundamentally, ARCore is doing two things: tracking the position of the mobile device as it moves and building its understanding of the real world.”
If you’re looking for some examples of ARCore in action, check out these apps that use ARCore. Some of them apply ARCore for viewing the dimensions of eCommerce products in your own space like the IKEA catalog, while others are entertainment-based, like the Star Wars AR game.
What is ARKit?
ARKit is Apple’s set of tools that enables you to build augmented-reality apps for iOS. Anyone using Apple’s A9 or later (iPhone 6s/7/SE/8/X, iPad 2017/Pro) on iOS 11.0 or later can use ARKit. For some features, iOS 12 or newer is required.
If you are looking for some ARKit action, check out Swift Playground. It is an app built for iPad and Mac to make learning Swift fun.
ARKit shares many similarities with ARCore, with the key difference being that its Apple-exclusive support plays nicely with SceneKit and SpriteKit. You can learn more about ARKit from here.
Getting started
Download the starter app containing all the prebuilt UI from here.
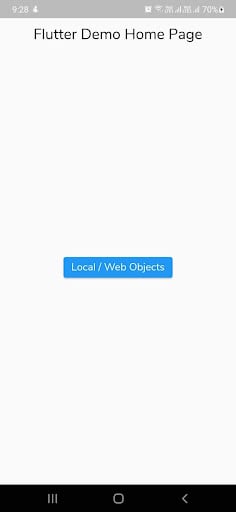
Open it in your editor, then build and run the app:


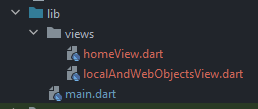
The file structure of the starter project looks like this:

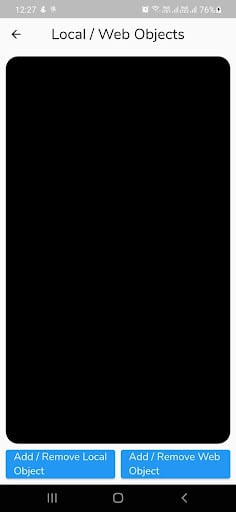
main.dart– The entry point for the whole apphomeView.dart– This contains the Home view, having a button navigating to the AR view screenlocalAndWebObjectsView.dart– Screen displaying the usage of fetching 3D objects from local and web
What is the ar_flutter_plugin?
The ar_flutter_plugin is a Flutter plugin for AR that supports ARCore on Android and ARKit on iOS devices. You get both at once! Obviously this is an advantage because you don’t have to choose development for one over the other.
Additionally, you can learn about the plugin architecture from here.
Setting up the plugin
Add Flutter dependency
Add the ar_flutter_plugin in your pubspec.yaml file:
...
dependencies:
 flutter:
   sdk: flutter
 ar_flutter_plugin: ^0.6.2
...
Android Configuration
Update the minSdkVersion in your app-level build.gradle file:
android {
    defaultConfig {
        ...
        minSdkVersion 24
    }
}
Or add the minSdkVersion in your local.properties file under the Android directory:
flutter.minSdkVersion=24
And update the app-level build.gradle file:
android {
    defaultConfig {
        ...
        minSdkVersion localProperties.getProperty('flutter.minSdkVersion')
    }
}
iOS Configuration
If you face problems with permissions in iOS, add the below Podfile in your iOS directory:
post_install do |installer|
    installer.pods_project.targets.each do |target|
      flutter_additional_ios_build_settings(target)
      target.build_configurations.each do |config|
        # Additional configuration options could already be set here

        # BEGINNING OF WHAT YOU SHOULD ADD
        config.build_settings['GCC_PREPROCESSOR_DEFINITIONS'] ||= [
          '$(inherited)',

          ## dart: PermissionGroup.camera
          'PERMISSION_CAMERA=1',

          ## dart: PermissionGroup.photos
          'PERMISSION_PHOTOS=1',

          ## dart: [PermissionGroup.location, PermissionGroup.locationAlways, PermissionGroup.locationWhenInUse]
          'PERMISSION_LOCATION=1',

          ## dart: PermissionGroup.sensors
          'PERMISSION_SENSORS=1',

          ## dart: PermissionGroup.bluetooth
          'PERMISSION_BLUETOOTH=1',´

          # add additional permission groups if required
        ]
        # END OF WHAT YOU SHOULD ADD
      end
    end
  end
Usage
You need to understand the following APIs before proceeding:
ARView: Creates a platform-dependent camera view usingPlatformARViewARSessionManager: Manages theARView’s session configuration, parameters, and eventsARObjectManager: Manages all node related actions of anARViewARAnchorManager: Manages anchor functionalities like download handler and upload handlerARLocationManager: Provides ability to get and update current location of the deviceARNode: A model class for node objects
You can learn more APIs from here.
Using local or remote objects
One of the most basic uses is to place 3D objects from assets or the web to the screen.
For this, you need to provide your .gltf or .glb files in your pubspec file as below:

What is a glTF or GLB file?
glTF is Graphics Language Transmission Format for 3D models and scenes. It has two extensions:
.gltf: stores a scene description in JSON/ASCII format, including node hierarchy, cameras and materials.glb: stores model description in the binary format
You can learn more about glTF from here.
Now, go to your localAndWebObjectsView.dart file and create the following variables:
late ARSessionManager arSessionManager;
late ARObjectManager arObjectManager;

//String localObjectReference;
ARNode? localObjectNode;

//String webObjectReference;
ARNode? webObjectNode;
Next, update the empty Container with ARView widget as below:
ARView(
 onARViewCreated: onARViewCreated,
)
Here, you are using the onARViewCreated method for the onARViewCreated property of the widget:
void onARViewCreated(
   ARSessionManager arSessionManager,
   ARObjectManager arObjectManager,
   ARAnchorManager arAnchorManager,
   ARLocationManager arLocationManager) {
 // 1
 this.arSessionManager = arSessionManager;
 this.arObjectManager = arObjectManager;
 // 2
 this.arSessionManager.onInitialize(
       showFeaturePoints: false,
       showPlanes: true,
       customPlaneTexturePath: "triangle.png",
       showWorldOrigin: true,
       handleTaps: false,
     );
 // 3
 this.arObjectManager.onInitialize();
}
In the above code, you are doing the following:
- Defining both
arSessionManagerandarObjectManagervariables - Using
ARSessionManager’s onInitialize method to set session properties
These settings are used to visualize feature points, planes, world coordinate systems, and more. Here, you are using thecustomPlaneTexturePathto refer to assets defined in yourpubspec - Also, using the
ARObjectManager’sonInitializeto set up the manager
Build and run your app. You’ll get to see the ARView like this:
Creating and removing a local object
Now, you need to use the “Add / Remove Local Object” button to create or remove the localObjectNode using the onLocalObjectButtonPressed callback as below:
Future<void> onLocalObjectButtonPressed() async {
 // 1
 if (localObjectNode != null) {
   arObjectManager.removeNode(localObjectNode!);
   localObjectNode = null;
 } else {
   // 2
   var newNode = ARNode(
       type: NodeType.localGLTF2,
       uri: "assets/Chicken_01/Chicken_01.gltf",
       scale: Vector3(0.2, 0.2, 0.2),
       position: Vector3(0.0, 0.0, 0.0),
       rotation: Vector4(1.0, 0.0, 0.0, 0.0));
   // 3
   bool? didAddLocalNode = await arObjectManager.addNode(newNode);
   localObjectNode = (didAddLocalNode!) ? newNode : null;
 }
}
Here you have done the following:
- Checked whether the
localObjectNodeis null or not, if not null then remove the local object - Created a new
ARNodeobject by providing the local glTF file path and type along with the coordinate system containing the position, rotations, and other transformations of the node - Added the
newNodeto the top level (likeStack) of theARViewand assigned it to thelocalObjectNode
NodeType is an enum that is used to set up the type of nodes the plugin supports including localGLTF2, webGLB, fileSystemAppFolderGLB, and fileSystemAppFolderGLTF2.
Build and run your app, then click on the Add / Remove Local Object button:
Add a remote object
Next, you need to use the Add / Remove Web Object button with the onWebObjectAtButtonPressed callback as below:
Future<void> onWebObjectAtButtonPressed() async {
 if (webObjectNode != null) {
   arObjectManager.removeNode(webObjectNode!);
   webObjectNode = null;
 } else {
   var newNode = ARNode(
       type: NodeType.webGLB,
       uri:
           "https://github.com/KhronosGroup/glTF-Sample-Models/raw/master/2.0/Duck/glTF-Binary/Duck.glb",
       scale: Vector3(0.2, 0.2, 0.2));
   bool? didAddWebNode = await arObjectManager.addNode(newNode);
   webObjectNode = (didAddWebNode!) ? newNode : null;
 }
}
The above method is similar to the onLocalObjectButtonPressed method with a difference in the URL. Here, the URL is targeting a GLB file from the web.
Build and run your app, then click on the Add / Remove Web Object button:
Working with anchors
If you want to track the position or pose changes of your 3D object, you need to define an anchor for that. An anchor describes or detects feature points and planes in the real world and simply lets you place 3D objects in the world.
N.B., a feature point is a distinctive location in images. For example, corners, junctions and more.
This ensures that the object stays where it is placed, even if the environment changes over time and impacts your app’s user experience.
In the end, dispose of the managers using the dispose method to let go of the resources.
Conclusion
You can find the final project here.
In this tutorial, you learned about building an augmented reality app using Flutter. For the next step, you can try rotating or transforming objects using gestures, or fetching 3D objects using Google Cloud Anchor API or an external database.
We hope you enjoyed this tutorial. Feel free to reach out to us if you have any queries. Thank you!
The post Build an augmented reality app in Flutter appeared first on LogRocket Blog.
from LogRocket Blog https://ift.tt/nCa86i7
via Read more


