JSON web token (JWT) authentication is used to verify ownership of JSON data. JWT is not encryption, rather it determines if the data can be trusted because its ownership is verified. JWT is an open standard (RFC 7519) that enables information to be securely transmitted between two parties as a JSON object. JWTs are digitally signed using either a public/private key pair or a secret.
In this article, we’ll demonstrate the process of implementing JWT authentication in Laravel 9. We’ll also review some of Laravel’s features and compare JWT to Laravel’s inbuilt authentication packages (Sanctum and Passport).
Our demo will follow these steps:
- Install Laravel 9
- Create a database
- Connect to the database
- Make the migrations
- Install and set up JWT
- Configure AuthGuard
- Modify the
Usermodel - Create the AuthController
- Create the todo model, controller, and migration
- Modify the todo migration
- Modify the todo model
- Modify the todo controller
- Add the API routes
- Test the application
- Register the API
- Log in to the API
- Test the endpoints
- Create a todo
Before jumping into the demo, let’s cover a brief overview of Laravel.
What is Laravel?
Laravel is a free, open-source PHP web framework built by Taylor Otwell based on the Symfony framework. It is designed for building online applications that follow the model-view-controller (MVC) architectural paradigm.
PHP frameworks are often favored by newer developers; PHP is well documented and has an active resource community. Laravel is the most popular PHP framework and is often the framework of choice for both new and seasoned developers. It is used to build standard business applications as well as enterprise-level apps.
According to the company’s website, the following large corporations use Laravel: Disney, Warner Brothers, Twitch, The New York Times, Pfizer, and BBC, among others.
Why use Laravel?
Based on GitHub stars, Laravel is reportedly the most popular backend framework as of 2021. Here are some reasons why that developers like building with Laravel:
- MVC support: Laravel supports development efforts using the MVC architectural paradigm, making it simple to use and ideal for both small and large applications. MVC streamlines coding structure, making it easier to maintain
- Robust ORM: Laravel’s ORM, Eloquent, makes working with the database a breeze. Eloquent simplifies the process of creating relationships between interconnected database objects
- Inbuilt templating engine: Laravel’s inbuilt templating engine (Blade) combines one or more templates with a data model to generate views, converting the templates into cached PHP code for increased efficiency. Blade also has a set of control structures, such as conditionals and loops, that are internally translated to their PHP counterparts
- Powerful CLI: Laravel’s CLI, Artisan, is used to publish package assets, manage database migrations, and seed and produce boilerplate code for new controllers, models, and migrations. Artisan’s capabilities can be expanded through the addition of custom commands
- Multiple file systems: Laravel includes support for cloud storage systems such as Amazon S3 and Rackspace Cloud Storage, as well as local storage. The API for each system is the same, making it straightforward to switch between different storage alternatives. In a distributed environment, these three methods can be combined into one application to serve files from many locations
- Inbuilt authentication systems: Laravel provides scaffolding for secure, session-based authentication and also provides painless authentication through Sanctum for APIs and mobile applications
- Excellent documentation: Laravel’s official documentation is extensive yet concise, making it useful for both beginners and experts
- Extensive testing: Laravel provides inbuilt testing support with PHPUnit. Laravel also provides attractive testing APIs, database seeding, and painless browser testing
- Choice of Monolith or API: Laravel may be used with Livewire, to create robust, full-stack apps in PHP. Similarly, Laravel may be combined with Inertia to create a monolithic JavaScript-driven frontend. Alternatively, Laravel can be used as a powerful backend API for a mobile app, Next.js project, or another frontend of your choosing
- Large, engaged community: Laravel boasts an extensive community of developers who are passionate about the framework and accommodating to developers of all skill levels
- Scalability: The Laravel ecosystem offers a slew of tools and resources (e.g., Forge, Octane, Vapor) for achieving enterprise-level scalability without the associated complexity
- Beautiful code: Laravel places a strong emphasis on aesthetics; every feature is carefully studied with an eye toward providing an exceptional user experience. Its simple, elegant syntax places enhanced functionality at the developer’s fingertips
Laravel JWT authentication vs. Sanctum or Passport
Choosing the type of authentication to use in your Laravel application is based on the type of application you’re building. Sanctum offers both session-based and token-based authentication and is good for single-page application (SPA) authentications. Passport uses JWT authentication as standard but also implements full OAuth 2.0 authorization.
OAuth allows authorization from third-party applications like Google, GitHub, and Facebook, but not every app requires this feature. If you want to implement token-based authentication that follows the JWT standard, but without the OAuth extras, then Laravel JWT authentication is your best bet.
JWT authentication demo
Now, let’s take a look at how to implement JWT authentication in Laravel 9. The full code for this project is available on GitHub. Feel free to fork and follow along.
Prerequisites
This tutorial is designed as a hands-on demonstration. Before getting started, ensure you’ve met the following requirements:
Install Laravel 9
We’ll get started by creating a new Laravel 9 project.
Install and navigate to the new Laravel project using these commands:
composer create-project laravel/laravel laravel-jwt
cd laravel-jwt
Create a database
Create a MySQL database named laravel-jwt. For this demo, I’m using XAMMP, but any database management system will suffice.
Connect to the database
To allow our Laravel application to interact with the newly formed database, we must first establish a connection. To do so, we’ll need to add our database credentials to the .env file:
DB_CONNECTION=mysql
DB_HOST=127.0.0.1
DB_PORT=3306
DB_DATABASE=laravel-jwt
DB_USERNAME=root
DB_PASSWORD=
Make the migrations
The User table migration comes preinstalled in Laravel, so all we have to do is run it to create the table in our database. To create the User table, use the following command:
php artisan migrate
Install and set up JWT
Now that our database is set up, we’ll install and set up the Laravel JWT authentication package. We’ll be using php-open-source-saver/jwt-auth a fork of tymondesign/jwt-auth, because tymondesign/jwt-auth appears to have been abandoned and isn’t compatible with Laravel 9.
Install the newest version of the package using this command:
composer require php-open-source-saver/jwt-auth
Next, we need to make the package configurations public. Copy the JWT configuration file from the vendor to confi/jwt.php with this command:
php artisan vendor:publish --provider="PHPOpenSourceSaver\JWTAuth\Providers\LaravelServiceProvider"
Now, we need to generate a secret key to handle the token encryption. To do so, run this command:
php artisan jwt:secret
This will update our .env file with something like this:
JWT_SECRET=xxxxxxxx
This is the key that will be used to sign our tokens.
Configure AuthGuard
Inside the config/auth.php file, we’ll need to make a few changes to configure Laravel to use the JWT AuthGuard to power the application authentication.
First, we’ll make the following changes to the file:
'defaults' => [
        'guard' => 'api',
        'passwords' => 'users',
    ],


    'guards' => [
        'web' => [
            'driver' => 'session',
            'provider' => 'users',
        ],

        'api' => [
                'driver' => 'jwt',
                'provider' => 'users',
        ],

    ],
In this code, we’re telling the API guard to use the JWT driver and to make the API guard the default.
Now, we can use Laravel’s inbuilt authentication mechanism, with jwt-auth handling the heavy lifting!
Modify the User model
In order to implement the PHPOpenSourceSaverJWTAuthContractsJWTSubject contract on our User model, we’ll use two methods: getJWTCustomClaims() and getJWTIdentifier().
Replace the code in the app/Models/User.php file, with the following:
namespace App\Models;
use Illuminate\Contracts\Auth\MustVerifyEmail;
use Illuminate\Database\Eloquent\Factories\HasFactory;
use Illuminate\Foundation\Auth\User as Authenticatable;
use Illuminate\Notifications\Notifiable;
use PHPOpenSourceSaver\JWTAuth\Contracts\JWTSubject;

class User extends Authenticatable implements JWTSubject
{
    use HasFactory, Notifiable;

    /**
     * The attributes that are mass assignable.
     *
     * @var array<int, string>
     */
    protected $fillable = [
        'name',
        'email',
        'password',
    ];

    /**
     * The attributes that should be hidden for serialization.
     *
     * @var array<int, string>
     */
    protected $hidden = [
        'password',
        'remember_token',
    ];

    /**
     * The attributes that should be cast.
     *
     * @var array<string, string>
     */
    protected $casts = [
        'email_verified_at' => 'datetime',
    ];

     /**
     * Get the identifier that will be stored in the subject claim of the JWT.
     *
     * @return mixed
     */
    public function getJWTIdentifier()
    {
        return $this->getKey();
    }

    /**
     * Return a key value array, containing any custom claims to be added to the JWT.
     *
     * @return array
     */
    public function getJWTCustomClaims()
    {
        return [];
    }

}
That’s it for our model setup!
Create the AuthController
Now, we’ll create a controller to handle the core logic of the authentication process.
First, we’ll run this command to generate the controller:
php artisan make:controller AuthController
Then, we’ll replace the controller’s content with the following code snippet:
namespace App\Http\Controllers;
use Illuminate\Http\Request;
use Illuminate\Support\Facades\Auth;
use Illuminate\Support\Facades\Hash;
use App\Models\User;

class AuthController extends Controller
{

    public function __construct()
    {
        $this->middleware('auth:api', ['except' => ['login','register']]);
    }

    public function login(Request $request)
    {
        $request->validate([
            'email' => 'required|string|email',
            'password' => 'required|string',
        ]);
        $credentials = $request->only('email', 'password');

        $token = Auth::attempt($credentials);
        if (!$token) {
            return response()->json([
                'status' => 'error',
                'message' => 'Unauthorized',
            ], 401);
        }

        $user = Auth::user();
        return response()->json([
                'status' => 'success',
                'user' => $user,
                'authorisation' => [
                    'token' => $token,
                    'type' => 'bearer',
                ]
            ]);

    }

    public function register(Request $request){
        $request->validate([
            'name' => 'required|string|max:255',
            'email' => 'required|string|email|max:255|unique:users',
            'password' => 'required|string|min:6',
        ]);

        $user = User::create([
            'name' => $request->name,
            'email' => $request->email,
            'password' => Hash::make($request->password),
        ]);

        $token = Auth::login($user);
        return response()->json([
            'status' => 'success',
            'message' => 'User created successfully',
            'user' => $user,
            'authorisation' => [
                'token' => $token,
                'type' => 'bearer',
            ]
        ]);
    }

    public function logout()
    {
        Auth::logout();
        return response()->json([
            'status' => 'success',
            'message' => 'Successfully logged out',
        ]);
    }

    public function refresh()
    {
        return response()->json([
            'status' => 'success',
            'user' => Auth::user(),
            'authorisation' => [
                'token' => Auth::refresh(),
                'type' => 'bearer',
            ]
        ]);
    }

}
Here’s a quick explanation of the public functions in the AuthController:
constructor: We establish this function in ourcontrollerclass so that we can use theauth:apimiddleware within it to block unauthenticated access to certain methods within the controllerlogin: This method authenticates a user with their email and password. When a user is successfully authenticated, theAuthfacadeattempt()method returns the JWT token. The generated token is retrieved and returned as JSON with the user objectregister: This method creates the user record and logs in the user with token generationslogout: This method invalidates the userAuthtokenrefresh: This method invalidates the userAuthtoken and generates a new token
We’re done with setting up our JWT authentication!
If that’s all you’re here for, you can skip to the test application section.
But, for the love of Laravel, let’s add a simple todo feature to our project!
Create the todo model, controller, and migration
We’ll create the Todo model, controller, and migration all at once with the following command:
php artisan make:model Todo -mc
Modify the todo migration
Next, go to the database/migrations/….create_todos_table.php file, and replace the content with the following code:
use Illuminate\Database\Migrations\Migration;
use Illuminate\Database\Schema\Blueprint;
use Illuminate\Support\Facades\Schema;

return new class extends Migration
{
    /**
     * Run the migrations.
     *
     * @return void
     */
    public function up()
    {
        Schema::create('todos', function (Blueprint $table) {
            $table->id();
            $table->string('title');
            $table->string('description');
            $table->timestamps();
        });
    }

    /**
     * Reverse the migrations.
     *
     * @return void
     */
    public function down()
    {
        Schema::dropIfExists('todos');
    }
};
Modify the todo model
Now, navigate to the app/Models/Todo.php file, and replace the content with the following code.
namespace App\Models;

use Illuminate\Database\Eloquent\Factories\HasFactory;
use Illuminate\Database\Eloquent\Model;

class Todo extends Model
{
    use HasFactory;
    protected $fillable = ['title', 'description'];

}
Modify the todo controller
Next, go to the app/Http/Controllers/TodoController.php file, and replace the content with the following code:
namespace App\Http\Controllers;

use Illuminate\Http\Request;
use App\Models\Todo;

class TodoController extends Controller
{
    public function __construct()
    {
        $this->middleware('auth:api');
    }

    public function index()
    {
        $todos = Todo::all();
        return response()->json([
            'status' => 'success',
            'todos' => $todos,
        ]);
    }

    public function store(Request $request)
    {
        $request->validate([
            'title' => 'required|string|max:255',
            'description' => 'required|string|max:255',
        ]);

        $todo = Todo::create([
            'title' => $request->title,
            'description' => $request->description,
        ]);

        return response()->json([
            'status' => 'success',
            'message' => 'Todo created successfully',
            'todo' => $todo,
        ]);
    }

    public function show($id)
    {
        $todo = Todo::find($id);
        return response()->json([
            'status' => 'success',
            'todo' => $todo,
        ]);
    }

    public function update(Request $request, $id)
    {
        $request->validate([
            'title' => 'required|string|max:255',
            'description' => 'required|string|max:255',
        ]);

        $todo = Todo::find($id);
        $todo->title = $request->title;
        $todo->description = $request->description;
        $todo->save();

        return response()->json([
            'status' => 'success',
            'message' => 'Todo updated successfully',
            'todo' => $todo,
        ]);
    }

    public function destroy($id)
    {
        $todo = Todo::find($id);
        $todo->delete();

        return response()->json([
            'status' => 'success',
            'message' => 'Todo deleted successfully',
            'todo' => $todo,
        ]);
    }
}
Add the API routes
To access our newly created methods we need to define our API routes.
Navigate to the routes/api.php file, and replace the content with the following code:
use Illuminate\Http\Request;
use Illuminate\Support\Facades\Route;
use App\Http\Controllers\AuthController;
use App\Http\Controllers\TodoController;

Route::controller(AuthController::class)->group(function () {
    Route::post('login', 'login');
    Route::post('register', 'register');
    Route::post('logout', 'logout');
    Route::post('refresh', 'refresh');

});

Route::controller(TodoController::class)->group(function () {
    Route::get('todos', 'index');
    Route::post('todo', 'store');
    Route::get('todo/{id}', 'show');
    Route::put('todo/{id}', 'update');
    Route::delete('todo/{id}', 'destroy');
});
In the above code, we’re using Laravel 9 syntax. You’ll need to declare your route the normal way if you’re using lower versions of Laravel.
Test the application
Before we move to Postman and start testing the API endpoints, we need to start our Laravel application.
Run the below command to start the Laravel application:
php artisan serve
Register the API
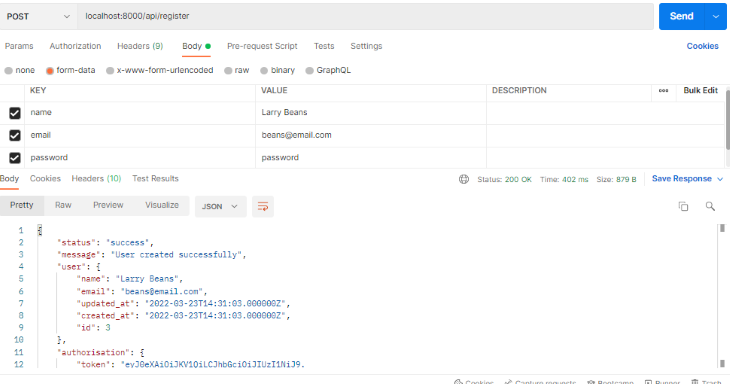
To start the Postman application, add the registration API in the address bar, select the POST HTTP request method from the dropdown, choose the form-data option on the Body tab and select the name, email, and password input fields.
Then, click Send to see the server response.

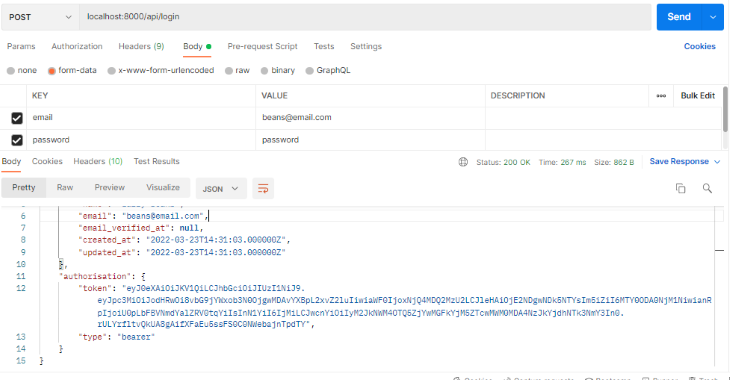
Log in to the API
In the previous step, we created an account in the Postman application. To log in to the API, add the email and password to the input field, and click Send to see the response.

Test the endpoints
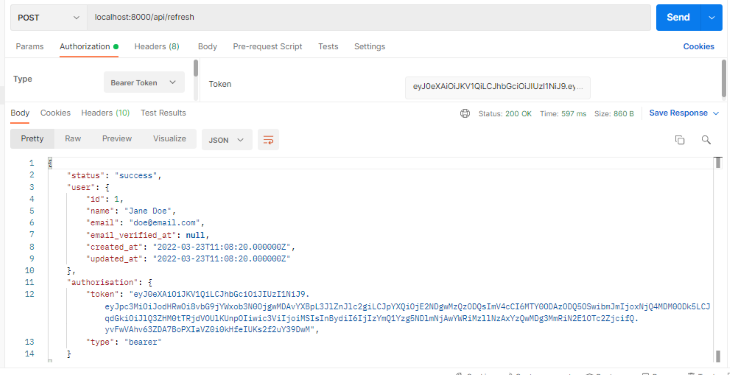
The refresh, logout, and todo endpoints are all protected by the auth:api middleware and therefore require that we send a valid token with the authorization header.
To copy the token from our login response, select Bearer Token from the dropdown on the Authorization tab, paste the copied token into the Token field, and click Send to refresh the API.

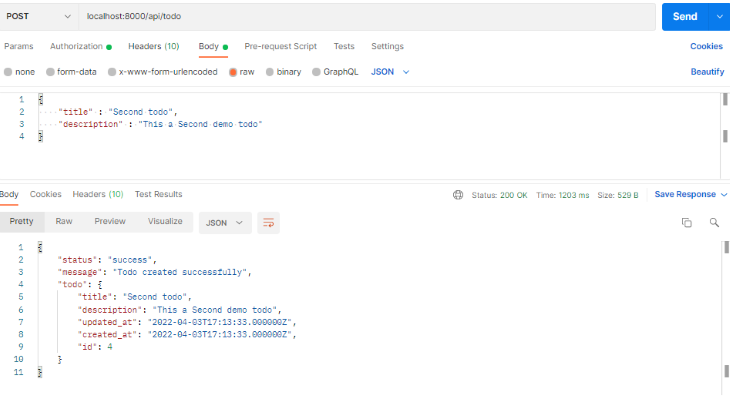
Create a todo
Now that you have an authorization token, add the token in the request header, and create a todo as shown below:

Now, test other endpoints to ensure they are working correctly.
Conclusion
In this article, we discussed the benefits of building with Laravel and compared JWT authentication to Sanctum and Passport — Laravel’s inbuilt authentication packages. We also built a demo project to show how to create a REST API authentication with JWT in Laravel 9. We created a sample todo application, connected the app to a database, and performed CRUD operations.
To learn more about Laravel, check out the official documentation.
The post Implementing JWT authentication in Laravel 9 appeared first on LogRocket Blog.
from LogRocket Blog https://ift.tt/o24zkWM
via Read more


