State management is one of the cornerstones in web application development; any nontrivial app needs some kind of a state management. For years, Vuex was the de-facto state management tool for Vue apps.
However, the new Vue docs officially recommend another tool: Pinia. But before you say, “Oh, no, not another tool to learn,” you should know that Pinia is de-facto Vuex 5 as Evan You wrote in this tweet:
In this tutorial, we’ll examine the most important features of Pinia by learning how to create, use, and inspect data stores, including:
- Pinia vs. Vuex
- Using a basic Pinia store
- Getting started with Pinia
- Defining app stores in Pinia
- Creating views and components in Pinia
- Configuring the router
- Inspecting the Pinia stores in Vue Devtools
The project we’ll build along the way will demonstrate the basics of building apps with complex state. But first, let’s see how Pinia differs from Vuex.
Pinia vs. Vuex
Although Pinia can be considered Vuex 5, there are some important differences between the two you should bear in mind:
- In Pinia, mutations are removed because of their extreme verbosity
- Pinia fully supports TypeScript and offers autocompletion for JavaScript code
- Pinia does not need nested modules, but if one store uses another store, this can be considered implicit nesting
- In Pinia, there is no need to namespace app stores like for Vuex modules
- Pinia uses Composition API, but can be used with Options API too
- Pinia offers server-side rendering (SSR) support
- Vue 2 or Vue 3 can use Pinia (both with devtools support)
Using a basic Pinia store
The Pinia API is maximally simplified. Here is an example of a basic Pinia store:
import { defineStore } from 'pinia'

export const useCounterStore = defineStore({
  id: 'counter',
  state: () => ({
    counter: 0
  }),
  getters: {
    doubleCount: (state) => state.counter * 2
  },
  actions: {
    increment() {
      this.counter++
    }
  }
})
To define a store, we use the defineStore function. Here, the word define is used instead of create because a store is not created until it’s actually used in a component/page.
Starting the store name with use is a convention across composables. Each store must provide a unique id to mount the store to devtools.
Pinia also uses the state, getters, and actions concepts, which are equivalent to data, computed, and methods in components:
- The
stateis defined as a function returning the initial state - The
gettersare functions that receive thestateas a first argument - The
actionsare functions that can be asynchronous
That’s pretty much everything you need to know to define a Pinia store. We’ll see how stores are actually used in components/pages throughout the rest of the tutorial.
After seeing how simple the Pinia API is, let’s start building our project.
Getting started with Pinia
To demonstrate Pinia’s features, we’ll build a basic blog engine with the following features:
- A list of all posts
- A single post page with the post’s comments
- A list of all post authors
- A single author page with the author’s written posts
First, let’s create a new Vue project by running the following command:
npm init vue@latest
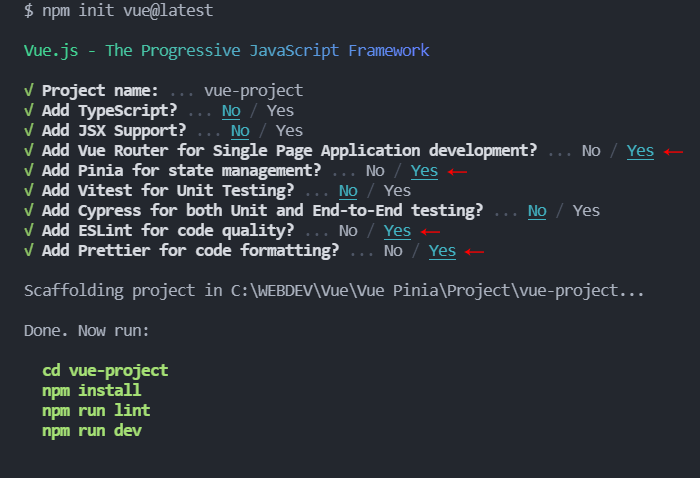
This will install and execute create-vue, the official Vue project scaffolding tool, to setup a new project with Vue and Vite. In the process, you must choose the tools necessary for the project:
Select all the tools marked with a red arrow: Router, Pinia, ESLint, and Prettier. When the setup completes, navigate to the project and install the dependencies:
cd vue-project
npm install
And now you can open the project in the browser by running the following:
npm run dev
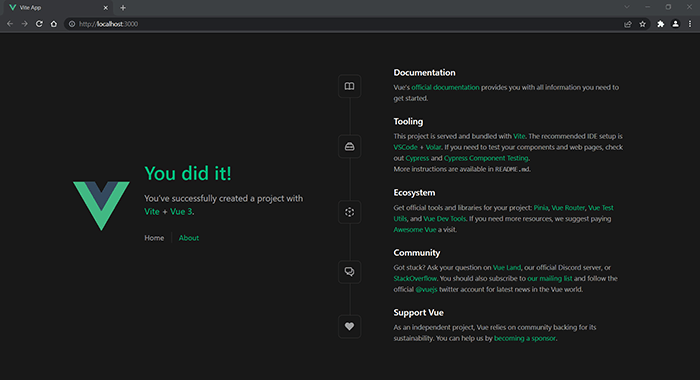
Your new Vue app will be served at http://localhost:3000. Here is what you should see:
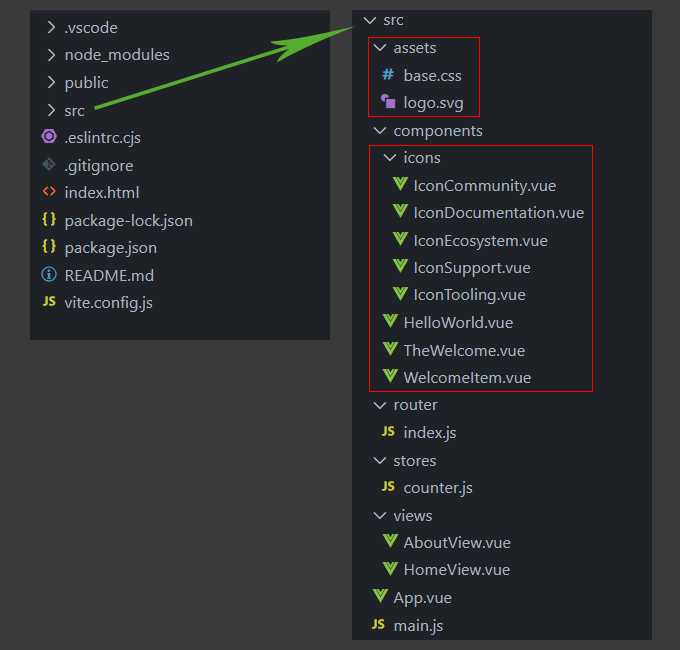
Now, to adapt it to our needs, we’ll clean up the default project structure. Here is how it looks now and what we’ll delete.
To do this, first, close your terminal and delete all files/folders within the red borders.
Now, we’re ready to start writing the project’s code.
Let’s first open main.js file to see how the Pinia root store is created and included in the project:
import { createApp } from 'vue'
import { createPinia } from 'pinia' // Import

import App from './App.vue'
import router from './router'

const app = createApp(App)

app.use(createPinia()) // Create the root store
app.use(router)

app.mount('#app')
As you can see, createPinia function is imported, creates the Pinia store, and passes it to the app.
Now, open the App.vue file and replace its content with the following:
<script setup>
import { RouterLink, RouterView } from 'vue-router'
</script>

<template>
   <header class="navbar">
    <div>
      <nav>
        <RouterLink to="/">Posts</RouterLink> -
        <RouterLink to="/authors">Authors</RouterLink>
      </nav>
    </div>
  </header>

  <RouterView />
</template>

<style>
  .navbar {
    background-color: lightgreen;
    padding: 1.2rem;
  }
</style>
Here, we changed the link labels by replacing Home with Posts and About with Authors.
We also changed the Authors link from /about to /authors and removed all default styles and added our own for the navbar class, which we add to distinguish the navigation from the posts.
Ok, now we’re ready to dive deeper into Pinia and define the necessary app stores.
Defining app stores in Pinia
For our small app, we’ll use the JSONPlaceholder service as a data source and these three resources: users, posts, and comments.
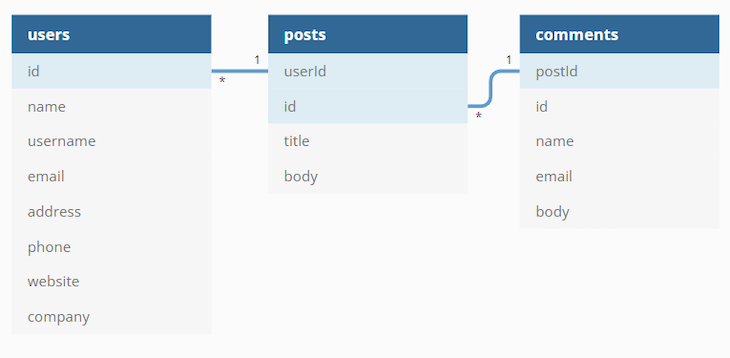
To understand how we’ll create the app stores better, let’s see how these resources relate to each other. Take a look at the following diagram:
As you can see, users are connected to posts by its id, and posts are connected to comments in the same way. So, to get a post’s author, we can use userId, and to get the comments for a post, we can use postId.
With this knowledge, we can start mapping the data to our stores.
Defining the posts store
The first store we’ll define is for blog posts. In the stores directory, rename counter.js to post.js and replace its content with the following:
import { defineStore } from 'pinia'

export const usePostStore = defineStore({
  id: 'post',
  state: () => ({
    posts: [],
    post: null,
    loading: false,
    error: null
  }),
  getters: {
    getPostsPerAuthor: (state) => {
      return (authorId) => state.posts.filter((post) => post.userId === authorId)
    }
  },
  actions: {
    async fetchPosts() {
      this.posts = []
      this.loading = true
      try {
        this.posts = await fetch('https://jsonplaceholder.typicode.com/posts')
        .then((response) => response.json())
      } catch (error) {
        this.error = error
      } finally {
        this.loading = false
      }
    },
    async fetchPost(id) {
      this.post = null
      this.loading = true
      try {
        this.post = await fetch(`https://jsonplaceholder.typicode.com/posts/${id}`)
        .then((response) => response.json())
      } catch (error) {
        this.error = error
      } finally {
        this.loading = false
      }
    }
  }
})
Let’s break this into small chunks and explain what’s going on. First, we define a usePostStore with an id of post.
Second, we define our state with four properties:
postsfor holding the fetched postspostfor holding the current postloadingfor holding the loading stateerrorfor holding the error, if such exists
Third, we create a getter to get how many posts an author has written. By default, a getter takes the state as an argument and uses it to get access to posts array. Getters can’t take custom arguments, but we can return a function that can receive such.
So, in our getter function, we filter posts to find all posts with a particular user ID. We’ll provide that ID when we use it in a component later.
However, note that when we return a function with an argument from a getter, the getter is not cached anymore.
Finally, let’s create two asynchronous actions to fetch all posts and a single post.
In fetchPosts() action, we first reset the posts and set loading to true. Then, we fetch the posts by using FetchAPI and the posts’ resource from JSONPlaceholder. If there is an error, we assign the error to the error property. And finally, we set loading back to false.
The fetchPost(id) action is almost identical, but this time we use the post property and provide an id to get a single post; make sure you use backticks instead of single quotes when fetching the post.
Here, we also reset the post property because if we don’t do it, the current post will display with the data from the previous post and the newly fetched post will be assigned to the post.
We have the posts, now it’s time to get some comments.
Defining the comments store
In the stores directory, create a comment.js file with the following content:
import { defineStore } from 'pinia'
import { usePostStore } from './post'

export const useCommentStore = defineStore({
  id: 'comment',
  state: () => ({
    comments: []
  }),
  getters: {
    getPostComments: (state) => {
      const postSore = usePostStore()
      return state.comments.filter((post) => post.postId === postSore.post.id)
    }
  },
  actions: {
    async fetchComments() {
      this.comments = await fetch('https://jsonplaceholder.typicode.com/comments')
      .then((response) => response.json())
    }
  }
})
Here, we create a comments array property in the state to hold the fetched comments. We fetch them with the help of fetchComments() action.
The interesting part here is the getPostComments getter. To get the post’s comments, we need a current post’s ID. Since we have it already in the post store, can we get it from there?
Yes, fortunately, Pinia allows us to use one store in another and vice versa. So, to get the post’s ID, we import the usePostStore and use it inside the getPostComments getter.
Ok, now we have the comments; the last thing is to get the authors.
Defining the authors store
In the stores directory, create an author.js file with the following content:
import { defineStore } from 'pinia'
import { usePostStore } from './post'

export const useAuthorStore = defineStore({
  id: 'author',
  state: () => ({
    authors: []
  }),
  getters: {
    getPostAuthor: (state) => {
      const postStore = usePostStore()
      return state.authors.find((author) => author.id === postStore.post.userId)
    }
  },
  actions: {
    async fetchAuthors() {
      this.authors = await fetch('https://jsonplaceholder.typicode.com/users')
      .then((response) => response.json())
    }
  }
})
This is pretty identical to commentStore. We again import usePostStore and use it to provide the needed author’s ID in the getPostAuthor getter.
And that’s it. You see how easy it is to create stores with Pinia, a simple and elegant solution.
Now, let’s see how to use the stores in practice.
Creating views and components in Pinia
In this section, we’ll create the necessary views and components to apply the Pinia stores we just created. Let’s start with the list of all posts.
Note that I use Pinia with the Composition API and <script setup> syntax. If you want to use the Options API instead, check this guide.
Creating the posts view
In the views directory, rename HomeView.vue to PostsView.vue and replace its content with the following:
<script setup>
  import { RouterLink } from 'vue-router'
  import { storeToRefs } from 'pinia'
  import { usePostStore } from '../stores/post'

  const { posts, loading, error } = storeToRefs(usePostStore())
  const { fetchPosts } = usePostStore()

  fetchPosts()
</script>

<template>
  <main>
    <p v-if="loading">Loading posts...</p>
    <p v-if="error"></p>
    <p v-if="posts" v-for="post in posts" :key="post.id">
      <RouterLink :to="`/post/${post.id}`"></RouterLink>
      <p></p>
    </p>
  </main>
</template>
Note that if you get a notification that you’ve renamed the file, just ignore it.
Here, we import and extract all necessary data from post store.
We can’t use destructuring for state properties and getters because they will lose their reactivity. To solve this, Pinia provides the storeToRefs utility, which creates a ref for each property. The actions can be extracted directly without issues.
We call fetchPosts() to fetch the posts. When using Composition API and call a function inside the setup() function, it’s equivalent to using the created() Hook. So, we’ll have the posts before the component mounts.
We also have a series of v-if directives in the template. First, we show the loading message if loading is true. Then, we show the error message if an error occurred.
Finally, we iterate through posts and display a title and a body for each one. We use the RouterLink component to add a link to the title so when users click it, they will navigate to the single post view, which we’ll create a bit later.
Now, let’s modify the router.js file. Open it and replace its content with the following:
import { createRouter, createWebHistory } from 'vue-router'
import PostsView from '../views/PostsView.vue'

const router = createRouter({
  history: createWebHistory(),
  routes: [
    {
      path: '/',
      name: 'posts',
      component: PostsView
    },
    {
      path: '/about',
      name: 'about',
      // route level code-splitting
      // this generates a separate chunk (About.[hash].js) for this route
      // which is lazy-loaded when the route is visited.
      component: () => import('../views/AboutView.vue')
    }
  ]
})

export default router
Here, we import the PostsView.vue and use it as a component in the first route. We also change the name from home to posts.
Testing the posts view
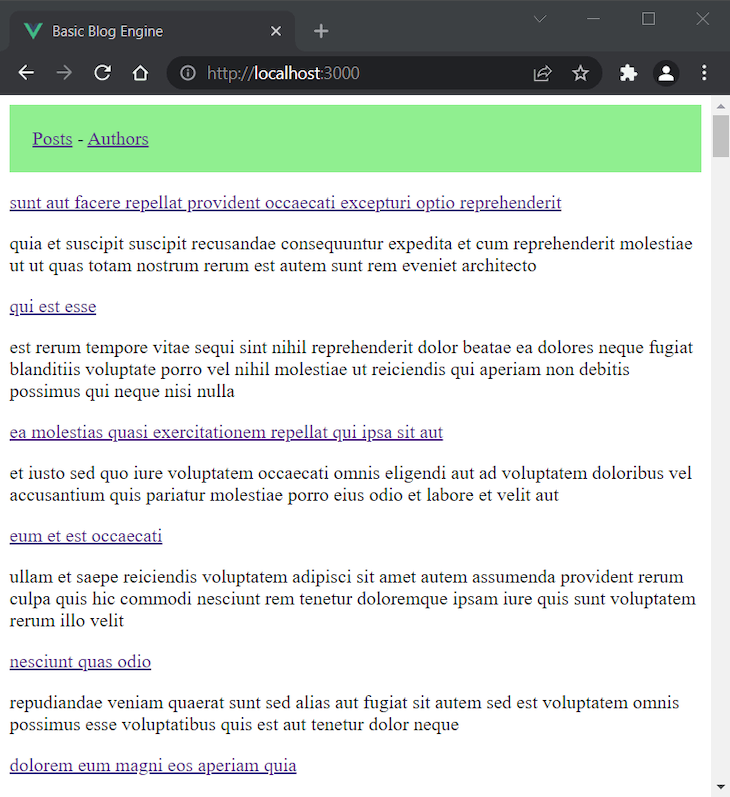
Ok, it’s time to test what we achieved so far. Run the app (npm run dev) and see the result in your browser:
You will probably get some Vue warnings in the console starting with “No match found…” This is because we haven’t created the necessary components yet and you can safely ignore them.
You may also need to reload the page if posts do not display.
Let’s continue by creating the single post view. Close the terminal to avoid any unnecessary error messages.
Creating a single post view
In the views directory, create a PostView.vue file with the following content:
<script setup>
  import { useRoute } from 'vue-router'
  import { storeToRefs } from 'pinia'
  import { useAuthorStore } from '../stores/author'
  import { usePostStore } from '../stores/post'
  import Post from '../components/Post.vue'

  const route = useRoute()
  const { getPostAuthor } = storeToRefs(useAuthorStore())
  const { fetchAuthors} = useAuthorStore()
  const { post, loading, error } = storeToRefs(usePostStore())
  const { fetchPost } = usePostStore()

  fetchAuthors()
  fetchPost(route.params.id)
</script>

<template>
  <div>
    <p v-if="loading">Loading post...</p>
    <p v-if="error"></p>
    <p v-if="post">
      <post :post="post" :author="getPostAuthor"></post>
    </p>
  </div>
</template>
In the setup, we extract getPostAuthor and fetchAuthors from the author store and the necessary data from post store. We also call fetchAuthors() to get the existing authors.
Next, we call the fetchPost(route.params.id) action with the ID provided with the help of the route object. This updates the getPostAuthor and we can use it effectively in the template.
To provide the actual post, we use a post component which takes two props: post and author. Let’s create the component now.
Creating the post component
In components directory, create a Post.vue file with the following content:
<script setup>
  import { RouterLink } from 'vue-router'
  import { storeToRefs } from 'pinia'
  import { useCommentStore } from '../stores/comment'
  import Comment from '../components/Comment.vue'

  defineProps(['post', 'author'])

  const { getPostComments } = storeToRefs(useCommentStore())
  const { fetchComments } = useCommentStore()

  fetchComments()
</script>

<template>
  <div>
    <div>
      <h2></h2>
      <p v-if="author">Written by: <RouterLink :to="`/author/${author.username}`"></RouterLink>
        | <span>Comments: </span>
      </p>
      <p></p>
    </div>
    <hr>
    <h3>Comments:</h3>
    <comment :comments="getPostComments"></comment>
  </div>
</template>
Here, we define the needed props by using the defineProps function and extract the necessary data from the comment store. Then, we fetch the comments so the getPostComments can be updated properly.
In the template, we first display the post title, then, in a byline, we add an author name with a link to the author’s page and the number of comments in the post. We then add the post body and the comments section below.
To display comments, we’ll use separate component and pass the post comments to the comments prop.
Creating a comment component
In the components directory, create a Comment.vue file with the following content:
<script setup>
  defineProps(['comments'])
</script>

<template>
  <div>
    <div v-for="comment in comments" :key="comment.id">
      <h3></h3>
      <p></p>
    </div>
  </div>
</template>
This is pretty simple. We define the comments prop and use it to iterate through the post’s comments.
Before we test the app again add the following to the router.js:
import PostView from '../views/PostView.vue'
// ...
routes: [
// ...
{ path: '/post/:id', name: 'post', component: PostView },
]
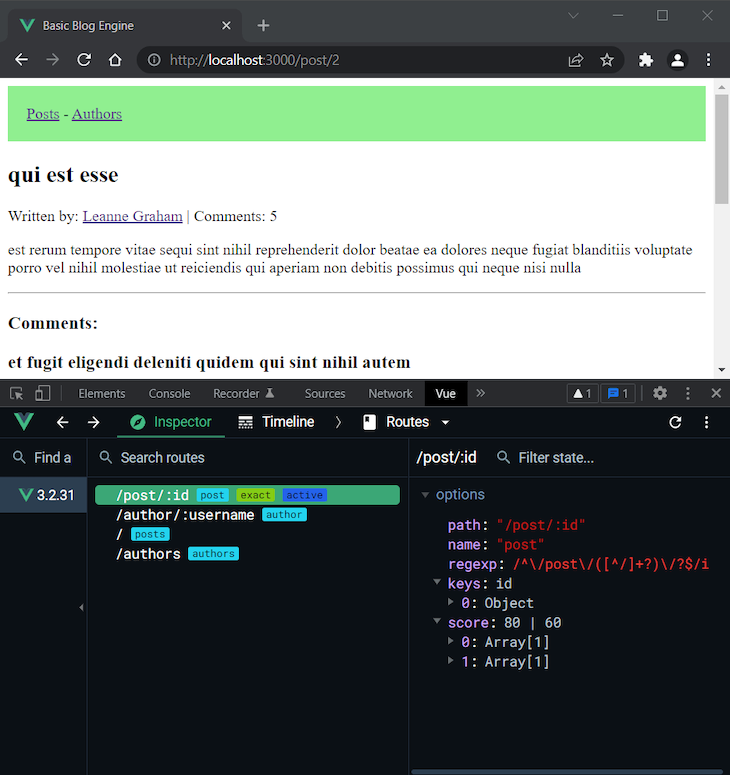
Run the app again. You should see a similar view when you navigate to a single post: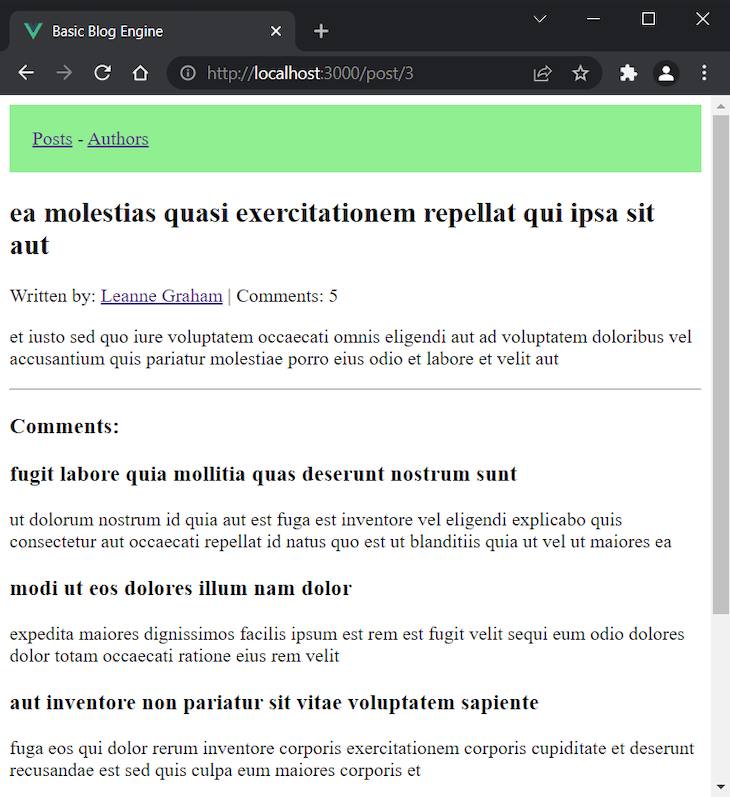
Now it’s time to display the authors. Close the terminal again.
Creating the authors view
In the views directory, rename AboutView.vue file to AuthorsView.vue and replace the content with the following:
<script setup>
  import { RouterLink } from 'vue-router'
  import { storeToRefs } from 'pinia'
  import { useAuthorStore } from '../stores/author'

  const { authors } = storeToRefs(useAuthorStore())
  const { fetchAuthors } = useAuthorStore()

  fetchAuthors()
</script>

<template>
  <div>
    <p v-if="authors" v-for="author in authors" :key="author.id">
      <RouterLink :to="`/author/${author.username}`"></RouterLink>
    </p>
  </div>
</template>
Here, we use the author store to fetch and get the authors to iterate through them in the template. For each author, we provide a link to their page.
Open router.js file again and change the route for the About page to the following:
    {
      path: '/authors',
      name: 'authors',
      // route level code-splitting
      // this generates a separate chunk (About.[hash].js) for this route
      // which is lazy-loaded when the route is visited.
      component: () => import('../views/AuthorsView.vue')
    },
Here, we change the path and name to /authors and authors, respectively, and import the AuthorsView.vue with lazy loading.
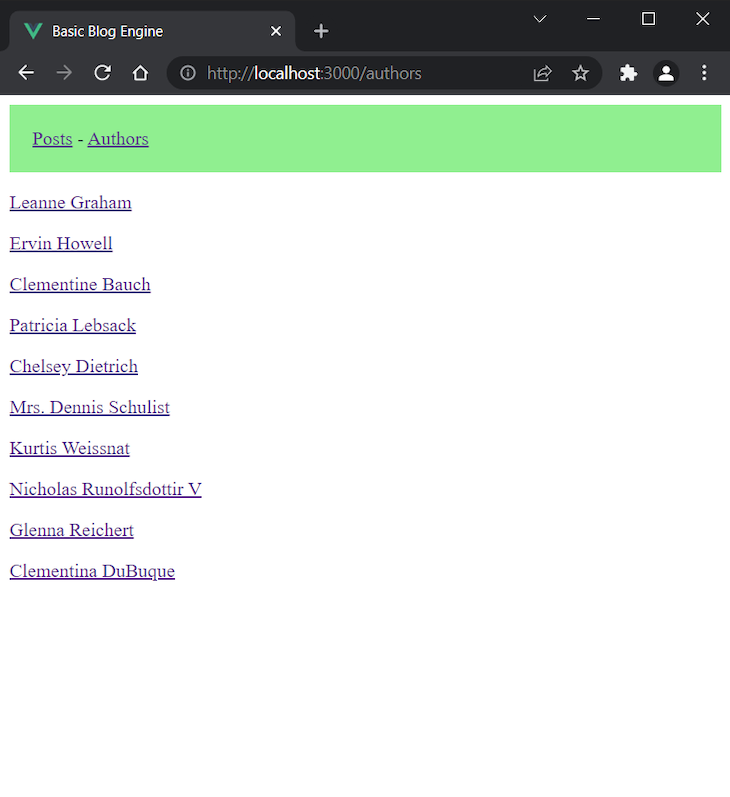
Run the app again. You should see the following when you visit the authors view:
Now let’s create the single author view. Close the terminal again.
Creating a single author view
In the views directory, create an AuthorView.vue file with the following content:
<script setup>
  import { computed } from 'vue'
  import { useRoute } from 'vue-router'
  import { storeToRefs } from 'pinia'
  import { useAuthorStore } from '../stores/author'
  import { usePostStore } from '../stores/post'
  import Author from '../components/Author.vue'

  const route = useRoute()
  const { authors } = storeToRefs(useAuthorStore())
  const { getPostsPerAuthor } = storeToRefs(usePostStore())
  const { fetchPosts } = usePostStore()

  const getAuthorByUserName = computed(() => {
    return authors.value.find((author) => author.username === route.params.username)
  })

  fetchPosts()
</script>

<template>
  <div>
    <author
    :author="getAuthorByUserName"
    :posts="getPostsPerAuthor(getAuthorByUserName.id)">
    </author>
  </div>
</template>
Here, to find who the current author is, we use their username to get it from the route. So, we create a getAuthorByUserName computed for this purpose; we pass author and posts props to an author component, which we’ll create right now.
Creating the author component
In the components directory, create Author.vue file with the following content:
<script setup>
  import { RouterLink } from 'vue-router'

  defineProps(['author', 'posts'])
</script>

<template>
  <div>
    <h1></h1>
    <p> posts written.</p>
    <p v-for="post in posts" :key="post.id">
      <RouterLink :to="`/post/${post.id}`"></RouterLink>
    </p>
  </div>
</template>
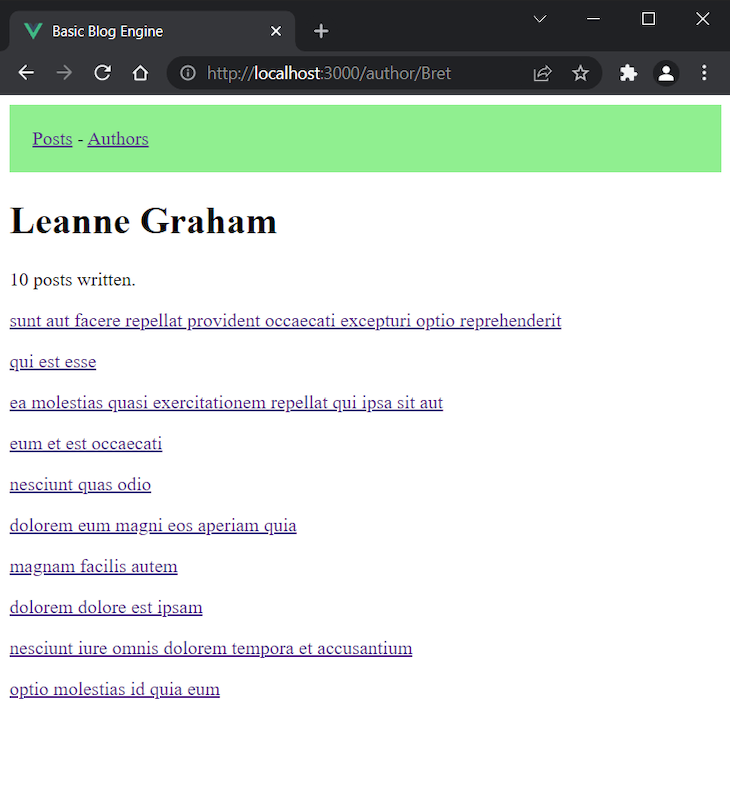
This component displays the author name, how many posts were written by the author, and the posts themselves.
Next, add the following to the router.js file:
import AuthorView from '../views/AuthorView.vue'
// ...
routes: [
// ...
{ path: '/author/:username', name: 'author', component: AuthorView }
]
Run the app again. You should see the following when you go to the author view:
Configuring the router
Here is how the final router.js file should look like:
import { createRouter, createWebHistory } from 'vue-router'
import PostsView from '../views/PostsView.vue'
import PostView from '../views/PostView.vue'
import AuthorView from '../views/AuthorView.vue'

const router = createRouter({
  history: createWebHistory(),
  routes: [
    {
      path: '/',
      name: 'posts',
      component: PostsView
    },
    {
      path: '/authors',
      name: 'authors',
      // route level code-splitting
      // this generates a separate chunk (About.[hash].js) for this route
      // which is lazy-loaded when the route is visited.
      component: () => import('../views/AuthorsView.vue')
    },
    { path: '/post/:id', name: 'post', component: PostView },
    { path: '/author/:username', name: 'author', component: AuthorView },
  ]
})

export default router
Now, all the Vue warnings for missing resources/components should be gone.
And that’s it. We successfully created and used Pinia stores in a fairly complex app.
Lastly, let’s see how we can inspect the app in the Vue devtools.
Inspecting the Pinia stores in Vue Devtools
In the next screenshots, we have a post with ID 2 opened. Here is how the routes of the app are listed in the Routes tab:
We can see that all routes we created are here and the one for the single post is active because it’s currently being used.
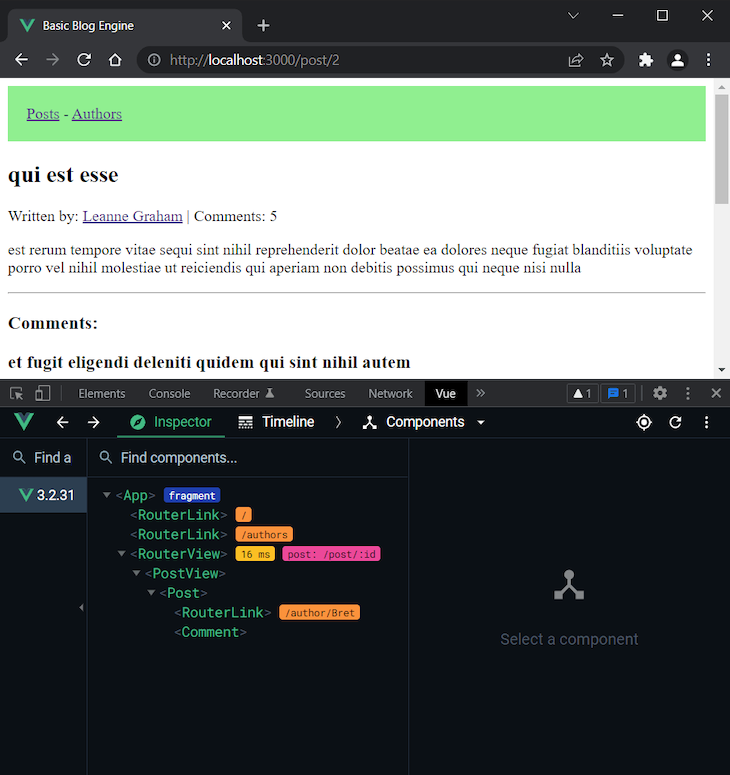
Now, let’s switch to the Components tab so we can explore the app components tree for the post view:
As we can see, the app starts with the two RouretLink components, and the RouterView component defined in App.vue. Then, we have the single post view followed by the post component. At the end, there is another RouterLink and the comment component.
Let’s now see the stores, which is the interesting part. Pinia shows all stores used in the active component. In our case, we have all three because we use them all when we open a single post.
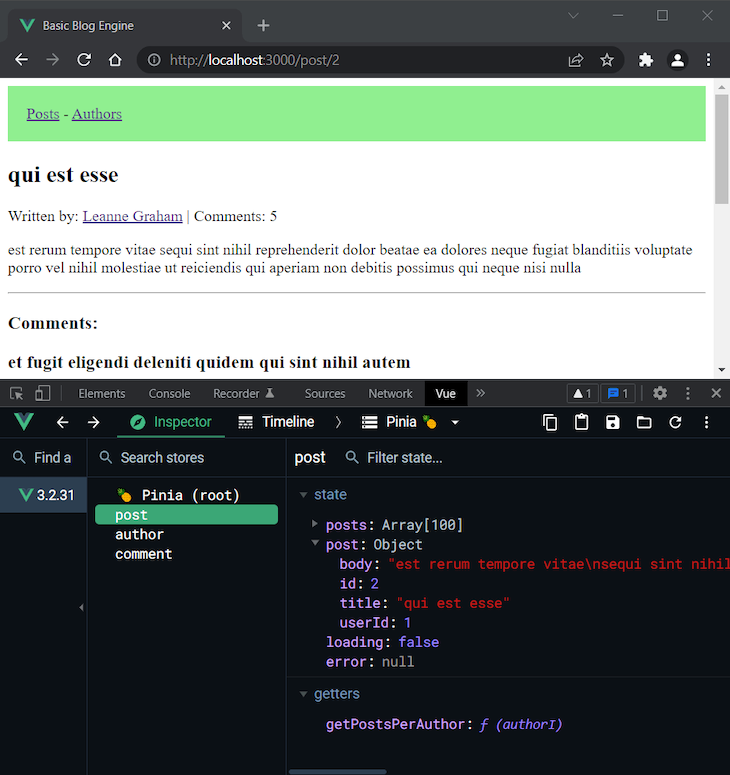
Here is the post store:
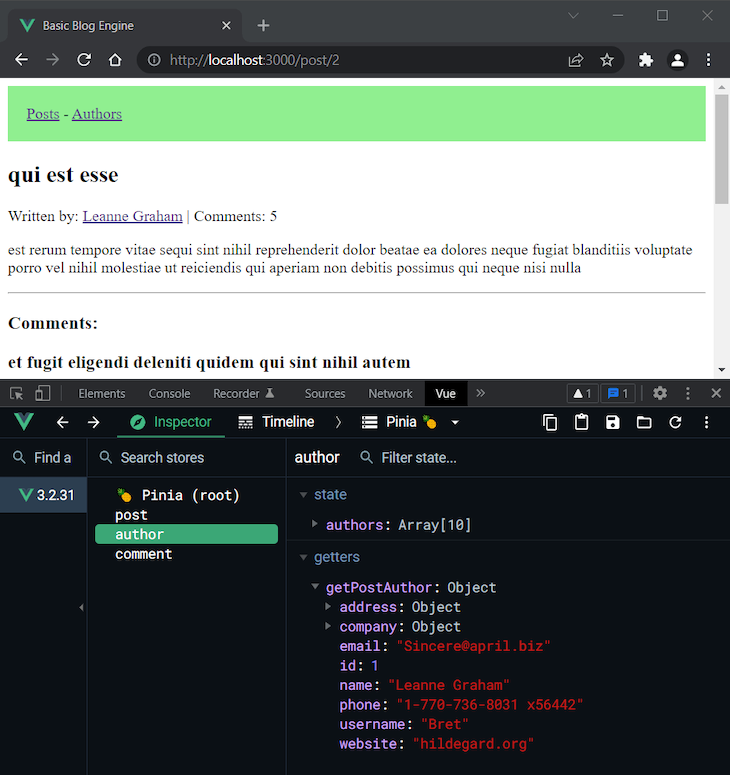
We can see that Pinia shows the correct opened post. The same is true for the author store:
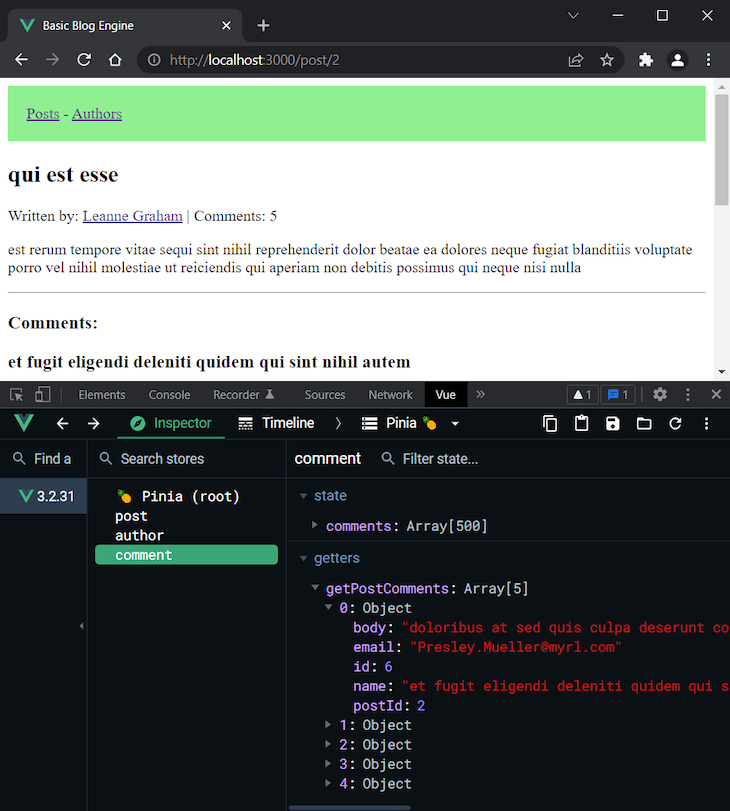
And finally, the comment store shows the comments:
Again, we can see that the name of the first comment matches the one displayed in the browser. So, everything worked as expected.
Now you know how to create, use, and inspect Pinia stores.
Conclusion
I’m pretty happy with the new official Vue state management tool. As we saw, it’s modular by design, easy to use, has a tiny footprint, and last but not least, it’s simple, flexible, and powerful. It’s really enjoyable to create stores with Pinia.
In this tutorial, we built a basic blog engine incorporating the main features Pinia provides (state, getters, and actions). Of course, the project can be extended further by adding CRUD functionality for the authors, posts, and comments, but this is out of the scope of this tutorial.
If you wish, you can try to implement such a functionality by yourself to practice what you’ve learned. The JSONPlaceholder guide can help you with this job.
For a more complex and real-world example of Pinia usage, you can explore the Directus project’s code.
Finally, make sure to check the Pinia docs to learn even more advanced ways to use it.
The post Complex Vue 3 state management made easy with Pinia appeared first on LogRocket Blog.
from LogRocket Blog https://ift.tt/uldJDGZ
via Read more


