


Application security is an important factor for every web application. Web developers use various strategies to improve the security layer of their web applications, such as implementing vulnerability prevention techniques.
Web application security risks typically increase when you start processing raw HTML and manipulate the DOM with untrusted content. If you are rendering HTML directly from a third-party source and the source gets affected by an internet-based threat, attackers can execute JavaScript code on your application users’ computers without your consent. These security attacks are known as XSS (cross-site scripting) attacks.
HTML sanitization is an OWASP-recommended strategy to prevent XSS vulnerabilities in web applications. HTML sanitization offers a security mechanism to remove unsafe (and potentially malicious) content from untrusted raw HTML strings before presenting them to the user.
The experimental, inbuilt browser Sanitization API helps you to insert untrusted HTML strings to your web application’s DOM in a safe way. In this article, I will discuss:
What is HTML sanitization?
HTML sanitization generally refers to removing potentially malicious JavaScript content from raw HTML strings. There are two different HTML sanitization implementations:
- Client-side sanitization: prevents unsafe content from the DOM level
- Server-side sanitization: prevents the storage of malicious HTML content in databases
We indeed need to use both sanitization layers to prevent XSS vulnerabilities. If your database is affected by malicious XSS payloads, the client-side sanitization layer will protect all application users, but if an attacker sends malicious HTML directly from the RESTful API, server-side sanitization will protect the system.
Web developers tend to use the following libraries for client-side/DOM-level sanitization:
- DOMPurity: HTML sanitizer library for JavaScript that
- Also works on server-side Node.js via the jsdom package
- js-xss: An HTML sanitizer library that works on browser, server-side Node.js, and as a command-line tool
- sanitize-html: An
htmlparser2-based sanitizer library for Node.js and browser that’s very popular among React developers because there is a wrapper library especially for React
These libraries typically parse unsafe HTML using either the browser’s inbuilt DOM iterator, or a custom HTML parser that excludes unsafe HTML content before using innerHTML.
Why do we need a browser-native Sanitization API?
The HTML sanitization API is a browser feature that helps to safely add unsafe HTML strings or documents to webpages. It provides methods to sanitize existing DOM elements and get new, sanitized DOM elements from a raw HTML string.
The solutions discussed above offer pretty good security solutions to prevent XSS attacks — but still, there are several issues. These libraries need to keep sanitization specifications up-to-date as browser standards change. For example, if the standard HTML specification introduced a potentially unsafe HTML attribute, then these libraries’ sanitization strategy becomes unstable.
Library-based sanitization can also be slow because the parsing happens twice — first during the library sanization process, and again during the browser DOM parsing process — when we inject safe HTML to a webpage.
Key goals
The HTML Sanitization API’s goal is to mitigate DOM-level XSS attacks via the following features:
- Providing a fully-featured, complete, and stable native sanitization interface for developers
- Maintaining up-to-date sanitization definitions by mapping the modern standard HTML specification
- Protecting DOM rather than providing a sanitized raw HTML string, unlike the sanitization libraries we mentioned above
A big draw of native sanitization is that it gives us the setHTML function, which directly parses and manipulates the DOM based on sanitization rules.
Understanding the HTML Sanitizer API specification
Now that we know the background, features, and current development status of the sanitizer API, let’s look at the API specification that gets exposed to the JavaScript environment.
The Sanitizer API comes with two main developer interfaces: the Sanitizer class and Element.setHTML method.
Sanitizer class and configuration
The Sanitizer class helps to create a new HTML sanitizer object for sanitization requirements. It comes with the following syntax:
new Sanitizer()
new Sanitizer(config)
We can create a new sanitizer object with the following syntax and the default configuration by using the non-parameterized constructor. The default configuration creates a Sanitizer object with a safelist-based technique to mitigate known XSS vulnerabilities.
const sanitizer = new Sanitizer();
However, we can customize the Sanitizer object by passing a configuration object, as shown below.
const sanitizer = new Sanitizer(config);
The configuration object has the following definition; note that this configuration definition may change in the future, since the API proposal is still in the web incubator.
{
  allowElements: <string Array>,
  blockElements: <string Array>,
  dropElements: <string Array>,
  allowAttributes: <Object>,
  dropAttributes: <Object>,
  allowCustomElements: <Boolean>,
  allowComments: <Boolean>
}
allowElements: A list of elements that the sanitizer should includeblockElements: A list of elements that the sanitizer should exclude by keeping their child elementsdropElements: Excludes elements like theblockElementsproperty, but also removes the entire child element tree that belongs to the excluded nodeallowAttributes: Allowed attributes as a key-array object- For example,
'class': ['div']allows theclassattribute for alldivelements — we can use the asterisk character(*) to allow a specific attribute for any HTML element
- For example,
dropAttributes: The opposite version of theallowAttributespropertyallowCustomElements: A boolean value to allow or disallow custom elements (default isfalse)allowComments: A boolean value to allow or disallow comments (default isfalse)
For example, we can initiate a custom Sanitizer object to allow only basic HTML tags and inline styling, as shown below.
{
  'allowElements': [
    'div',
    'span',
    'p',
    'em',
    'b'
  ],
  'allowAttributes': {
    'style': ['*']
  }
}
Sanitizer API methods: sanitize, sanitizeFor, and setHTML
The Sanitizer class helps us to initiate an HTML Sanitizer object, but we need to use some other methods to use the sanitizer instance in web applications. After we learn the following API specification, I will explain how to use the sanitizer API in the tutorial section.
Sanitizer.sanitize method
sanitize(input)
We can use the sanitize method to apply sanitizer rules to pre-existing DOM nodes. This function accepts a Document or DocumentFragment object and returns a sanitized DocumentFragment as the output.
Sanitizer.sanitizeFor method
sanitizeFor(element, input)
We can use this method to get a sanitized element node by sending an unsafe HTML string. In other words, it returns an element type DOM node after parsing the input string according to sanitization rules.
Element.setHTML method
setHTML(input, sanitizer)
This method is a safer, more set version of the Element.innerHTML property. The innerHTML property allows any HTML string, and is prone to XSS payloads. Hence, the setHTML method accepts a sanitizer instance and sanitizes potentially harmful HTML content before injecting new nodes into the DOM.
Experimenting with the Sanitizer API
You can use early implementations of the Sanitizer API on Google Chrome/Chromium ≥ 93 and Firefox ≥ 83 web browsers. These early implementations are typically not enabled by default on either web browsers, so first we have to enable them by modifying the browser configuration.
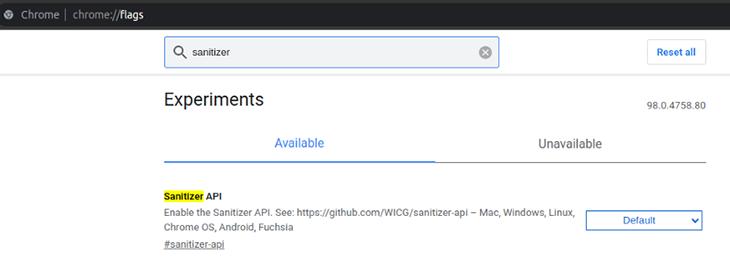
If you are using Chrome/Chromium, you can enable the #sanitizer-api switch as follows, by navigating to the chrome://flags URL.
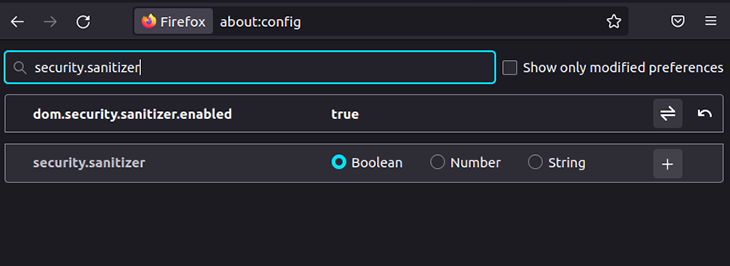
If you are using Mozilla Firefox, you can enable this feature via about:config, as follows.
In this tutorial, I will use Mozilla Firefox 96 to experiment with the upcoming Sanitizer API examples.
Let’s try out the sanitizer API with practical examples. I will use the JsFiddle online editor to demonstrate these examples, but you can test with your local development environment too, by creating an HTML file.
Sanitizing an unsafe HTML string and inserting to DOM
Let’s start with the basics. How can we render a safer DOM node from an unsafe HTML string with the Sanitizer API? Look at the following example code.
<div id="container"></div>
<script>
  // unsafe HTML string
  const unsafeHTML = `<p onclick="alert('Hello')">Hello</p>`;
  // Find the container node
  const container = document.getElementById('container');
  // Create a sanitizer object with the default config
  const sanitizer = new Sanitizer();
  // Inject new DOM nodes in a safer way
  container.setHTML(unsafeHTML, sanitizer);
</script>
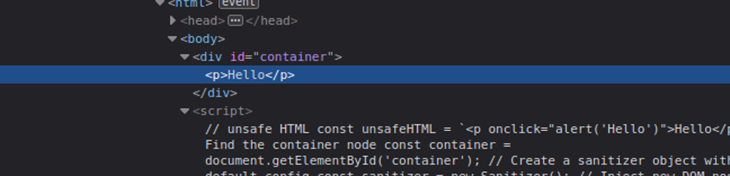
Here, we used the setHTML setter instead of the innerHTML property. If you inspect the DOM after running the above code, you can see that the setHTML method automatically excluded onclick before rendering child elements to the container node.
You can verify the insecurity of the innerHTML property by using the following code.
<div id="container"></div>
<script>
  // unsafe HTML string
  const unsafeHTML = `<p onclick="alert('Hello')">Hello</p>`;
  // Find the container node
  const container = document.getElementById('container');

  // Inject new DOM nodes
  container.innerHTML = unsafeHTML;
</script>
The above code injects new DOM nodes with the unsafe event handlers, as shown below.
innerHTML propertyYou can get the sanitized raw HTML string by reading the innerHTML property of the sanitized DOM element, but it somewhat breaks the main goal behind the sanitizer API, which is to safely inject DOM — not to use the Sanitizer API as yet another sanitization library.
Lazy sanitization with sanitizeFor
Earlier, we used the setHTML method to render an unsafe HTML string immediately with the sanitization process, but we’ll still have to render new elements sometime later, after the sanitization process, in some scenarios.
For example, web developers often need to render unsafe HTML strings from the internet to a WYSIWYG editor after its rendering process. As an optimized and error-free solution, we can first fetch content, apply sanitization, and then render the sanitized nodes when the editor component is fully rendered.
We can sanitize and save the result temporarily as a specific DOM node with the sanitizeFor method. Look at the following example.
<div id="container">Loading...</div>
<script>
  // unsafe HTML string
  const unsafeHTML = `<p onclick="alert('Hello')">Hello</p>`;
  // Create a sanitizer object with the default config
  const sanitizer = new Sanitizer();
  // Hold sanitized node
  const sanitizedDiv = sanitizer.sanitizeFor('div', unsafeHTML);
  // Inject nodes after sometime
  setTimeout(() => {
    // Find the container node
    const container = document.getElementById('container');
    // Inject the sanitized DOM node
    container.replaceChildren(sanitizedDiv);
  }, 1000);
</script>
The above code sanitizes an unsafe HTML string and saves the sanitized DOM node into a constant. Later, it injects the sanitized DOM node into the relevant container node using the replaceChildren method. Note that we used a one-second delay intentionally to simulate a network and rendering delay.
sanitizeFor functionSanitizing iframes
iframes are helpful to add widgets and third-party webpages into our web applications, but typically come with some security issues, since we load web content from other sources (often third-party sources). Therefore, it’s undoubtedly safest to sanitize web content that gets loaded via iframes.
Earlier, we used a string as the input for the Sanitization API methods, but now, we need to sanitize pre-existing DOM nodes. To do this, we need a function that accepts HTML document fragments or documents.
Remember the sanitize method? Look at the following example.
<iframe id="webpage"></iframe> <!-- Use a URL with cross-origin policy -->
<br/>
<button onclick="sanitize()">Sanitize</button>

<script>
function sanitize() {
  // Create a sanitizer object with the default config
  const sanitizer = new Sanitizer();
  // Find the iframe node
  const iframe = document.getElementById('webpage');
  // Sanitize the iframe's document node
  const sanitizedFrameNodes = sanitizer.sanitize(iframe.contentWindow.document);
  iframe.replaceChildren(sanitizeFrameNodes);
}
</script>
Customizing the sanitizer configuration
If we create a new Sanitizer class instance without sending a configuration object, the API will use a default configuration to mitigate known XSS vulnerabilities. But you can customize the sanitization logic by sending a configuration object.
Assume that you need to allow basic HTML tags and inline styles for a dynamic div element. We can implement a sanitizer for this requirement by using a custom configuration, as shown below.
<div id="container"></div>
<script>
  // unsafe HTML string
  const unsafeHTML = `<div onclick="alert('Hello')">
   <p><b>Hello Sanitizer API</b></p>
    <p><em onmovemove="window.location.reload()">Test</em></p>
    <img src="image.png" alt="Test"/>
  </div>`;
  // Find the container node
  const container = document.getElementById('container');
  // Create a sanitizer object with a custom config
  const sanitizer = new Sanitizer(
    {
      'allowElements': [
        'div',
        'span',
        'p',
        'em',
        'b'
      ],
      'allowAttributes': {
        'style': ['*']
      }
    });
  // Inject new DOM nodes in a safer way
  const sanitizedDiv = sanitizer.sanitizeFor('div', unsafeHTML);
  container.replaceChildren(sanitizedDiv);
</script>
Note that we can achieve the same output using the setHTML function, too, but I used replaceChildren instead, since Firefox’s experimental setHTML function included the img tag, even after the sanitization.
Be careful when you use custom sanitizer configurations. You have full control to allow any element and attribute when you customize the configurations — for example, the following sanitizer configuration makes your web application XSS-prone, since it allows the onclick event handler.
{
  'allowElements': ['div', 'p', 'em'],
  'allowAttributes': {
    'onclick': ['*']
  }
}
Beware sanitizer API misconfigurations!
Browser support and API status
Browser developers and security engineers usually submit new browser API proposals to the W3C organization for general approval. After the incubation period and approval, W3C adds the particular specification to the official web standard.
Several contributors started composing the Sanitization API proposal in 2016 in a GitHub repository. In late 2021, the API proposal reached the draft stage at the official web incubator. Nowadays, the web developer community improves the specification by suggesting various ideas — and strives to make it an official web standard.
Besides, Google Chrome/Chromium ≥ 93 and Firefox ≥ 83 provide early implementations of the Sanitizer API for web developers who are interested in testing them out now. These early implementations are not stable and are still subject to change in the future. You can see the full browser support details at CanIUse.
However, this browser feature will work in secure contexts. In other words, you can only use this browser feature with HTTPS connections. But you can also use the Sanitizer API with your local development environment because the standard secure context policy identifies localhost (or 127.0.0.1) as a secure context.
Conclusion
In this tutorial, we learned how to use the experimental Sanitizer API with some examples, and began by enabling it from the browser’s experimental features list. Even though Google Chrome/Chromium and Mozilla Firefox offer early implementations of this API specification, it is still in the W3C incubator program. In other words, the proposal’s editors may change the API specification based on the community’s suggestions and known security vulnerabilities. If you have a suggestion that improves the Sanitizer API’s structure, you can submit an issue to the Sanitizer API incubator repository on GitHub.
The Sanitizer API promises to help both frontend and framework developers. For example, React developers often tend to use the sanitize-html library and React’s dangerouslySetInnerHTML prop for rendering unsafe HTML strings to DOM.
However, if the experimental Sanitizer API becomes a browser standard, React will be able to offer a developer-friendly method (like setHTML) to sanitize and inject arbitrary HTML strings without affecting bundle size.
Frameworks that use custom HTML sanitizer implementations like Angular can reduce the framework bundle size by using the native Sanitization API. However, as mentioned before, the Sanitizer API is still experimental, so don’t use it in production systems until it becomes stable and W3C-approved.
You can experiment with the Sanitizer API further with the online HTML Sanitizer API playground.
The post What you need to know about inbuilt browser HTML sanitization appeared first on LogRocket Blog.
from LogRocket Blog https://ift.tt/Ag81IyN
via Read more


