Hyperledger is an umbrella project by the Linux Foundation that provides a distributed ledger, open source blockchain implementations, and the associated tools, like distributed ledger frameworks, smart contract engines, client libraries, graphical interfaces, utility libraries, and sample applications.
A blockchain is a peer-to-peer distributed ledger of transactions that is forged by consensus, combined with a system for smart contracts and other assistive technologies. These transactions are duplicated and distributed across the entire network of participating computer systems on the blockchain. In other words, a blockchain is a legally complied operating system of marketplaces, data-sharing networks, micro currencies, and decentralized digital communities.
Hyperledger Fabric is a permissioned blockchain infrastructure primarily aimed at integration projects in which a Distributed Ledger Technology (DLT) is required. It offers no user-facing services other than an SDK for Node.js, JavaScript, and Go. It provides modular architecture between nodes, execution of smart contracts, and configurable consensus and membership services.
In this article, we’ll create our first permissioned blockchain application, exploring smart contracts and discussing some important features of Hyperledger Fabric. Let’s get started!
Table of contents
- About Hyperledger Fabric
- Hyperledger Fabric architecture
- How applications interact with the network
- Developing a permissioned Blockchain application
- Set up a development environment
- Run Hyperledger Fabric
- Hyperledger Fabric Node.js SDK
- Key chaincode APIs
- Understanding sample smart contracts
- Package smart contract
- Install the chaincode package
- Approve a chaincode definition
- Committing the chaincode definition to the channel
- Using our chaincode
- Write your first application
- Conclusion
About Hyperledger Fabric
A Hyperledger Fabric Network is comprised of three main components.
Peer nodes execute chaincode, access ledger data, endorse transactions, and interface with applications. Peer nodes can be started, stopped, reconfigured, and deleted at any point in the blockchain lifecycle.
Orderer nodes ensure the consistency of the blockchain and deliver the endorsed transactions to the peers of the network. An orderer node is responsible for ordering transactions, forming the ordering service, packaging transactions into blocks, and distributing these blocks to anchor peers across the network.
Membership Service Provider (MSPs) nodes are generally implemented as a Certificate Authority, which manage X.509 certificates and are used to authenticate member identity and roles. MSPs nodes are the abstraction layer for all cryptographic mechanisms and protocols behind issuing certificates, validating certificates, and authenticating users.
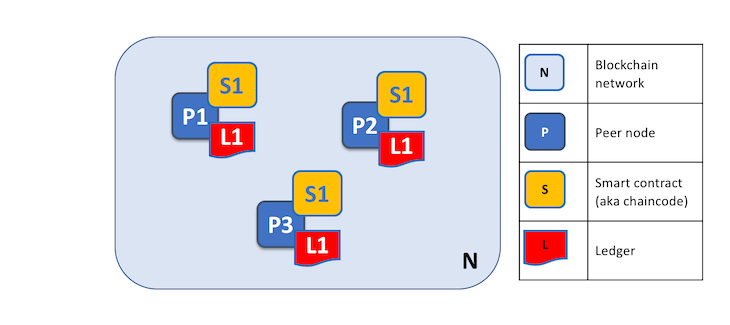
In Hyperledger Fabric, you can use different consensus algorithms, however, the Practical Byzantine Fault Tolerance (PBFT) is the most commonly used.
Functionalities
Hyperledger Fabric has five main functionalities.
Identity management
For permissioned networks, membership identity service manages user IDs, authenticating participants on the blockchain network. Additionally, developers can enable and limit specific network operations through additional layers using access control lists. For example, a specific user ID could be permitted to invoke a chaincode application but blocked from deploying new chaincode.
Efficient processing
To provide concurrency and parallelism to the network, Hyperledger Fabric includes transaction ordering, for example, by types of node authorities. Developers can perform multiple transactions by the same node and assign network roles by node type.
Modular design
Hyperledger Fabric implements modular architecture to provide functional choice to network designers, for example through availability of different crypto algorithms, algorithms or identity, ciphering, ordering, and encryption, enabling universal design.
Privacy and confidentiality
Hyperledger Fabric enables competing businesses or any group that requires private, confidential transactions to coexist on the same permissioned network. It supports features like restricted messaging paths for specific subsets of network members. For example, data including transactions, members, and channel information are invisible and inaccessible to any network members not explicitly granted access.
Chaincode functionality
Encoding logic is invoked by specific types of transactions on the channel, for example, system chaincode, lifecycle and configuration system chaincode, and endorsement and validation system chaincode.
Hyperledger Fabric architecture
Now that we’re familiar with the functionalities of Hyperledger Fabric, let’s review the components that comprise it.
Node
In Hyperledger Fabric, any computing device communicating on the network is termed as a node.
Client
A client is a node that can act on the end-users behalf.
Peer
Hyperledger Fabric has a peer-to-peer network in which a peer node is responsible for the state of the ledger and optimizing performance. Peers are of two types. For one, endorsers simulate and endorse transactions. A transaction endorsement is a signed response to the results of the simulated transaction. On the other hand, committers verify endorsements and validate transaction results prior to committing transactions to the blockchain
Transactions
Hyperledger Fabric transactions are of two types. Deploy transactions create a new chaincode with a parameter as a program and install the chaincode on the blockchain. Invoke transactions execute in the context of a previous chaincode or smart contract deployment.
Data structures
Key-Value Store (KVS) is the basic data structure of the blockchain. Often, keys are names, and the value is blobs. KVS supports two operations, PUT and GET. The data structure is taken as a state at a given point in time. The default state database, LevelDB, can be replaced with CouchDB.
Ledger
In what is known as ordered hashchain blocks of transactions, state changes are stored in order of occurrence, making it easy to reference later on. The blockchain records transactions within the ledger. A ledger contains ordered blocks, which contains an ordered transaction array. A ledger stores every state change whether successful or unsuccessful.
Fabric database
In Hyperledger Fabric, data is stored in two places, the state database and the ledger database.
The current state data represents the latest values for all assets in the ledger. Since the current state represents all the committed transactions on the channel, it is sometimes referred to as world state.
The ledger database stores serialized blocks where each block has one or more transactions. Each transaction contains a read-write set, which modifies one or more key/value pairs. The ledger is the definitive source of data and is immutable.
Ordering mechanisms
Hyperledger Fabric provides three ordering mechanisms.
The SOLO ordering mechanism, which involves a single ordering node, is most typically used by developers experimenting with Hyperledger Fabric networks.
The Kafka ordering mechanism is recommended for production use. The data consists of endorsed transactions and RW sets. Because it uses Apache Kafka, this type of ordering is crash fault-tolerant.
Lastly, the Simplified Byzantine Fault Tolerance ordering mechanism is both crash fault-tolerant and byzantine fault-tolerant, meaning it can reach agreement even in the presence of malicious or faulty nodes.
Consensus
In a distributed ledger system, consensus is the process of reaching agreement on the next set of transactions to be added to the ledger. Hyperledger Fabric is made up of three distinct steps.
First, in the transaction endorsement step, an endorsing peer executes the chaincode, which, if it succeeds, yields an actual transaction for the ledger. Then, the endorsing peer signs the transaction and returns it to the proposer.
The ordering service supports strict ordering, meaning that if the Transaction T1 has already been written within block B1, then the same transaction T1 cannot be re-written into different blocks like B2 or B3. Lastly, validation and commitment include transaction validation and ledger commitment.
Smart contracts
A smart contract defines the transaction logic that controls the lifecycle of a business object contained in the global state. In Hyperledger Fabric, smart contract execution is called chaincode. Hyperledger Fabric users often use the terms smart contract and chaincode interchangeably.
Hyperledger Fabric smart contracts are also called chaincode and are written in Go. The chaincode serves as the business logic for a Hyperledger Fabric network, and the smart contract directs how involved nodes manipulate assets within the network.
How applications interact with the network
In Hyperledger Fabric, smart contracts and chaincode are hosted on the network, identified by name and version. To run chaincode or smart contracts, applications use SDK APIs that are implemented by the SDK.
Hyperledger Fabric has three options for developers to create applications, the Node.js SDK, the Java SDK, and the CLI. Additionally, Hyperledger provides Hyperledger Fabric Samples for users to explore features of Hyperledger Fabric.
Developing a permissioned blockchain application
Now that we understand the Hyperledger Fabric architecture, let’s create a permissioned blockchain application. First, let’s clarify the main steps we’ll follow when developing our Hyperledger Fabric application.
First, we need to set up the development environment, including installations for the network where our smart contract will run. Next, we need to understand the Node.js SDK and the core programming behind our application. Hyperledger Fabric offers multiple SDKs, like Go, JavaScript, and Java. In this tutorial, we’ll work with a little bit of Go and lots of JavaScript.
Additionally, we need to understand sample smart contracts, including transactions. We’ll run queries as simulated by apps and also update the ledger. Lastly, we’ll develop a sample blockchain application using our smart contract.
Set up a development environment
Prerequisites
To set up a development environment with Hyperledger Fabric, we’ll need the following
- The latest version of cURL
- Docker and Docker Compose ≥v17.06.2-ce
- Go v1.12.x
- Node.js ≥v8.9 or ≥v10.15.3
Installations
In our example, we’ll use Linux based distros Ubuntu 20.04 and 18.04. First, update your current machine with sudo apt-get update. Then, we’ll install cURL with sudo apt instal curl and check the cURL version with curl --version, as seen below:
 curl --version
curl 7.68.0 (x86_64-pc-linux-gnu) libcurl/7.68.0 OpenSSL/1.1.1f zlib/1.2.11 brotli/1.0.7 libidn2/2.2.0 libpsl/0.21.0 (+libidn2/2.2.0) libssh/0.9.3/openssl/zlib nghttp2/1.40.0 librtmp/2.3
Release-Date: 2020-01-08
Protocols: dict file ftp ftps gopher http https imap imaps ldap ldaps pop3 pop3s rtmp rtsp scp sftp smb smbs smtp smtps telnet tftp
Features: AsynchDNS brotli GSS-API HTTP2 HTTPS-proxy IDN IPv6 Kerberos Largefile libz NTLM NTLM_WB PSL SPNEGO SSL TLS-SRP UnixSockets
Docker
We’ll need to install the required Docker packages as follows:
sudo apt-get install apt-transport-https ca-certificates gnupg-agent software-properties-common
Next, we’ll add Docker’s official GPG key:
curl -fsSL https://download.docker.com/linux/ubuntu/gpg | sudo apt-key add -

To set up Docker, run the following code:
sudo add-apt-repository "deb [arch=amd64] https://download.docker.com/linux/ubuntu $(lsb_release -cs) stable"
Install Docker with the code below:
sudo apt-get install docker-ce docker-ce-cli containerd.io`
We’ll check the Docker version with docker --version in the following code snippet:
logrocket:~$ docker --version
Docker version 20.10.12, build e91ed57
Next, we’ll test run the Docker engine:
docker run hello-world
Docker Compose
To download the latest version of Docker Compose, run the following code:
sudo curl -L "https://github.com/docker/compose/releases/download/1.25.5/docker-compose-$(uname -s)-$(uname -m)" -o /usr/local/bin/docker-compose
Change permissions to executable with sudo chmod +x /usr/local/bin/docker-compose. To check the Docker Compose version, run docker-compose --version as follows:
logrocket:~$ docker-compose --version
docker-compose version 1.25.5, build 8a1c60f6
Go
Download the tar file:
curl -O https://storage.googleapis.com/golang/go1.12.9.linux-amd64.tar.gz
Move the Go directory:
sudo mv go1.12.9.linux-amd64.tar.gz /usr/local/
Extract the tar file with the code below:
sudo tar -xvzpf /usr/local/go1.12.9.linux-amd64.tar.gz
You can delete the tar file with the following code:
sudo rm -rf /usr/local/go1.12.9.linux-amd64.tar.gz
Environment variables
Open the profile with vim .profile and add the PATH variable at the end of the .profile file:
export GOPATH=$HOME/go
export PATH=$PATH:/usr/local/go/bin:$GOPATH/bin
Navigate to the source profile with source ~/.profile and check the current Go version with the following code:
logrocket:~$ go version
go version go1.12.9 linux/amd64
Node.js
Run the code below to get Node.js v10.x:
curl -sL https://deb.nodesource.com/setup_10.x | sudo -E bash -`
Install Node.js with the command below:
sudo apt-get install -y nodejs
To check the current version of Node.js, run the following code:
nodejs --version
logrocket:~$ nodejs --version
v10.19.0
Now, check the npm version with npm -v:
logrocket:~$ npm -v
6.14.4
Hyperledger Fabric
Create a new directory by running the code below:
mkdir hyperledger-fabric && cd hyperledger-fabric
Add Docker permissions:
sudo usermod -aG docker $USER
Check permissions and refresh the terminal:
logrocket:~$ id -nG
tapasweni adm cdrom sudo dip plugdev lpadmin lxd sambashare
newgrp docker
Download Fabric v1.4.7:
curl -sSL https://raw.githubusercontent.com/hyperledger/fabric/master/scripts/bootstrap.sh  | bash -s -- 1.4.7 1.4.7 0.4.20


logrocket:~$ curl -sSL https://raw.githubusercontent.com/hyperledger/fabric/master/scripts/bootstrap.sh  | bash -s -- 1.4.7 1.4.7 0.4.20

Clone hyperledger/fabric-samples repo

===> Cloning hyperledger/fabric-samples repo
Cloning into 'fabric-samples'...
remote: Enumerating objects: 9165, done.
remote: Counting objects: 100% (1/1), done.
remote: Total 9165 (delta 0), reused 1 (delta 0), pack-reused 9164
Receiving objects: 100% (9165/9165), 5.21 MiB | 3.71 MiB/s, done.
Resolving deltas: 100% (4898/4898), done.
===> Checking out v1.4.7 of hyperledger/fabric-samples

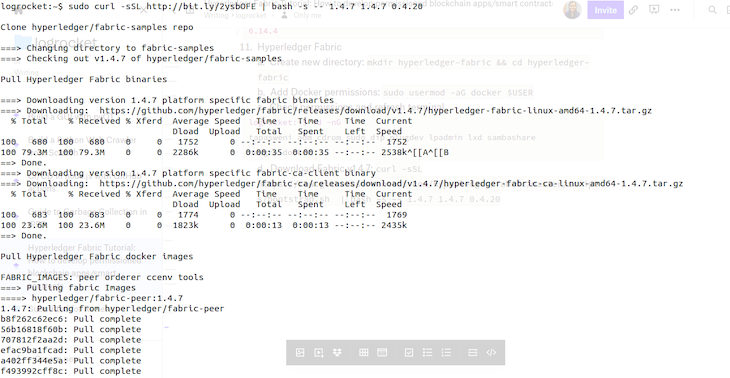
Pull Hyperledger Fabric binaries

===> Downloading version 1.4.7 platform specific fabric binaries
===> Downloading:  https://github.com/hyperledger/fabric/releases/download/v1.4.7/hyperledger-fabric-linux-amd64-1.4.7.tar.gz
  % Total    % Received % Xferd  Average Speed   Time    Time     Time  Current
                                 Dload  Upload   Total   Spent    Left  Speed
100   680  100   680    0     0   1683      0 --:--:-- --:--:-- --:--:--  1679
100 79.3M  100 79.3M    0     0  4614k      0  0:00:17  0:00:17 --:--:-- 4762k
==> Done.
===> Downloading version 1.4.7 platform specific fabric-ca-client binary
===> Downloading:  https://github.com/hyperledger/fabric-ca/releases/download/v1.4.7/hyperledger-fabric-ca-linux-amd64-1.4.7.tar.gz
  % Total    % Received % Xferd  Average Speed   Time    Time     Time  Current
                                 Dload  Upload   Total   Spent    Left  Speed
100   683  100   683    0     0   1876      0 --:--:-- --:--:-- --:--:--  1876
100 23.6M  100 23.6M    0     0  3962k      0  0:00:06  0:00:06 --:--:-- 4904k
==> Done.

Pull Hyperledger Fabric docker images

FABRIC_IMAGES: peer orderer ccenv tools
===> Pulling fabric Images
====> hyperledger/fabric-peer:1.4.7
1.4.7: Pulling from hyperledger/fabric-peer
Digest: sha256:a395036c83125ccf3820eb1752ac9ba8017e4432768b59d658bfba91a311d154
Status: Image is up to date for hyperledger/fabric-peer:1.4.7
docker.io/hyperledger/fabric-peer:1.4.7
====> hyperledger/fabric-orderer:1.4.7
1.4.7: Pulling from hyperledger/fabric-orderer
Digest: sha256:aef31580eee468e08eb8354bb5f2ec23e0fc12f9b638bd41d207dd5e4d6c6e60
Status: Image is up to date for hyperledger/fabric-orderer:1.4.7
docker.io/hyperledger/fabric-orderer:1.4.7
====> hyperledger/fabric-ccenv:1.4.7
1.4.7: Pulling from hyperledger/fabric-ccenv
Digest: sha256:11dbbdce7f3f789d7bbc758b593005e9aeccd991ed64a3f296e824aaf67f07c6
Status: Image is up to date for hyperledger/fabric-ccenv:1.4.7
docker.io/hyperledger/fabric-ccenv:1.4.7
====> hyperledger/fabric-tools:1.4.7
1.4.7: Pulling from hyperledger/fabric-tools
Digest: sha256:59328549b3384f565cb5bd19b74c977820781e4709158666ead74fcd970c11e1
Status: Image is up to date for hyperledger/fabric-tools:1.4.7
docker.io/hyperledger/fabric-tools:1.4.7
===> Pulling fabric ca Image
====> hyperledger/fabric-ca:1.4.7
1.4.7: Pulling from hyperledger/fabric-ca
Digest: sha256:9418ea351bfbef4bf2bca34bcd77305bdb9a45d2c1aab3237c08c17da0b4d1dd
Status: Image is up to date for hyperledger/fabric-ca:1.4.7
docker.io/hyperledger/fabric-ca:1.4.7
===> List out hyperledger docker images
hyperledger/fabric-ca        1.4            743a758fae29   19 months ago   154MB
hyperledger/fabric-ca        1.4.7          743a758fae29   19 months ago   154MB
hyperledger/fabric-ca        latest         743a758fae29   19 months ago   154MB
hyperledger/fabric-tools     1.4            a026b435e575   19 months ago   1.49GB
hyperledger/fabric-tools     1.4.7          a026b435e575   19 months ago   1.49GB
hyperledger/fabric-tools     latest         a026b435e575   19 months ago   1.49GB
hyperledger/fabric-ccenv     1.4            c5fbec1827ad   19 months ago   1.36GB
hyperledger/fabric-ccenv     1.4.7          c5fbec1827ad   19 months ago   1.36GB
hyperledger/fabric-ccenv     latest         c5fbec1827ad   19 months ago   1.36GB
hyperledger/fabric-orderer   1.4            df155b01ed80   19 months ago   123MB
hyperledger/fabric-orderer   1.4.7          df155b01ed80   19 months ago   123MB
hyperledger/fabric-orderer   latest         df155b01ed80   19 months ago   123MB
hyperledger/fabric-peer      1.4            5d5fbecd1efe   19 months ago   131MB
hyperledger/fabric-peer      1.4.7          5d5fbecd1efe   19 months ago   131MB
hyperledger/fabric-peer      latest         5d5fbecd1efe   19 months ago   131MB
hyperledger/fabric-baseos    amd64-0.4.20   121a92cc3fc0   22 months ago   85MB
logrocket:~$
Now, update the environment variables:
vim .profile
export PATH=/home/$USER/hyperledger/fabric-samples/bin:$PATH
source ~/.profile
Run Hyperledger Fabric
Go inside fabric-samples/first-network:

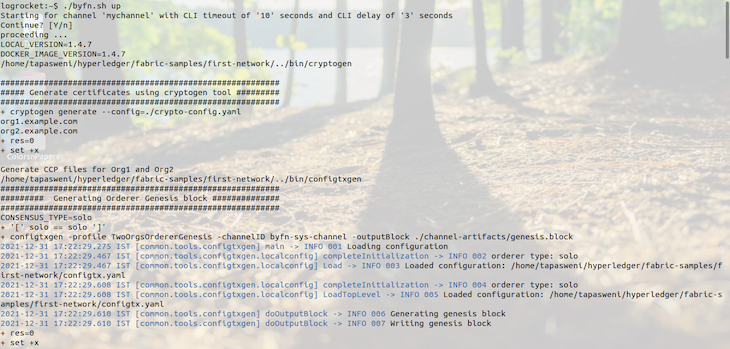
Bring the network up with ./byfn.sh up:
logrocket:~$ cd first-network/
logrocket:~$ ls
base               channel-artifacts     connection-org2.yaml    docker-compose-cli.yaml           docker-compose-kafka.yaml  scripts
byfn.sh            configtx.yaml         connection-org3.json    docker-compose-couch-org3.yaml    docker-compose-org3.yaml
ccp-generate.sh    connection-org1.json  connection-org3.yaml    docker-compose-couch.yaml         eyfn.sh
ccp-template.json  connection-org1.yaml  crypto-config.yaml      docker-compose-e2e-template.yaml  org3-artifacts
ccp-template.yaml  connection-org2.json  docker-compose-ca.yaml  docker-compose-etcdraft2.yaml     README.md
logrocket:~$ ./byfn.sh -m up
Starting for channel 'mychannel' with CLI timeout of '10' seconds and CLI delay of '3' seconds
Continue? [Y/n]
proceeding ...
LOCAL_VERSION=1.4.7
DOCKER_IMAGE_VERSION=1.4.7
/home/tapasweni/hyperledger/fabric-samples/first-network/../bin/cryptogen

##########################################################
##### Generate certificates using cryptogen tool #########
##########################################################
+ cryptogen generate --config=./crypto-config.yaml
org1.example.com
org2.example.com
+ res=0
+ set +x

Generate CCP files for Org1 and Org2
/home/tapasweni/hyperledger/fabric-samples/first-network/../bin/configtxgen
##########################################################
#########  Generating Orderer Genesis block ##############
##########################################################
CONSENSUS_TYPE=solo
+ '[' solo == solo ']'
+ configtxgen -profile TwoOrgsOrdererGenesis -channelID byfn-sys-channel -outputBlock ./channel-artifacts/genesis.block
2021-12-31 17:52:52.853 IST [common.tools.configtxgen] main -> INFO 001 Loading configuration
2021-12-31 17:52:53.051 IST [common.tools.configtxgen.localconfig] completeInitialization -> INFO 002 orderer type: solo
2021-12-31 17:52:53.051 IST [common.tools.configtxgen.localconfig] Load -> INFO 003 Loaded configuration: /home/tapasweni/hyperledger/fabric-samples/first-network/configtx.yaml
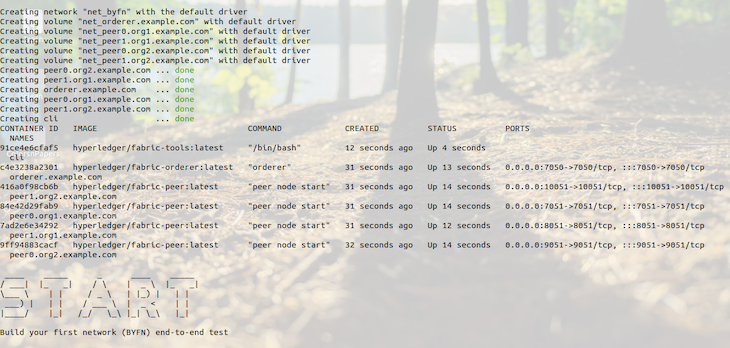
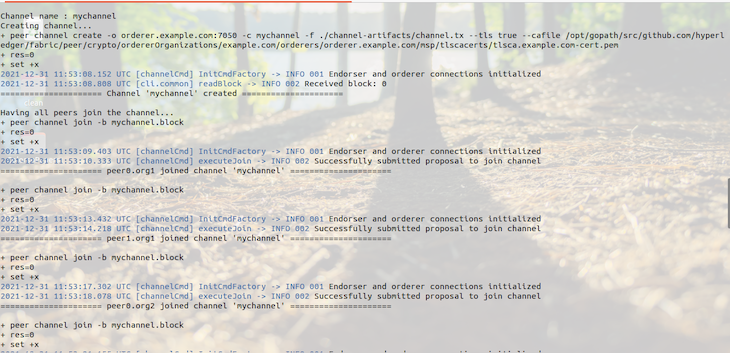
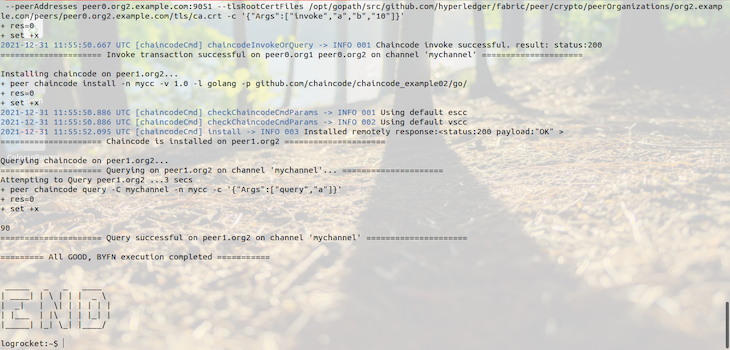
Verify Docker with docker ps -a:
logrocket:~$ docker ps -a
CONTAINER ID   IMAGE                                                                                                  COMMAND                  CREATED              STATUS              PORTS                                           NAMES
ef86361332c7   dev-peer1.org2.example.com-mycc-1.0-26c2ef32838554aac4f7ad6f100aca865e87959c9a126e86d764c8d01f8346ab   "chaincode -peer.add…"   About a minute ago   Up About a minute                                                   dev-peer1.org2.example.com-mycc-1.0
c9008d040273   dev-peer0.org1.example.com-mycc-1.0-384f11f484b9302df90b453200cfb25174305fce8f53f4e94d45ee3b6cab0ce9   "chaincode -peer.add…"   2 minutes ago        Up 2 minutes                                                        dev-peer0.org1.example.com-mycc-1.0
9ad7861a975c   dev-peer0.org2.example.com-mycc-1.0-15b571b3ce849066b7ec74497da3b27e54e0df1345daff3951b94245ce09c42b   "chaincode -peer.add…"   4 minutes ago        Up 4 minutes                                                        dev-peer0.org2.example.com-mycc-1.0
91ce4e6cfaf5   hyperledger/fabric-tools:latest                                                                        "/bin/bash"              5 minutes ago        Up 5 minutes                                                        cli
c4e3238a2301   hyperledger/fabric-orderer:latest                                                                      "orderer"                6 minutes ago        Up 5 minutes        0.0.0.0:7050->7050/tcp, :::7050->7050/tcp       orderer.example.com
416a0f98cb6b   hyperledger/fabric-peer:latest                                                                         "peer node start"        6 minutes ago        Up 5 minutes        0.0.0.0:10051->10051/tcp, :::10051->10051/tcp   peer1.org2.example.com
84e42d29fab9   hyperledger/fabric-peer:latest                                                                         "peer node start"        6 minutes ago        Up 5 minutes        0.0.0.0:7051->7051/tcp, :::7051->7051/tcp       peer0.org1.example.com
7ad2e6e34292   hyperledger/fabric-peer:latest                                                                         "peer node start"        6 minutes ago        Up 5 minutes        0.0.0.0:8051->8051/tcp, :::8051->8051/tcp       peer1.org1.example.com
9ff94883cacf   hyperledger/fabric-peer:latest                                                                         "peer node start"        6 minutes ago        Up 5 minutes        0.0.0.0:9051->9051/tcp, :::9051->9051/tcp       peer0.org2.example.com
logrocket:~$
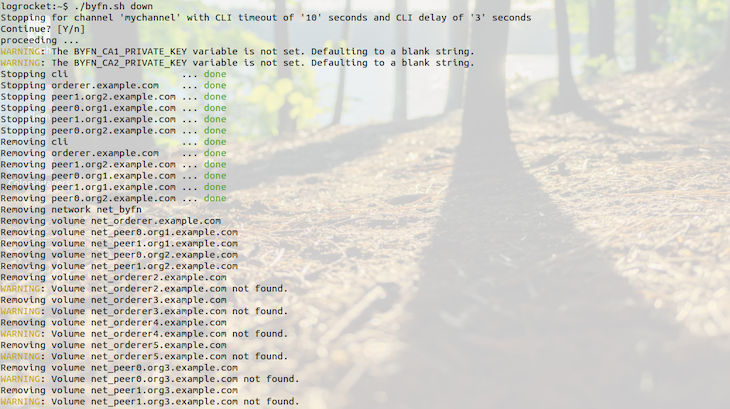
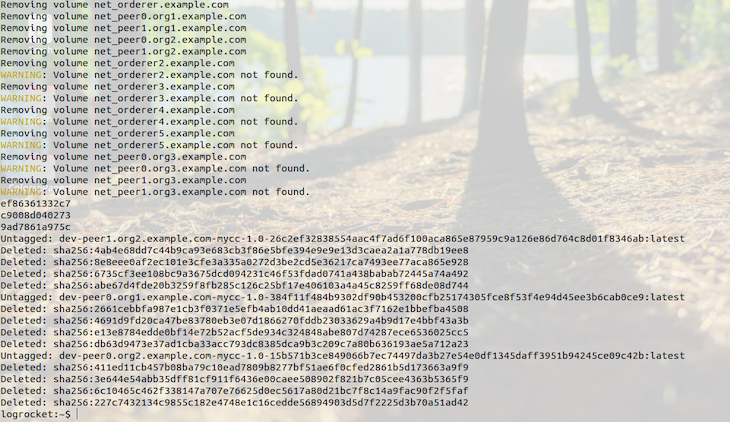
Bring the network down with ./byfn.sh down:
logrocket:~$ ./byfn.sh -m down
Stopping for channel 'mychannel' with CLI timeout of '10' seconds and CLI delay of '3' seconds
Continue? [Y/n]
proceeding ...
WARNING: The BYFN_CA1_PRIVATE_KEY variable is not set. Defaulting to a blank string.
WARNING: The BYFN_CA2_PRIVATE_KEY variable is not set. Defaulting to a blank string.
Stopping cli                    ... done
Stopping peer0.org2.example.com ... done
Stopping peer0.org1.example.com ... done
Stopping peer1.org2.example.com ... done
Stopping peer1.org1.example.com ... done
Stopping orderer.example.com    ... done
Removing cli                    ... done
Removing peer0.org2.example.com ... done
Removing peer0.org1.example.com ... done
Removing peer1.org2.example.com ... done
Removing peer1.org1.example.com ... done
Removing orderer.example.com    ... done
Removing network net_byfn
Removing volume net_orderer.example.com
Removing volume net_peer0.org1.example.com
Removing volume net_peer1.org1.example.com
Removing volume net_peer0.org2.example.com
Removing volume net_peer1.org2.example.com
Removing volume net_orderer2.example.com
WARNING: Volume net_orderer2.example.com not found.
Removing volume net_orderer3.example.com
WARNING: Volume net_orderer3.example.com not found.
Removing volume net_orderer4.example.com
WARNING: Volume net_orderer4.example.com not found.
Removing volume net_orderer5.example.com
WARNING: Volume net_orderer5.example.com not found.
Removing volume net_peer0.org3.example.com
WARNING: Volume net_peer0.org3.example.com not found.
Removing volume net_peer1.org3.example.com
WARNING: Volume net_peer1.org3.example.com not found.
1c1c3bd27578
052b542e408f
2371102e3fa1
Untagged: dev-peer1.org2.example.com-mycc-1.0-26c2ef32838554aac4f7ad6f100aca865e87959c9a126e86d764c8d01f8346ab:latest
Deleted: sha256:574b46ed09496b052b9963d79362fa3e15d5430d6f7e227c8edccfe37a94a54d
Deleted: sha256:89856e5feb7feafde31a15decf9d2657f7344e38ee90bc8e73f7c0e189a0422c
Deleted: sha256:570373df622999f59a978635db23a4ce6f6f3c6b1067aeafd3d2a64b4b1020b0
Deleted: sha256:31ce9090622db38830dfdc3209c4044d70f7345e863fcd54c40ac2d2a2abbf03
Untagged: dev-peer0.org1.example.com-mycc-1.0-384f11f484b9302df90b453200cfb25174305fce8f53f4e94d45ee3b6cab0ce9:latest
Deleted: sha256:c40d025bb22f74cfa14568a70257964d94b557e23811c9bfb5d4591200f64b62
Deleted: sha256:b9e1d83750424813abf0fe6f96fbc3904680bf0ae23474b4939e60596b77f1d9
Deleted: sha256:a5dc79ea636789a36962fcac872a77a86235f95fa9f3714c8bd8da42237b51f3
Deleted: sha256:8b9a4e82ec7825be4e6f52b7192c2b76fc5ab671a871dcc9c3423f23713009da
Untagged: dev-peer0.org2.example.com-mycc-1.0-15b571b3ce849066b7ec74497da3b27e54e0df1345daff3951b94245ce09c42b:latest
Deleted: sha256:599b2ad18745375616a97b3a99411571aeb456b0c320f853bdd9d15d19a5c875
Deleted: sha256:65a03c40d4a982f5b6589a8fd2e6aac66b70a295d68b3c8892a8fe5bf41f3edc
Deleted: sha256:ab76526d7091a8511de05ae2c91f0279f10aa0b07ad4a62c5cc105c454d79894
Deleted: sha256:6d5781813eb41dfc57917af52d5c4e7234864d005b8d38c07f51a759fa8790f0
logrocket:~$
Create a channel named mychannel with ./network.sh up createChannel:
========= Channel successfully joined ===========
Hyperledger Fabric Node.js SDK
This tutorial uses the Hyperledger Node.js SDK, which we’ll use to interact with the network and deploy smart contracts over the network, ledger, and API.
SDKs
To interact with Fabric network client, we use Fabric-CA Client, which falls under the umbrella of Fabric CA. The Fabric CA component allows applications to enroll peers and application users to establish trusted identities on the blockchain network. It also provides support for pseudonym transaction submissions with Transaction Certificates.
The Fabric Common package encapsulates the common code used by all fabric-sdk-node packages, supporting fine-grained interactions with the Fabric network to send transaction invocations.
fabric-network is responsible for establishing a connection with the Fabric blockchain network. This package encapsulates the APIs to connect to a Fabric network, submit transactions, and perform queries against the ledger at a higher level of abstraction than through Fabric Common.
Lastly, the fabric-protos package encapsulates the protobuffers that are used to communicate over gRPC.
Installing APIs
Install the network API:
npm install fabric-network
Install the client API:
npm install fabric-ca-client
Install the common API:
npm install fabric-common
Install protobuffers API:
npm install fabric-protos
Getting started with the SDK
The Gateway class is the entry point used to interact with a Hyperledger Fabric blockchain network and the first thing to be initiated. The long-living object provides a reusable connection to a peer within the Fabric blockchain network, enabling access to any of the blockchain networks or channels of which that particular peer is a member.
Next, we’ll get access to the smart contract/ chaincode running and deployed within that blockchain network. Transactions are triggered, and queries are evaluated to this blockchain network.
Using smart contract event listeners, client applications can initiate actions or business processes in response to chaincode events emitted by smart contract transactions. All updates to the ledger can be observed using block event listeners.
Key chaincode APIs
The ChaincodeStub provides functions that allow developers to interact with the underlying ledger to query, update, and delete assets:
func (stub *ChaincodeStub) GetState(key string) ([]byte, error)
The code above returns the value of the specified key from the ledger. If the key does not exist in the state database, nil, nil is returned:
func (stub *ChaincodeStub) PutState(key string, value []byte) error
The code above puts the specified key and value into the transaction and writes it as a data-write proposal. PutState doesn’t affect the ledger until the transaction is validated and successfully committed:
func (stub *ChaincodeStub) DelState(key string) error
The code above records the specified key to be deleted in the Write set of the transaction proposal. When the transaction is validated and successfully committed, the key and its value will be deleted from the ledger.
fabric-contract-api provides the contract interface where we write the business logic in technical words for our smart contracts or chaincode.
The CommercialPaperContract extends Contract {...} class contains the transaction definitions for commercial paper, issue, buy, and redeem.
You must create both an Init and an Invoke method within your chaincode. Before the chaincode can be invoked, the chaincode must be installed and instantiated using the peer chaincode install and instantiate commands, respectively.
So far, this completes our understanding of Hyperledger Fabric, its architecture, setup, features, and SDK. In the next part of the article, we’ll install our application and explore more about smart contracts.
Understanding sample smart contracts
In Hyperledger Fabric, the core business logic and rules are defined by smart contracts or chaincode. End users interact with the blockchain network and blockchain ledger by calling a smart contract’s defined rules, invoking smart contracts or chaincode.
Let’s assume that user U has implemented smart contract SC. Anyone who wants to participate, whether an organization or group, has to validate transactions or query the blockchain ledger, which can be accomplished by installing the chaincode on their peers.
After installing or deploying the smart contract or chaincode, peers join the channel. Channel members can then deploy the chaincode to the channel and use the smart contract business logic or rules in the chaincode to create or update assets on the channel ledger.
So far, we’ve already successfully created the channel. We will not use the Peer CLI provided by Hyperledger Fabric to deploy the assets-transfer package chaincode to the channel. Instead, first, let’s package the smart contract. To be installed on any participating machine, the chaincode should be packaged in the .tar.gz file. In other words, a peer that is a participating unit on the network can interact with other machines and computing devices on the blockchain network.
Next, we install the chaincode package, which has to be installed on every peer of the participating organization to follow each others’ rules or business logic. Before participating with these organization on the blockchain network, a certain threshold of peers who are a part of the organization must approve the chaincode definition. Finally, to further invoke the business logic or rules set for interaction, each channel should have the chaincode committed.
Package smart contract
Let’s review our sample JavaScript chaincode. In fabric-samples, you’ll go to the basic Go version of the asset-transfer chaincode with cd fabric-samples/asset-transfer-basic/chaincode-javascript.
The sample uses node modules to install and deploy the chaincode. package.json describes the dependencies required to package and install our chaincode. If you’ve thoroughly understood the first part, these dependencies will be familiar to you:
$ cat package.json

"dependencies": {
        "fabric-contract-api": "^2.0.0",
        "fabric-shim": "^2.0.0"
Let’s review the fabric-contract-api of our sample smart contract:
const { Contract } = require('fabric-contract-api');

class AssetTransfer extends Contract {
    ...
}
The code above will enable basic CRUD operations on our ledger, or in other words, read and write to the blockchain ledger using different function calls:
async CreateAsset(ctx, id, color, size, owner, appraisedValue) {
        const asset = {
            ID: id,
            Color: color,
            Size: size,
            Owner: owner,
            AppraisedValue: appraisedValue,
        };

        await ctx.stub.putState(id, Buffer.from(JSON.stringify(asset)));
    }
Inside this directory, run npm install to install any dependencies required by our chaincode package before installing or deploying chaincode on the ledger. To create a chaincode package, go to test-network and set config paths as follows:
cd ../../test-network
export PATH=${PWD}/../bin:$PATH
export FABRIC_CFG_PATH=$PWD/../config/
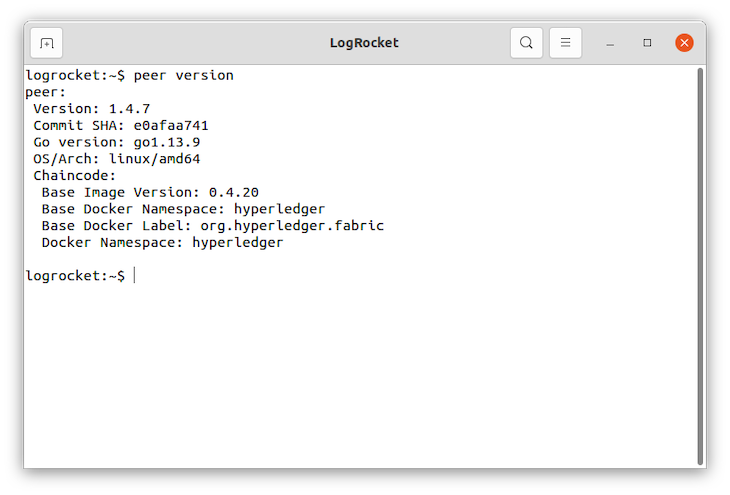
Run peer version to make sure you’re able to interact with the peer CLI:
logrocket:~$ peer version
peer:
 Version: 1.4.7
 Commit SHA: e0afaa741
 Go version: go1.13.9
 OS/Arch: linux/amd64
 Chaincode:
  Base Image Version: 0.4.20
  Base Docker Namespace: hyperledger
  Base Docker Label: org.hyperledger.fabric
  Docker Namespace: hyperledger
Let’s package our chaincode using the command below:
peer lifecycle chaincode package basic.tar.gz --path ../asset-transfer-basic/chaincode-javascript/ --lang node --label basic_1.0
Now, you can install the basic.tar.gz file on the network of your choice. Your chaincode or smart contract is ready to be installed, establish interactions with the ledger, and eventually become one of them by abiding by the smart contract.
Install the chaincode package
Let’s install the basic, packaged asset-transfer smart contract/chaincode on our peers. Think about our user U and smart contract SC. Let’s create two organizations, Org1 and Org2. As in our example, both organizations require endorsements from each other, so chaincode will be installed on every peer operated by both organizations:
peer0.org1.example.com
peer0.org2.example.com
Let’s install the chaincode on the Org1 peer first. Set the following environment variables to operate the peer CLI as the Org1 admin user. The CORE_PEER_ADDRESS will be set to point to the Org1 peer, peer0.org1.example.com:
export CORE_PEER_TLS_ENABLED=true
export CORE_PEER_LOCALMSPID="Org1MSP"
export CORE_PEER_TLS_ROOTCERT_FILE=${PWD}/organizations/peerOrganizations/org1.example.com/peers/peer0.org1.example.com/tls/ca.crt
export CORE_PEER_MSPCONFIGPATH=${PWD}/organizations/peerOrganizations/org1.example.com/users/Admin@org1.example.com/msp
export CORE_PEER_ADDRESS=localhost:7051
Now, install the peer lifecycle chaincode on the peer. Issue the peer lifecycle chaincode install command to install the chaincode on the peer. You will not get the chaincode package identifier. In the next step, we’ll use this package ID to approve the chaincode:
peer lifecycle chaincode install basic.tar.gz
2021-02-06 09:09:27.534 IST [cli.lifecycle.chaincode] submitInstallProposal -> INFO 001 Installed remotely: response:<status:200 payload:"\nJbasic_1.0:e2db7f693d4dfwi9599953fnd00300dd0232323e9ebb88c5721cb8248c3aead8123\022\tbasic_1.0" >
2021-02-06 09:09:27.534 IST [cli.lifecycle.chaincode] submitInstallProposal -> INFO 002 Chaincode code package identifier: basic_1.0:e2db7f693d4aa6156e652741dwi487575730de9ebb88c5721cb8248c3aead8123
Next, we’ll install the chaincode package on the Org2 peer using peer lifecycle chaincode install basic.tar.gz. As we did earlier, set the required environment variables and install the chaincode package. Our Org2 peer is peer0.org2.example.com:
export CORE_PEER_LOCALMSPID="Org2MSP"
export CORE_PEER_TLS_ROOTCERT_FILE=${PWD}/organizations/peerOrganizations/org2.example.com/peers/peer0.org2.example.com/tls/ca.crt
export CORE_PEER_MSPCONFIGPATH=${PWD}/organizations/peerOrganizations/org2.example.com/users/Admin@org2.example.com/msp
export CORE_PEER_ADDRESS=localhost:9051

peer lifecycle chaincode install basic.tar.gz
Approve a chaincode definition
Each participating organization has to agree on a chaincode package, which has a unique hash value and a label. Each organization may get the chaincode package from a developer; if someone tries to change something on the chaincode, that chaincode package will give a different hash value compares to others.
Next, we’ll approve the chaincode, which includes the important parameters of chaincode governance, like the name, version, and the chaincode endorsement policy for your organization.
Each organization gets an identical Package ID, which is a combination of that chaincode package’s hash value and label. Approve this identical Package ID with channelID, name, version, init-required, etc. for your organization. Run the code below:
peer lifecycle chaincode queryinstalled
Installed chaincodes on peer:
Package ID: basic_1.0:63828323nvsb3283283ss283932bb6cb291df20aa39542c3ef94008615704007f3, Label: basic_1.0
Set this package ID as an environment variable and use the package ID below to approve:
export CC_PACKAGE_ID=basic_1.0:63828323nvsb3283283ss283932bb6cb291df20aa39542c3ef94008615704007f3

peer lifecycle chaincode approveformyorg -o localhost:7050 --ordererTLSHostnameOverride orderer.example.com --channelID mychannel --name basic --version 1.0 --package-id $CC_PACKAGE_ID --sequence 1 --tls --cafile ${PWD}/organizations/ordererOrganizations/example.com/orderers/orderer.example.com/msp/tlscacerts/tlsca.example.com-cert.pem
There are multiple options that can be supplied with the command as parameter. For one, the --package-id flag includes the package identifier in the chaincode definition. The --sequence flag is an integer value that keeps track of the number of times a chaincode has been defined or updated. When the chaincode package is installed for first time, the sequence number is set to 1. Lastly, the --signature-policy flag is used to specify a chaincode endorsement policy.
Now, let approve for Org1:
export CORE_PEER_LOCALMSPID="Org1MSP"
export CORE_PEER_MSPCONFIGPATH=${PWD}/organizations/peerOrganizations/org1.example.com/users/Admin@org1.example.com/msp
export CORE_PEER_TLS_ROOTCERT_FILE=${PWD}/organizations/peerOrganizations/org1.example.com/peers/peer0.org1.example.com/tls/ca.crt
export CORE_PEER_ADDRESS=localhost:7051

peer lifecycle chaincode approveformyorg -o localhost:7050 --ordererTLSHostnameOverride orderer.example.com --channelID mychannel --name basic --version 1.0 --package-id $CC_PACKAGE_ID --sequence 1 --tls --cafile ${PWD}/organizations/ordererOrganizations/example.com/orderers/orderer.example.com/msp/tlscacerts/tlsca.example.com-cert.pem
It’s recommended that all channel members approve a chaincode before committing the chaincode definition.
Committing the chaincode definition to the channel
After a sufficient number of organizations have approved a chaincode definition, one organization can commit the chaincode definition to the channel. If a majority of channel members have approved the definition, the commit transaction will be successful, and the parameters agreed to in the chaincode definition will be implemented on the channel.
Before committing, we need to check commit readiness to channel using the code below:
peer lifecycle chaincode checkcommitreadiness [flags]

Flags:
      --channel-config-policy string   The endorsement policy associated to this chaincode specified as a channel config policy reference
  -C, --channelID string               The channel on which this command should be executed
      --collections-config string      The fully qualified path to the collection JSON file including the file name
      --connectionProfile string       The fully qualified path to the connection profile that provides the necessary connection information for the network. Note: currently only supported for providing peer connection information
  -E, --endorsement-plugin string      The name of the endorsement plugin to be used for this chaincode
  -h, --help                           help for checkcommitreadiness
      --init-required                  Whether the chaincode requires invoking 'init'
  -n, --name string                    Name of the chaincode
  -O, --output string                  The output format for query results. Default is human-readable plain-text. json is currently the only supported format.
      --peerAddresses stringArray      The addresses of the peers to connect to
      --sequence int                   The sequence number of the chaincode definition for the channel (default 1)
      --signature-policy string        The endorsement policy associated to this chaincode specified as a signature policy
      --tlsRootCertFiles stringArray   If TLS is enabled, the paths to the TLS root cert files of the peers to connect to. The order and number of certs specified should match the --peerAddresses flag
  -V, --validation-plugin string       The name of the validation plugin to be used for this chaincode
  -v, --version string                 Version of the chaincode

Global Flags:
      --cafile string                       Path to file containing PEM-encoded trusted certificate(s) for the ordering endpoint
      --certfile string                     Path to file containing PEM-encoded X509 public key to use for mutual TLS communication with the orderer endpoint
      --clientauth                          Use mutual TLS when communicating with the orderer endpoint
      --connTimeout duration                Timeout for client to connect (default 3s)
      --keyfile string                      Path to file containing PEM-encoded private key to use for mutual TLS communication with the orderer endpoint
  -o, --orderer string                      Ordering service endpoint
      --ordererTLSHostnameOverride string   The hostname override to use when validating the TLS connection to the orderer.
      --tls                                 Use TLS when communicating with the orderer endpoint
`
We’ll see the flags and option parameters later in this tutorial. Let’s check commit readiness:
peer lifecycle chaincode checkcommitreadiness --channelID mychannel --name basic --version 1.0 --sequence 1 --tls --cafile ${PWD}/organizations/ordererOrganizations/example.com/orderers/orderer.example.com/msp/tlscacerts/tlsca.example.com-cert.pem --output json

    {
            "Approvals": {
                    "Org1MSP": true,
                    "Org2MSP": true
            }
    }
When both Org1MSP and Org2MSP are set to true, it means it’s ready! Let’s commit:
peer lifecycle chaincode commit -o localhost:7050 --ordererTLSHostnameOverride orderer.example.com --channelID mychannel --name basic --version 1.0 --sequence 1 --tls --cafile ${PWD}/organizations/ordererOrganizations/example.com/orderers/orderer.example.com/msp/tlscacerts/tlsca.example.com-cert.pem --peerAddresses localhost:7051 --tlsRootCertFiles ${PWD}/organizations/peerOrganizations/org1.example.com/peers/peer0.org1.example.com/tls/ca.crt --peerAddresses localhost:9051 --tlsRootCertFiles ${PWD}/organizations/peerOrganizations/org2.example.com/peers/peer0.org2.example.com/tls/ca.crt
Using our chaincode
Now, our chaincode is installed and ready to be used by our clients. Let’s use the chaincode to create an initial set of assets on the ledger and query the chaincode:
peer chaincode invoke -o localhost:7050 --ordererTLSHostnameOverride orderer.example.com --tls --cafile ${PWD}/organizations/ordererOrganizations/example.com/orderers/orderer.example.com/msp/tlscacerts/tlsca.example.com-cert.pem -C mychannel -n basic --peerAddresses localhost:7051 --tlsRootCertFiles ${PWD}/organizations/peerOrganizations/org1.example.com/peers/peer0.org1.example.com/tls/ca.crt --peerAddresses localhost:9051 --tlsRootCertFiles ${PWD}/organizations/peerOrganizations/org2.example.com/peers/peer0.org2.example.com/tls/ca.crt -c '{"function":"InitLedger","Args":[]}'

2021-02-06 10:09:27.534 IST [chaincodeCmd] chaincodeInvokeOrQuery -> INFO 001 Chaincode invoke successful. result: status:200

peer chaincode query -C mychannel -n basic -c '{"Args":["GetAllAssets"]}'

[{"Key":"asset1","Record":{"ID":"asset1","color":"blue","size":5,"owner":"Tomoko","appraisedValue":300}},
{"Key":"asset2","Record":{"ID":"asset2","color":"red","size":5,"owner":"Brad","appraisedValue":400}},
{"Key":"asset3","Record":{"ID":"asset3","color":"green","size":10,"owner":"Jin Soo","appraisedValue":500}},
{"Key":"asset4","Record":{"ID":"asset4","color":"yellow","size":10,"owner":"Max","appraisedValue":600}},
{"Key":"asset5","Record":{"ID":"asset5","color":"black","size":15,"owner":"Adriana","appraisedValue":700}},
{"Key":"asset6","Record":{"ID":"asset6","color":"white","size":15,"owner":"Michel","appraisedValue":800}}]
Use the docker ps command to further see our smart contract running:
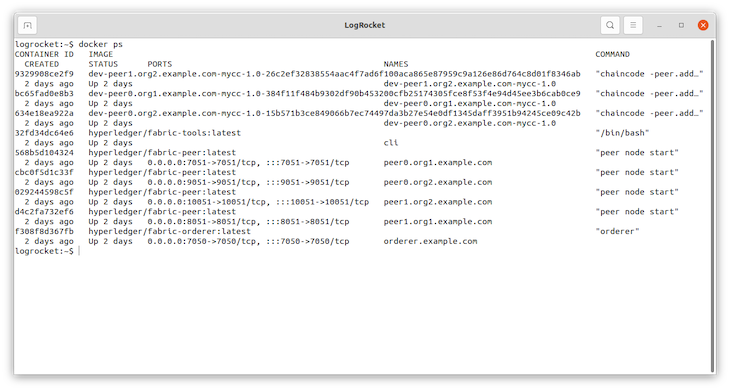
$ docker ps
CONTAINER ID        IMAGE                                                                                                                                                                    COMMAND                  CREATED             STATUS              PORTS                              NAMES
7bf2f1bf792b        dev-peer0.org1.example.com-basic_2.0-572cafd6a972a9b6aa3fa4f6a944efb6648d363c0ba4602f56bc8b3f9e66f46c-69c9e3e44ed18cafd1e58de37a70e2ec54cd49c7da0cd461fbd5e333de32879b   "docker-entrypoint.s…"   2 minutes ago       Up 2 minutes                                           dev-peer0.org1.example.com-basic_2.0-572cafd6a972a9b6aa3fa4f6a944efb6648d363c0ba4602f56bc8b3f9e66f46c
985e0967c27a        dev-peer0.org2.example.com-basic_2.0-572cafd6a972a9b6aa3fa4f6a944efb6648d363c0ba4602f56bc8b3f9e66f46c-158e9c6a4cb51dea043461fc4d3580e7df4c74a52b41e69a25705ce85405d760   "docker-entrypoint.s…"   2 minutes ago       Up 2 minutes                                           dev-peer0.org2.example.com-basic_2.0-572cafd6a972a9b6aa3fa4f6a944efb6648d363c0ba4602f56bc8b3f9e66f46c
31fdd19c3be7        hyperledger/fabric-peer:latest                                                                                                                                           "peer node start"        About an hour ago   Up About an hour    0.0.0.0:7051->7051/tcp             peer0.org1.example.com
1b17ff866fe0        hyperledger/fabric-peer:latest                                                                                                                                           "peer node start"        About an hour ago   Up About an hour    7051/tcp, 0.0.0.0:9051->9051/tcp   peer0.org2.example.com
4cf170c7ae9b        hyperledger/fabric-orderer:latest
Write your first application
Now, let’s install and run our sample JavaScript application, which is a simple Node.js application:
cd asset-transfer-basic/application-javascript
npm install
ls
app.js                  node_modules            package.json       package-lock.json
node app.js
Our app.js has the following main components:
- Enrolls the admin user:
async function main() {
  try {
    // build an in memory object with the network configuration (also known as a connection profile)
    const ccp = buildCCP();

    // build an instance of the fabric ca services client based on
    // the information in the network configuration
    const caClient = buildCAClient(FabricCAServices, ccp);

    // setup the wallet to hold the credentials of the application user
    const wallet = await buildWallet(Wallets, walletPath);

    // in a real application this would be done on an administrative flow, and only once
    await enrollAdmin(caClient, wallet);
- Registers and enrolls an application user:
// in a real application this would be done only when a new user was required to be added
// and would be part of an administrative flow
await registerAndEnrollUser(caClient, wallet, mspOrg1, org1UserId, 'org1.department1');

Successfully registered and enrolled user appUser and imported it into the wallet
- Prepares a connection to the channel and smart contract:
// Create a new gateway instance for interacting with the fabric network.
// In a real application this would be done as the backend server session is setup for
// a user that has been verified.
const gateway = new Gateway();

try {
  // setup the gateway instance
  // The user will now be able to create connections to the fabric network and be able to
  // submit transactions and query. All transactions submitted by this gateway will be
  // signed by this user using the credentials stored in the wallet.
  await gateway.connect(ccp, {
    wallet,
    identity: userId,
    discovery: {enabled: true, asLocalhost: true} // using asLocalhost as this gateway is using a fabric network deployed locally
  });

  // Build a network instance based on the channel where the smart contract is deployed
  const network = await gateway.getNetwork(channelName);


  // Get the contract from the network.
  const contract = network.getContract(chaincodeName);
- Initializes the ledger with some sample data:
// Initialize a set of asset data on the channel using the chaincode 'InitLedger' function.
// This type of transaction would only be run once by an application the first time it was started after it
// deployed the first time. Any updates to the chaincode deployed later would likely not need to run
// an "init" type function.
console.log('\n--> Submit Transaction: InitLedger, function creates the initial set of assets on the ledger');
await contract.submitTransaction('InitLedger');
console.log('*** Result: committed');

Submit Transaction: InitLedger, function creates the initial set of assets on the ledger
- Invokes each of the chaincode functions:
// GetAllAssets returns all assets found in the world state.
 async GetAllAssets(ctx) {
     const allResults = [];
     // range query with empty string for startKey and endKey does an open-ended query of all assets in the chaincode namespace.
     const iterator = await ctx.stub.getStateByRange('', '');
     let result = await iterator.next();
     while (!result.done) {
         const strValue = Buffer.from(result.value.value.toString()).toString('utf8');
         let record;
         try {
             record = JSON.parse(strValue);
         } catch (err) {
             console.log(err);
             record = strValue;
         }
         allResults.push({ Key: result.value.key, Record: record });
         result = await iterator.next();
     }
     return JSON.stringify(allResults);
 }
  Evaluate Transaction: GetAllAssets, function returns all the current assets on the ledger
  Result: [
  {
    "Key": "asset1",
    "Record": {
      "ID": "asset1",
      "Color": "blue",
      "Size": 5,
      "Owner": "Tomoko",
      "AppraisedValue": 300,
      "docType": "asset"
    }
  },
  {
    "Key": "asset2",
    "Record": {
      "ID": "asset2",
      "Color": "red",
      "Size": 5,
      "Owner": "Brad",
      "AppraisedValue": 400,
      "docType": "asset"
    }
  },
  {
    "Key": "asset3",
    "Record": {
      "ID": "asset3",
      "Color": "green",
      "Size": 10,
      "Owner": "Jin Soo",
      "AppraisedValue": 500,
      "docType": "asset"
    }
  },
  {
    "Key": "asset4",
    "Record": {
      "ID": "asset4",
      "Color": "yellow",
      "Size": 10,
      "Owner": "Max",
      "AppraisedValue": 600,
      "docType": "asset"
    }
  },
  {
    "Key": "asset5",
    "Record": {
      "ID": "asset5",
      "Color": "black",
      "Size": 15,
      "Owner": "Adriana",
      "AppraisedValue": 700,
      "docType": "asset"
    }
  },
  {
    "Key": "asset6",
    "Record": {
      "ID": "asset6",
      "Color": "white",
      "Size": 15,
      "Owner": "Michel",
      "AppraisedValue": 800,
      "docType": "asset"
    }
  }
// CreateAsset issues a new asset to the world state with given details.
async CreateAsset(ctx, id, color, size, owner, appraisedValue) {
  const asset = {
      ID: id,
      Color: color,
      Size: size,
      Owner: owner,
      AppraisedValue: appraisedValue,
  };
  return ctx.stub.putState(id, Buffer.from(JSON.stringify(asset)));
}

Submit Transaction: CreateAsset, creates new asset with ID, color, owner, size, and appraisedValue arguments
Conclusion
When you’re finished using the asset-transfer sample, don’t forget to bring down the test network using the network.sh script, freeing up your resources with ./network.sh down. This command will bring down the CAs, peers, and ordering node of the network that we created. Note that all of the data on the ledger will be lost. Restart with the tutorial with a clean initial state.
In this article, we explored creating smart contracts with Hyperledger Fabric in detail. We covered its architecture, features, and JavaScript SDK. Let us know what you create, and be sure to leave a comment if you have any questions. Happy coding!
The post Hyperledger Fabric: Develop permissioned blockchain smart contracts appeared first on LogRocket Blog.
from LogRocket Blog https://ift.tt/YNdkTwD
via Read more


