When using Firebase Authentication service to carry out actions like password reset, email address verification, and email-based sign in, you might want to customize the email template sent by Firebase, for example, by changing the styling or including your logo. However, Firebase offers limited customizability in this regard, which is a security measure implemented to prevent the use of Firebase for spamming.
In this tutorial, we’ll learn to overcome this limitation and use customized email templates with Firebase. To follow along with this tutorial, you should be familiar with both JavaScript and Firebase and have basic knowledge of Express. You’ll also need to have Node.js installed on your machine.
Although we’re using React for the frontend of our tutorial, you can still follow along with other frameworks or simply vanilla JavaScript. You can view the repo for the completed Express app and the completed React app. You can also view the hosted app. Let’s get started!
Table of contents
- How to send customized email templates in Firebase
- Setting up the React and Express app
- Brief overview of the workflow
- Create an Express API to send customized email templates
- Conclusion
How to send customized email templates in Firebase
Normally, to customize Firebase email templates, we’d go to the Templates section on the Authentication page of our Firebase project, which looks like the image below:
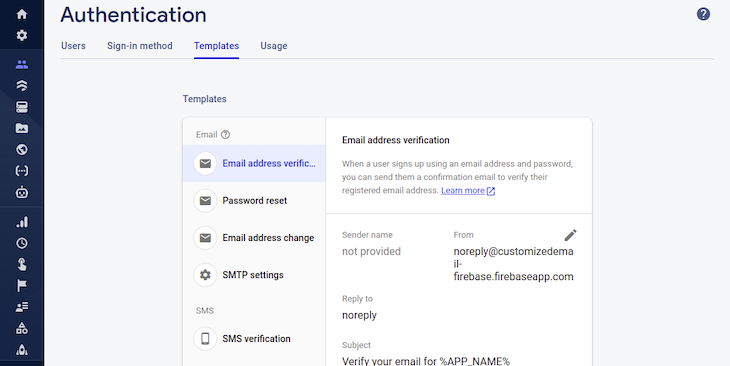
On this page, Firebase allows us to customize only a few things, like the Sender name, the Reply to field, and the action URL. Most of the time, this isn’t sufficient for how much detail we want to see in our emails.
Luckily for us, there are two different ways to solve the problem in Firebase. However, the drawback is that we’ll have to create a backend to send the email ourselves rather than just using a function from the SDK that handles everything automatically.
For one, we can generate email action links. As the most efficient method, it requires that we use the Firebase Admin SDK to generate a link that will be embedded in emails sent to our users. When a user clicks the link, it will be processed by Firebase to carry out the action it is intended for, like verifying a user’s email or resetting their password.
On the other hand, we can take full control over the workflow. We won’t use the Firebase Admin SDK to generate an action link, but rather, we’ll generate the link ourselves and create an API that uses the Admin SDK to handle the action to be taken whenever the link is clicked.
For this tutorial, we’ll demonstrate how to send customized emails using the first method. We’ll generate an email action link to verify registered user accounts using the Firebase Authentication service.
Setting up the React and Express app
I’ve already created starter repos for both the React and Express apps, so we can focus solely on the topic at hand. For our first step, we’ll clone the repos. Let’s start by cloning the React repo with the following commands:
$ git clone -b userAuth-starter https://github.com/Tammibriggs/CustomizedEmail-Firebase.git

$ cd CustomizedEmail-Firebase

$ npm install // install dependencies
The cloned repo is a React app where I’ve created user registration, verification, and authentication functionality using the Firebase JavaScript SDK. Right now, if we start the app with the npm start command, it won’t work properly because we haven’t provided the necessary Firebase configuration, which is in the firebase.js file. We’ll do that later in the tutorial.
When we register or try to log in with an unverified registered email address, Firebase will send us an email saying that we should verify our email address:
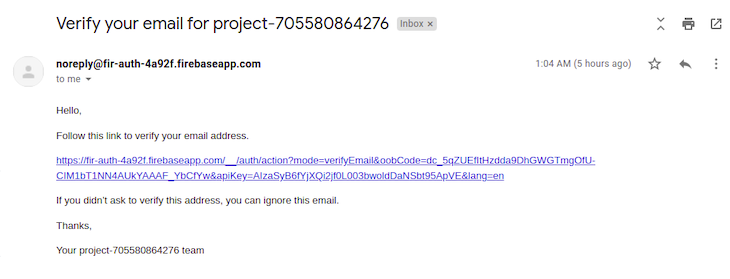
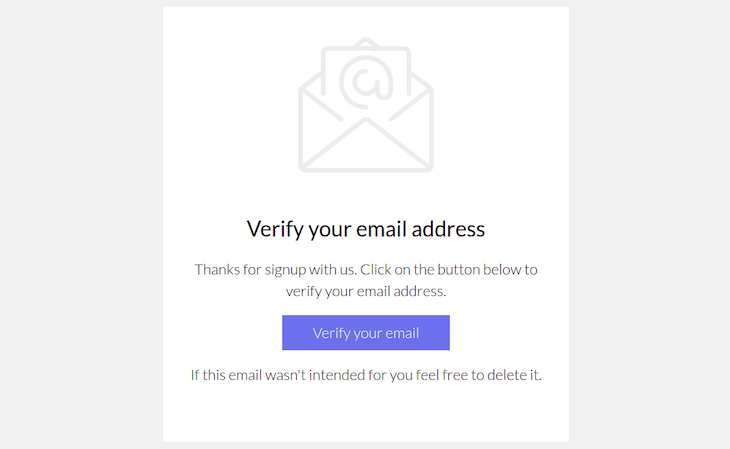
The image above is the default Firebase email with limited customizability. At the end of this tutorial, our custom verification email will look like the following image:
Now, let’s clone the starter Express app with the commands below:
Note: Either use the commands below in another folder or change the folder name of the cloned React app. Otherwise, there will be conflict in the folder name because they have been cloned from the same repo.
$ git clone -b starter https://github.com/Tammibriggs/CustomizedEmail-Firebase.git

$ cd CustomizedEmail-Firebase

$ npm install // install dependencies

$ npm start // start the app
In the Express app, I’ve set up the basic configurations needed for our build, including the necessary dependencies in the package.json file. I’ve also created a GET route just to check that our app works fine. You can access the route using http://localhost:8000/ in your browser, and you should see a welcome message.
Brief overview of the workflow
We’ll start by creating a POST route in Express that will receive the necessary data from the request body, then use that information to send an email to the user. Later on, we’ll use the route created in React to send customized emails to users.
Create an Express API to send customized email templates
To create the route that we’ll use to send customized verification emails in Express, we’ll complete four steps:
- Initialize the Firebase Admin SDK
- Generate an email action link using the Firebase Admin SDK
- Embed the link in the email template to be sent to the user using EJS, a template engine
- Send emails using SendGrid
Initializing the Firebase Admin SDK
To initialize the Firebase Admin SDK, we need to add a Firebase project, enable authentication, and then generate a private key that we’ll use for initialization.
To add a project, make sure you’re logged into your Google account, navigate to the Firebase console, and click Add project. You should see a page like the one below:

Enter the project name. For this tutorial, we’ll call ours custom-email. Accept the Firebase terms and click Continue. We’ll be prompted to enable Google Analytics. While we don’t need Google Analytics for this tutorial, leaving it on won’t cause any harm. Once you’ve completed these steps, you’ll be redirected to our project page:

Now, to enable authentication and get the service key, click on the Authentication icon from the sidebar menu. On the next page, click on Get started:
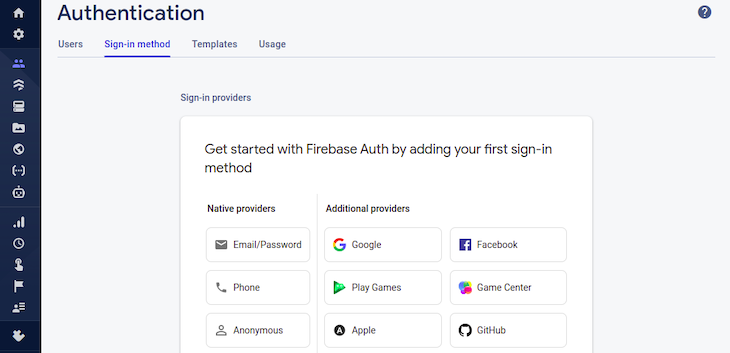
Click on Email/Password, and you’ll be prompted with a screen to enable it:
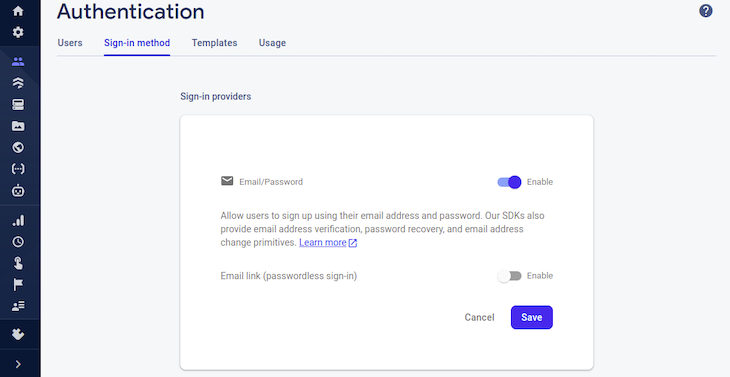
Enabling Email/Password authentication allows us to add a new user to the user record in the Users tab, which ensures that the function in the Admin SDK responsible for generating the email action link doesn’t throw an error. We also need it to make the React app we’ll be working with later on in this tutorial work properly.
Now, go to the User tab and click on the Add user button. We’ll see a prompt asking us to provide an email and password:
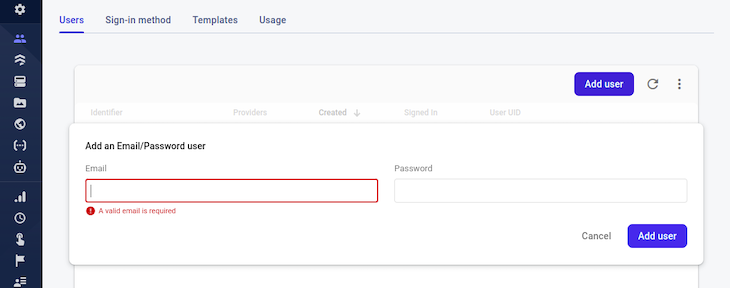
Provide a valid email and password, then click on Add user. Although we’re manually supplying the email right now, later on we’ll integrate the React app with our Firebase project so that newly registered user emails will be automatically added.
Next, let’s generate a private key for initializing the Admin SDK. In the sidebar, click on the settings icon, then click on Project settings. We’ll see a page like the one below:
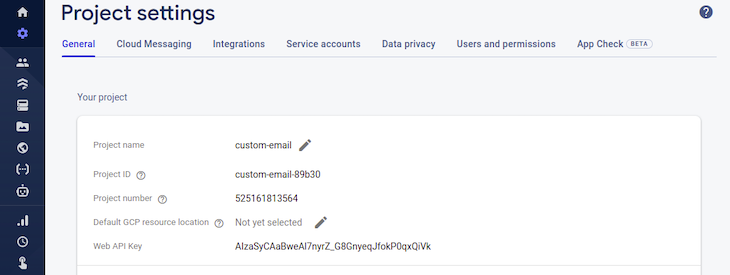
Go to the service accounts tab and scroll to the Generate new private key button:
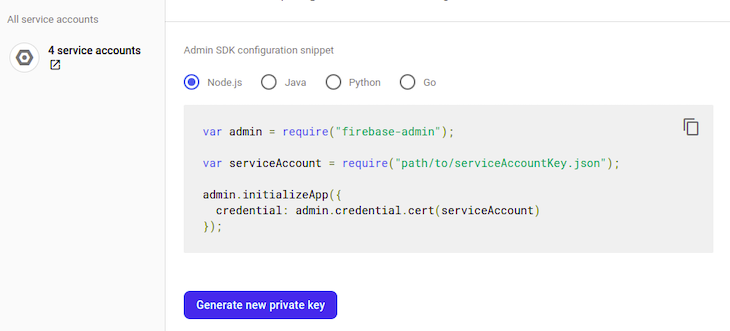
Click on the Generate new private key button, then you’ll see a prompt warning message that says we should keep the private key confidential:
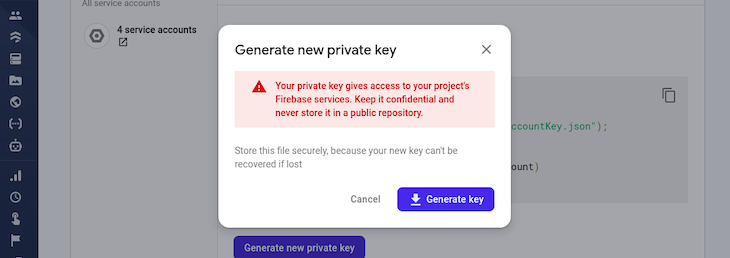
Click on Generate key, and a .json file like the following will be downloaded to your computer:
{
  "type": "service_account",
  "project_id": "<project_id>",
  "private_key_id": "<private_key_id>",
  "private_key": "<private_key>",
  "client_email": "<client_email>",
  "client_id": "<client_id>",
  "auth_uri": "<auth_uri>",
  "token_uri": "<token_uri>",
  "auth_provider_x509_cert_url": "<auth_provider>",
  "client_x509_cert_url": "<client_cert_url>"
}
Let’s work on this file. First, move the .json file to the root directory of your Express app, then rename it serviceAccountKey.js. We are changing it from .json to .js so that we can access the .env file using process.env.
Next, remove all properties except for project_id, private_key, and client_email, which are the properties we really need:
// serviceAccountKey.js
{
  "project_id": "<project_id>",
  "private_key": "<private_key>",
  "client_email": "<client_email>",
}
Copy and paste the property value to the corresponding variable in the .env file, which is in the root directory of the Express app:
// .env
PROJECT_ID = <your_project_id>
PRIVATE_KEY = <your_private_key>
CLIENT_EMAIL = <your_client_email>
In the serviceAccountKey.js file, let’s ensure that the property values are coming from the .env file:
// serviceAccountKey.js
const dotenv = require('./dotenvConfig')()

module.exports = {
  "project_id": process.env.PROJECT_ID,
  "private_key": process.env.PRIVATE_KEY.replace(/\\n/g, '\n'),
  "client_email": process.env.CLIENT_EMAIL,
}
Now, to initialize the Admin SDK, copy and paste the following code under the dotenv import in index.js, which is in the root directory of our Express app:
// index.js
...
const admin = require("firebase-admin")
const serviceAccount = require('./serviceAccountKey.js')

// initialize Firebase Admin SDK
const adminApp = admin.initializeApp({
  credential: admin.credential.cert(serviceAccount)
})
The code above can be found in the service account tab of the project settings page on Firebase. With this, we’ve initialized the Firebase Admin SDK.
Generate the email verification action link
To generate the email verification action link, first add the following command after the serviceAccount import:
// index.js
const {getAuth} = require("firebase-admin/auth")
Below is the example code that we’ll use to generate the action link:
const userEmail = 'user@example.com'
const actionCodeSettings = {
    url: redirectUrl // URL you want to be redirected to after email verification
  }
try{
   const actionLink = await getAuth()
  .generateEmailVerificationLink(useremail, actionCodeSettings)
}catch(error){
 // handle errors
}
Now, let’s use the code above to create a POST route where the userEmail and redirectUrl will come from the request body. Add the following code after the GET route in the index.js file:
// index.js
app.post('/send-custom-verification-email', async (req, res) => {
  const {userEmail, redirectUrl} = req.body
  const emailValidate = /^\w+([\.-]?\w+)*@\w+([\.-]?\w+)*(\.\w{2,3})+$/

  if(!userEmail?.match(emailValidate)){
    return res.status(401).json({message: 'Invalid email'})
  }else if(!redirectUrl || typeof redirectUrl !== 'string'){
    return res.status(401).json({message: 'Invalid redirectUrl'})
  }

  const actionCodeSettings = {
    url: redirectUrl
  }

  try{
    const actionLink =  await getAuth()
    .generateEmailVerificationLink(userEmail, actionCodeSettings)
    res.status(200).json({message:'Email successfully sent'})
  }catch(error){
    const message = error.message
    if(error.code === 'auth/user-not-found'){
      return res.status(404).json({message})
    }
    if(error.code === 'auth/invalid-continue-uri'){
      return res.status(401).json({message})
    }
    res.status(500).json({message})}
})
In the code above, we get the userEmail and redirectUrl from the request body, validate the values with the if statement, then pass them to the generateEmailVerificationLink method. If all goes well, generateEmailVerificationLink returns the action link, but if not, we catch any possible errors using the catch block.
To validate the request body, we’ll use the if statement. Alternately, for better validation, you can use express-validator.
Working on the email template to be sent to users
In the views folder in our Express app, I added a verify-email.html file, which is the email template we’ll use for this tutorial. We can view the template by opening it in our browser:
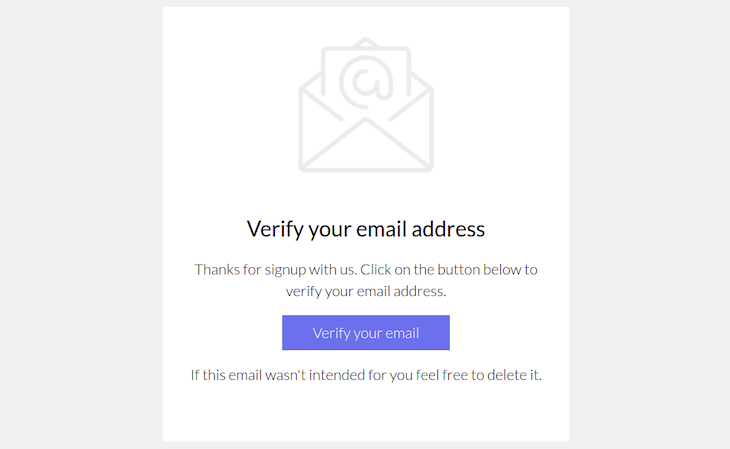
Our aim is that when a user clicks the Verify your email button, we’ll verify their email by passing the generated action link to the href attribute of the anchor tag using EJS.
First, rename the verify email template from .html to .ejs. Next, in the index.js file, add the following import after the getAuth import:
// index.js
const ejs = require('ejs')
Next, add the following lines of code after the actionLink variable:
// index.js
...
const template = await ejs.renderFile('views/verify-email.ejs', {
  actionLink,
  randomNumber: Math.random()
})
The code above will pass the action link and a random number to the email template. With the random number, we can configure Gmail to not hide our email when we send the verification email more than once to the same user.
Go to the verify-email.ejs file and modify the anchor tag in line 247 to look like the code below:
// verify-email.ejs
<a href="<%= actionLink %>" target="_blank" class="btn btn-primary">Verify your email</a>
Now, add the following code after the <!-- end tr --> comment at the bottom of the page:
// verify-email.ejs
<span style="color: #f1f1f1; display: none;"><%= randomNumber %></span>
With this, our email is ready to be sent to our users. The only thing left is to set up SendGrid to send the verification email.
Set up SendGrid to send transactional emails
To send emails using SendGrid, we first need to register for a free SendGrid account.
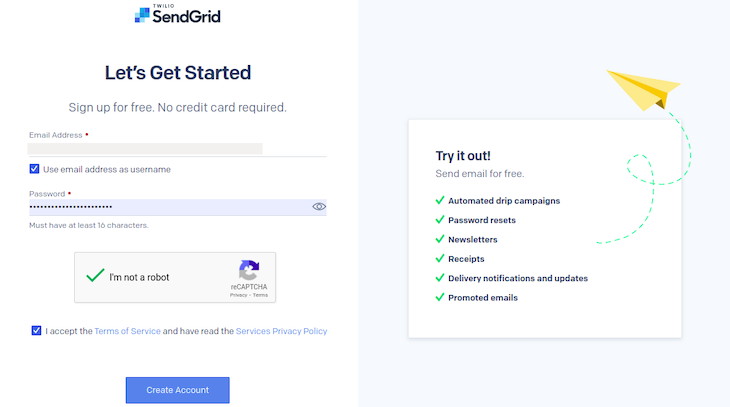
After supplying a valid email and a strong password, click on Create Account. To continue registration, we’ll need to provide more details about ourselves:
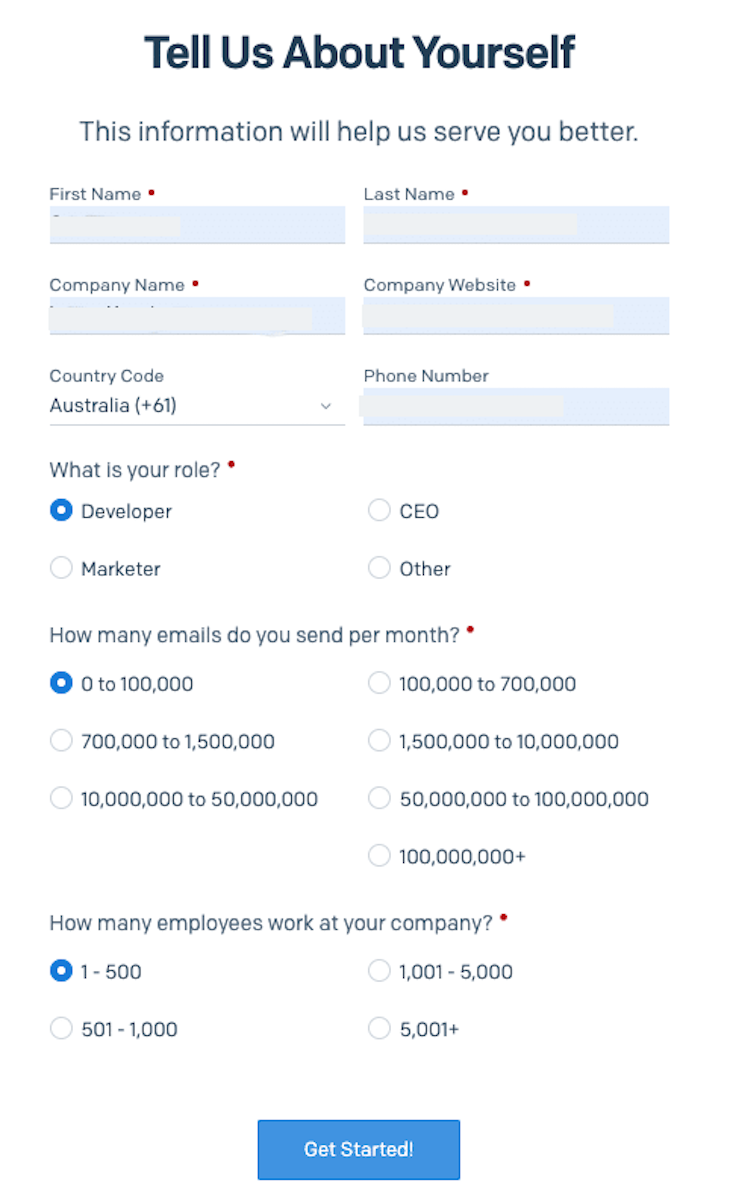
After completing the registration, we’ll be taken to the dashboard, where we are asked to create a sender identity before we can send emails:
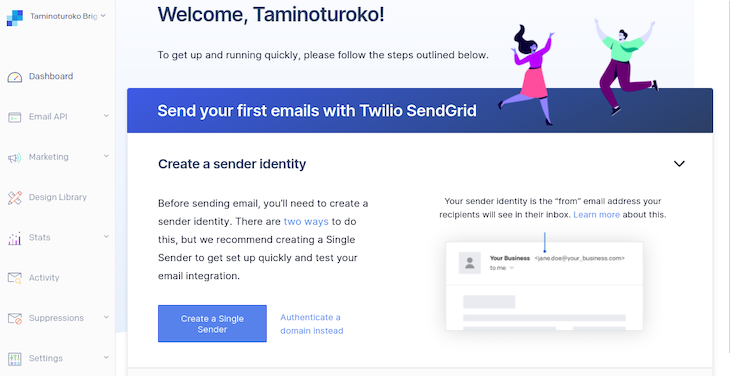
Click on the Create a Single Sender button. In the form that appears, fill in the required details. Keep in mind that SendGrid recommends using a custom email domain rather than a free email domain like Gmail.com:
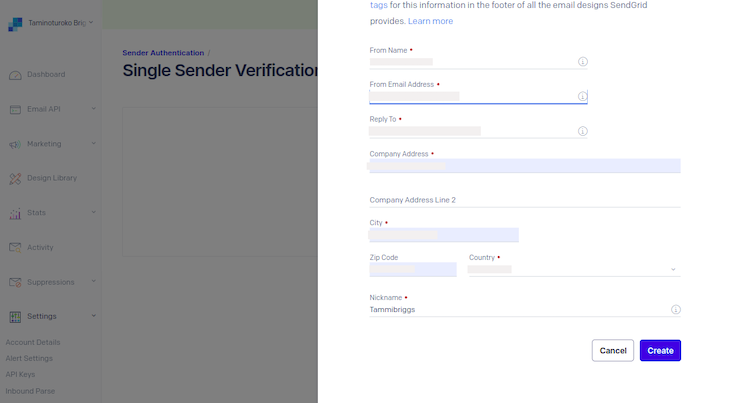
After filling out the form, click on the Create button. An email will be sent asking us to verify our single sender. Click on the Return to Single Sender Verification button, and with that, our sender identity will be verified:

Now, we need to create an API key that gives us the authorization to carry out certain actions. At the bottom of the sidebar, click on Settings, then click on API Keys, and you’ll be taken to this page:

Click on Create API Key at the top right-hand side of the page. You should see the following:
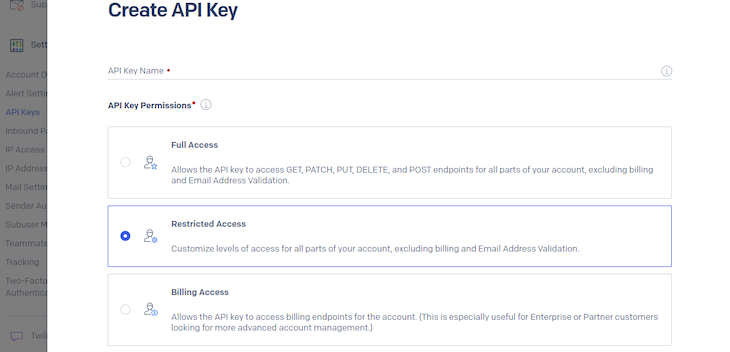
Give the API key a name and select the Restricted Access option. Then, scroll to the bottom of the page and give the API key full access to the Mail Send feature:

Now, go to the bottom of the page and click on Create & View. On the next page, you’ll be presented with your API key:
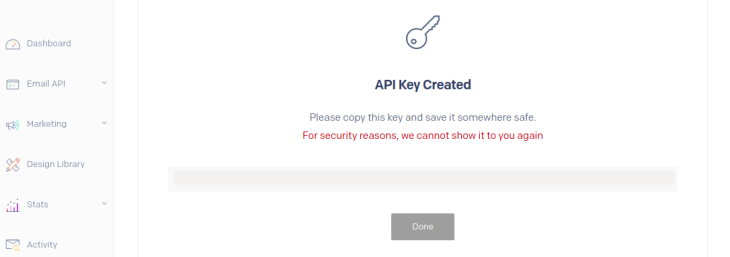
As the warning says, this API key won’t be shown again. Copy it right now, then go over the .env file in your Express app and supply it to the corresponding variable:
// .env
SENDGRID_API_KEY = <your SendGrid API key>
VERIFIED_SENDER = <your SendGrid verified sender identity>
Supply the value for the VERIFIED_SENDER variable, which is the email you used as the From Email Address when we created a single sender identity. Now, to create the functionality for sending emails, in the root directory of your Express app, create a sendEmail.js file and add the following lines of code to it:
// sendEmail.js
const dotenv = require('./dotenvConfig')()
const sgMail = require('@sendgrid/mail')

const SENDGRID_KEY = process.env.SENDGRID_API_KEY
const VERIFIED_EMAIL = process.env.VERIFIED_SENDER

sgMail.setApiKey(SENDGRID_KEY)

module.exports = function sendVerificationEmail(userEmail, template, actionLink){
  const message = {
    from: {
      name: 'Custom verify',
      email: VERIFIED_EMAIL
    },
    to: userEmail,
    subject: 'Verify your email address',
    text: `Thanks for signing up with us. Follow the link below to verify your email address.
    \n\n${actionLink} \n\nIf this email wasn't intended for you feel free to delete it.`,
    html: template
  }
  return sgMail.send(message)
}
In the code above, we set our SendGrid API key from the environment variables using the setApiKey function. Then, we created a sendVerificationEmail function for sending the verification emails that takes userEmail and actionLink as arguments. These arguments are used to construct the email that we’ll send to users.
You’ll notice that even after adding an HTML email, we still added a plain text version of our email. Some email clients and user settings cannot or choose not to load HTML, so this is a precautionary measure.
Now, what’s left is to call the sendVerificationEmail in our POST route in the index.js file. To do so, first add the following import after the ejs import:
// index.js
const sendVerificationEmail = require('./sendEmail')
Now, add the following code after the template variable in the POST route:
// index.js
await sendVerificationEmail(userEmail, template, actionLink)
Our POST route is now ready to send customized verification emails with Firebase. Cool, but we’re not done yet! We still need to use the API in the frontend React application.
In the React app we cloned earlier, when we go to the Register.js and Login.js files, we’ll see the code snippet below in the register and login function:
// Register.js & Login.js
sendEmailVerification(auth.currentUser)
  .then(() => {
    setTimeActive(true)
    history.push('/verify-email')
  })
.catch(err => alert(err.message))
We only need the code above to start sending customized emails from React. Before that, we need to replace the values of the firebaseConfig in the firebase.js file with the proper values.
Go to the overview page of the Firebase project we created earlier, and you’ll see a couple of icons like the ones below:
![]()
Click on the web </> icon to configure the Firebase project for the web. We should see a page like this:
![]()
Give the web app a name. For this tutorial, we’ll name it custom-email. Click the Register app button to move on to the next step, in which our firebaseConfig object is revealed to us:
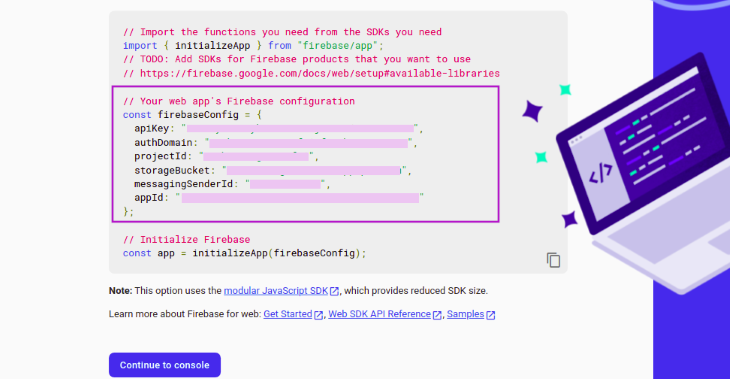
Copy the firebaseConfig and replace it with the one in the firebase.js file in our React app. Click the Continue to console button to complete the process. Now, when we start our app with the npm start command, everything will be functioning properly.
To start sending customized emails, create a sendEmail.js file in the src directory of our React app. Add the following lines of code:
// src/sendEmail.js
async function sendVerificationEmail(userEmail){
  const res = await fetch('http://localhost:8000/send-custom-verification-email', {
    method: 'POST',
    body: JSON.stringify({
      userEmail,
      redirectUrl: 'http://localhost:3000'
    }),
    headers: {
      'Accept': 'application/json',
      'Content-Type': 'application/json; charset=UTF-8',
    },
  })
  const resBody = await res.json();
  if(res.status !== 200){
    throw Error(resBody.message)
  }

  return resBody
}
export default sendVerificationEmail
In the code above, we created a function that receives the user’s email as an argument, sending a POST request with the user’s email and redirectUrl attached to the body, which is just what our API needs.
When a response returns from the API, we throw an exception if the status is not equal to 200, but if it is, we are returning the body of the response.
Now, we replace the sendEmailVerification in our Register.js and Login.js file with the one below. Let’s start with the Register.js file. First, add the following import after the useAuthValue import:
// src/Register.js
import sendVerificationEmail from './sendEmail'
Now, in the register function, replace sendEmailVerification(auth.currentUser) with the following command:
// src/Register.js
sendVerificationEmail(auth.currentUser.email)
We’ll do the exact same thing in the Login.js file. Our React app is now ready to send customized verification emails when a new user registers or an unverified user tries to login.
Note: Before testing the React app, make sure the Express server is still running.
Conclusion
In this tutorial, we learned how to send customized emails when using the Firebase Authentication service. You can use the information in this tutorial to go all out on emails sent to your users with Firebase, customizing them to match the visuals of your application.
I hope you enjoyed this article, and be sure to leave a comment if you have any questions. Happy coding!
The post Customize email templates when using Firebase in React appeared first on LogRocket Blog.
from LogRocket Blog https://ift.tt/OZLgs1t
via Read more


